m (Cleanup) |
Trig Jegman (talk | contribs) mNo edit summary |
||
| (15 intermediate revisions by 6 users not shown) | |||
| Line 1: | Line 1: | ||
{{Header Nav|game=Dragon Warrior}} | {{Header Nav|game=Dragon Warrior}} | ||
[[ | [[File:DW1 Map Northeast.png|right]] | ||
Traveling to the northeast from Tantagel you again find harder monsters, another town with new equipment and a secret item you can search for, a shrine that will come into play later in the game, and a dangerous cave that leads to an even more dangerous area of Alefgard. | |||
==Enemies== | |||
Enemies that you will encounter here: | Enemies that you will encounter here: | ||
* [[Dragon Warrior/Enemies#Slime|Slimes]] | * [[Dragon Warrior/Enemies#Slime|Slimes]] | ||
| Line 13: | Line 16: | ||
* [[Dragon Warrior/Enemies#Skeleton|Skeletons]] | * [[Dragon Warrior/Enemies#Skeleton|Skeletons]] | ||
== | ==Bridges== | ||
You will first journey to the west region of this area by way of the bridge northeast of Tantegel Castle and Brecconary Town. You can explore this region by around level 5, but don't stray too far from the bridge. The enemies in the east region, across the second bridge, are much stronger. Higher levels and some equipment from Garinham will ready you for the enemies around Kol. | |||
== | ==Magic== | ||
[[File:DW1_Snap_Sleep.png|thumb|right|Putting a Skeleton to sleep]] | |||
Magic | Magic will become increasingly common in your battles with other monsters. You will meet Magicians and Magidrakees in this area, and they know the spell of Hurt. While physical attacks do progressively less damage with greater defense power, nothing can take the sting off of a Hurt spell. The damage taken from Hurt fluctuates a lot, but a lucky cast can harm you substantially. | ||
When you reach level 4, you can cast the spell of Hurt as well. Using Hurt can reduce the number of turns in a battle by quite a bit. It also costs 2 MP, which may be magic points that you'll wish you saved for a Heal spell. Judge your remaining MP carefully and always remember to hang on to a few for a life-saving Heal. | |||
When you reach level 4, you can cast the spell of Hurt as well. | At level 7, you learn the invaluable spell of Sleep. This spell can save your life more than Heal in certain scenarios. Both Scorpions and Skeletons, the two strongest monsters you will have encountered by this time, are susceptible. Just remember that sleeping monsters may wake up at any moment, so be prepared to Heal yourself if they get a lucky strike in. | ||
{{-}} | {{-}} | ||
== | |||
[[ | ==Kol== | ||
[[File:DW1 Map Kol.png|left]] | |||
{| {{prettytable|notwide=1|style=width:50%}} | {| {{prettytable|notwide=1|style=width:50%; float:right}} | ||
|+Kol | |+Kol | ||
|- | |- | ||
| Line 58: | Line 61: | ||
|One night||20G | |One night||20G | ||
|} | |} | ||
{{-|left}} | |||
Kol is a small village filled with interesting people. Talk of fairies, golems, and keys fill the air, but very little specific knowledge can be obtained. One thing is for certain: you can learn a lot if you listen to the right people. A mysterious man shelters himself away behind a poisonous swamp, and analyzes your weapon's strength. A guard who appears to be shirking his duties has the most valuable clue of all: Keys can be found in Rimuldar. Nearby, a man suggests that you may find Rimuldar to the south. | |||
A secret item is hidden in this town. A man in Kol behind a locked door reveals that the owner of the '''Faeries Flute''' has departed for Rimuldar, where he is behind another locked door in the inn and reveals the location of the flute. It can be found by searching the ground four steps south of the bath. | |||
== The Kol Shrine == | == The Kol Shrine == | ||
[[ | [[File:DW1 Map Kol Shrine.png|thumb|right|Inside the Kol Shrine]] | ||
To the west of Kol lies a shrine that can only be reached by traveling north of the mountain range that cuts across the west region of this land. | To the west of Kol lies a shrine that can only be reached by traveling north of the mountain range that cuts across the west region of this land. The journey isn't too long, and once you step inside, you will find a hermit who proposes a test to prove your courage. He seeks to trade a '''Silver Harp''' for the '''Staff of Rain''', but he gives you no clues as to where you might find such an interesting instrument. It's just one more thing to search for. You'll have to keep your ears and eyes open for clues. Don't forget to return here and visit the man when you find the harp. | ||
== | |||
At this time, you may like to take a | == Mountain Cave == | ||
At this time, you may like to take a detour to [[Dragon Warrior/Southwest Alefgard|Southwest Alefgard]] and visit the Mountain Cave. There are a few tough monsters in the lower floor, but it can serve as a good training exercise. You may even find an item that can give you an edge in battle. Do not travel too far south while visiting the Mountain Cave, or the monsters will quickly overwhelm you. | |||
==Swamp Cave== | ==Swamp Cave== | ||
[[ | [[File:DW1 Map Swamp Cave.png|right]] | ||
Enemies that you will encounter here: | Enemies that you will encounter here: | ||
* [[Dragon Warrior/Enemies#Ghost|Ghosts]] | * [[Dragon Warrior/Enemies#Ghost|Ghosts]] | ||
| Line 75: | Line 83: | ||
* [[Dragon Warrior/Enemies#Green_Dragon|Green Dragon]] | * [[Dragon Warrior/Enemies#Green_Dragon|Green Dragon]] | ||
To even approach this cave, you'll have to withstand a painful journey through a poisonous swamp. Keep your hit points high with Herbs or Heal spells. Once you get inside, you'll need a light. If you have a torch handy, light it. But even better would be the Light spell that you receive at level 9, which is a good level to reach before you enter this cave. Also, Half Plate armor and Iron Shield (from Garinham) would be a good idea as well. Not so much because of the enemies that you encounter in here, but because of what awaits you on the other side… | |||
But there's another point of interest in this cave. If you travel down along the right side of the cave, you will reach a square where you'll have a frightening encounter with a Green Dragon. Since you need a Magic Key to explore the chamber that the Dragon guards, it would be wise to postpone this battle until you are stronger and have some keys to use. Even if you feel that you are ready, save the game before you embark on this fight. | |||
If you can't beat the Green Dragon yet, don't worry, you can fight it later on when you are strong enough. | |||
{{Footer Nav|game=Dragon Warrior|prevpage=Northwest Alefgard|nextpage=Southeast Alefgard}} | {{Footer Nav|game=Dragon Warrior|prevpage=Northwest Alefgard|nextpage=Southeast Alefgard}} | ||
Latest revision as of 14:04, 10 July 2022

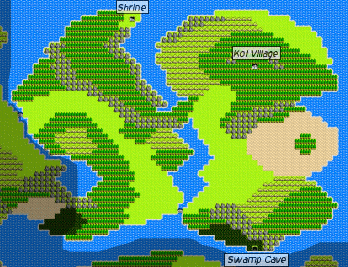
Traveling to the northeast from Tantagel you again find harder monsters, another town with new equipment and a secret item you can search for, a shrine that will come into play later in the game, and a dangerous cave that leads to an even more dangerous area of Alefgard.
Enemies[edit]
Enemies that you will encounter here:
Further to the east, you may also encounter:
Bridges[edit]
You will first journey to the west region of this area by way of the bridge northeast of Tantegel Castle and Brecconary Town. You can explore this region by around level 5, but don't stray too far from the bridge. The enemies in the east region, across the second bridge, are much stronger. Higher levels and some equipment from Garinham will ready you for the enemies around Kol.
Magic[edit]

Magic will become increasingly common in your battles with other monsters. You will meet Magicians and Magidrakees in this area, and they know the spell of Hurt. While physical attacks do progressively less damage with greater defense power, nothing can take the sting off of a Hurt spell. The damage taken from Hurt fluctuates a lot, but a lucky cast can harm you substantially.
When you reach level 4, you can cast the spell of Hurt as well. Using Hurt can reduce the number of turns in a battle by quite a bit. It also costs 2 MP, which may be magic points that you'll wish you saved for a Heal spell. Judge your remaining MP carefully and always remember to hang on to a few for a life-saving Heal.
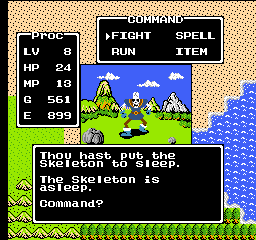
At level 7, you learn the invaluable spell of Sleep. This spell can save your life more than Heal in certain scenarios. Both Scorpions and Skeletons, the two strongest monsters you will have encountered by this time, are susceptible. Just remember that sleeping monsters may wake up at any moment, so be prepared to Heal yourself if they get a lucky strike in.
Kol[edit]

| WEAPON SHOP | |
|---|---|
| Club | 60G |
| Copper Sword | 180G |
| Iron Axe | 560G |
| Half Plate | 1000G |
| Full Plate | 3000G |
| Small Shield | 90G |
| ITEM SHOP | |
| Herb | 24G |
| Torch | 8G |
| Dragon Scale | 20G |
| Wyvern Wings | 70G |
| INN | |
| One night | 20G |
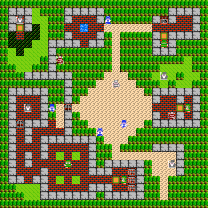
Kol is a small village filled with interesting people. Talk of fairies, golems, and keys fill the air, but very little specific knowledge can be obtained. One thing is for certain: you can learn a lot if you listen to the right people. A mysterious man shelters himself away behind a poisonous swamp, and analyzes your weapon's strength. A guard who appears to be shirking his duties has the most valuable clue of all: Keys can be found in Rimuldar. Nearby, a man suggests that you may find Rimuldar to the south.
A secret item is hidden in this town. A man in Kol behind a locked door reveals that the owner of the Faeries Flute has departed for Rimuldar, where he is behind another locked door in the inn and reveals the location of the flute. It can be found by searching the ground four steps south of the bath.
The Kol Shrine[edit]

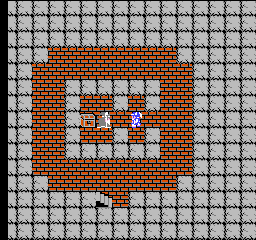
To the west of Kol lies a shrine that can only be reached by traveling north of the mountain range that cuts across the west region of this land. The journey isn't too long, and once you step inside, you will find a hermit who proposes a test to prove your courage. He seeks to trade a Silver Harp for the Staff of Rain, but he gives you no clues as to where you might find such an interesting instrument. It's just one more thing to search for. You'll have to keep your ears and eyes open for clues. Don't forget to return here and visit the man when you find the harp.
Mountain Cave[edit]
At this time, you may like to take a detour to Southwest Alefgard and visit the Mountain Cave. There are a few tough monsters in the lower floor, but it can serve as a good training exercise. You may even find an item that can give you an edge in battle. Do not travel too far south while visiting the Mountain Cave, or the monsters will quickly overwhelm you.
Swamp Cave[edit]

Enemies that you will encounter here:
Additionally, there is a location with a specific encounter:
To even approach this cave, you'll have to withstand a painful journey through a poisonous swamp. Keep your hit points high with Herbs or Heal spells. Once you get inside, you'll need a light. If you have a torch handy, light it. But even better would be the Light spell that you receive at level 9, which is a good level to reach before you enter this cave. Also, Half Plate armor and Iron Shield (from Garinham) would be a good idea as well. Not so much because of the enemies that you encounter in here, but because of what awaits you on the other side…
But there's another point of interest in this cave. If you travel down along the right side of the cave, you will reach a square where you'll have a frightening encounter with a Green Dragon. Since you need a Magic Key to explore the chamber that the Dragon guards, it would be wise to postpone this battle until you are stronger and have some keys to use. Even if you feel that you are ready, save the game before you embark on this fight.
If you can't beat the Green Dragon yet, don't worry, you can fight it later on when you are strong enough.
