(Create first entry) |
(Saving copy - still in progress) |
||
| Line 1: | Line 1: | ||
{{Header Nav|game=Sokoban}} | {{Header Nav|game=Sokoban}} | ||
== 11 == | == Floor 11 == | ||
<gallery> | <gallery> | ||
File:Sokoban Level 11.png|Initial layout | File:Sokoban Level 11.png|Initial layout | ||
| Line 15: | Line 15: | ||
Once the crates are moved, you should have no difficulty getting all other crates into the target zone. When packing the crates, put the first three crates in the bottom-right corner, and the fourth at the top-left. | Once the crates are moved, you should have no difficulty getting all other crates into the target zone. When packing the crates, put the first three crates in the bottom-right corner, and the fourth at the top-left. | ||
{{Footer Nav|game=Sokoban|prevpage=|nextpage=}} | == Floor 12 == | ||
[[File:Sokoban floor 12.png]] | |||
[[File:Sokoban floor 12 move.png]] | |||
To escape from the crates, move right, down, left, down twice, right, and up. This allows you to exit to the right, and take the crates to the target one-by-one. | |||
Fill the right-hand column first, then the left. | |||
== Floor 13 == | |||
[[File:Sokoban floor 13.png]] | |||
[[File:Sokoban floor 13 moves.png]] | |||
The crate above you needs to be moved one tile up and one tile left. Head to the top-left crate, andpush it one space to the left. Return to the starting point, and push the crate below two spaces down. Circle to the left and turn up - push that crate up one tile. Return to the starting cluster, and move the initially lowest crate left two spaced (as marked by the orange line.) | |||
The most difficult portion of the floor is packing the crates in the correct order. Place the first three crates between the pillars, starting from the bottom (marked with purple dots). The next three crates fill the top row, and the next three after that are placed just right of the pillars, starting at the top (marked in green). | |||
== Floor 14 == | |||
[[File:Sokoban floor 14.png]] | |||
[[File:Sokoban floor 14 packing.png]] | |||
[[File:Sokoban floor 14 pack alt.png]] | |||
The first step in the map is moving counter-clockwise. The left-most crate is moved in line with the crates at the bottom-left, the one next to the pillar is moved down, and the one blocking the exit leading to the target area is moved three spaces down. | |||
There are two packing orders available, both are a matter of personal preference. The first leaves the top three crates in their position, and requires placing another crate in the room right of the target. It fills the top row first (leaving a gap for the top two crates), followed by the bottom-left corner. This method requires a bit more moves, but takes less pushes. | |||
The other packing order takes less pushes, but is slightly longer. It first moves the crate on the far left to the top right corner, and tries filling the left two and right-most columns first. | |||
== Floor 15 == | |||
[[File:Sokoban floor 15.png]] | |||
Approach the target area from the right, pushing any crates out of the way. Once you reach the center, move the crates into the corners, taking extras from above or below. There should be four on the left and two on the right. | |||
Move an extra crate to the room at the bottom, then unblock the left exit by pushing the crate left. Add a fourth crate to the top and bottom rows, leaving a gap open on the top and bottom. Use the four crates on the left to fill the center row (leaving space for the two remaining crates from the top). | |||
== Floor 16 == | |||
== Floor 17 == | |||
[[File:Sokoban floor 17.png]] | |||
[[File:Sokoban floor 17 moves.png]] | |||
Starting with the top-most crate, move all crates except for the bottom-left one space to the right. This should end up with a crate just above the entrance of the lower loop - push that crate down one space. Now, move the lower-left crate one space to the right, and the upper crate one space to the left. From here, you can guide the right-most crate to the target, followed by the remaining crates on the left. | |||
== Floor 18 == | |||
[[File:Sokoban floor 18.png]] | |||
Before you can do anything, you need to prepare the map. At the bottom right corner, push a crate down, and a crate left. Open the center corridor by pushing the middle crate to the center target area. Next, push the crate in the left corridor to the room below, and push the next nearby crate to the right | |||
The top four targets need to be filled first, and they are taken from the right-hand side. Get a crate just off the top-most target - it will need to be moved back and forth as you get two crates into the bottom of the four targets (right, then left), and moved to position only after the third crate is placed. | |||
This leaves you with the set of seven targets below. Fill the top row first, and the bottom second. To do so, you need to clear out the left alcove first by placing it in the top-right target (or the bottom-right holding position if you already filled that spot with another crate). Next, get the two crates at the bottom-left corner of the room in the bottom row, and push the last three crates into position. | |||
== Floor 19 == | |||
[[File:Sokoban floor 19.png]] | |||
Move the first crate down one space, and continue right. When you reach the bottom two crates, move the lower left one space, and the other up one. This will allow clearing most of the bottom crates. | |||
To unblock the center crates, continue pushing the same crate further up, and take the first left. Push the crate left. The crate needs to be pushed left, and and crate above needs to be pushed up one space. The crate inside the corridor may be brought to the target area. When you return on the left-hand entrance, push the upper crate to the right, and clear the top two crates in the alcove. | |||
When packing, finish the right two columns first, then the bottom row. To fit the final six crates, place them at the top-right corner and bottom-right corner. The last crates should easily be moved into place. | |||
== Floor 20 == | |||
[[File:Sokoban floor 20.png]] | |||
This level is longer than it is difficult. It may take upto 2000 moves and 500 pushes because you need to circle around the left loop to move most crates to the target (especially the ones inside the target room but need to be moved to a holing position or onto the goal.) | |||
In the right room, start by moving the two upper crates up by one cell. Next, create a path around the left side, and push the upper crates to the right first, and get a crate from the upper-left room to the goal. | |||
To get other crates to the target, you need to move one crate outside the target room, then move it back into the goal. When you do, this allows you to put crates almost anywhere in the room just by shifting the left column. While tempting, it is not necessary to remove more than two crates from the target room. | |||
{{Footer Nav|game=Sokoban|prevpage=Walkthrough|nextpage=Walkthrough (21-30)}} | |||
Revision as of 05:15, 18 December 2010
Floor 11
-
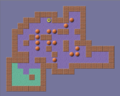
Initial layout
-
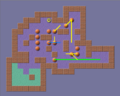
Movement paths


You will first need to move the bottom crate into the alcove on the right (as marked by the green line.) Once the crate is out of the way, you will need to adjust other crates in the counter-clockwise path. In the first cluster of three (marked by yellow lines), Move the bottom-left crate up one cell, the bottom right left by two, and move the first crate two cells below the top-right crate.
Next, handle the two crates at the north-east room. Push the crate in the alcove down by 4 tiles, and put the nearby crate in its place (or just at the entrance of the corner room).
Next, make room for moving the center crates. Move the top-right crate in the center one cell up (plus one cell right if you prefer getting a better path for visual purposes), and move the bottom-right crate up one cell. The final crate with the blue line is moved two cells right.
Once the crates are moved, you should have no difficulty getting all other crates into the target zone. When packing the crates, put the first three crates in the bottom-right corner, and the fourth at the top-left.
Floor 12


To escape from the crates, move right, down, left, down twice, right, and up. This allows you to exit to the right, and take the crates to the target one-by-one.
Fill the right-hand column first, then the left.
Floor 13


The crate above you needs to be moved one tile up and one tile left. Head to the top-left crate, andpush it one space to the left. Return to the starting point, and push the crate below two spaces down. Circle to the left and turn up - push that crate up one tile. Return to the starting cluster, and move the initially lowest crate left two spaced (as marked by the orange line.)
The most difficult portion of the floor is packing the crates in the correct order. Place the first three crates between the pillars, starting from the bottom (marked with purple dots). The next three crates fill the top row, and the next three after that are placed just right of the pillars, starting at the top (marked in green).
Floor 14


The first step in the map is moving counter-clockwise. The left-most crate is moved in line with the crates at the bottom-left, the one next to the pillar is moved down, and the one blocking the exit leading to the target area is moved three spaces down.
There are two packing orders available, both are a matter of personal preference. The first leaves the top three crates in their position, and requires placing another crate in the room right of the target. It fills the top row first (leaving a gap for the top two crates), followed by the bottom-left corner. This method requires a bit more moves, but takes less pushes.
The other packing order takes less pushes, but is slightly longer. It first moves the crate on the far left to the top right corner, and tries filling the left two and right-most columns first.
Floor 15

Approach the target area from the right, pushing any crates out of the way. Once you reach the center, move the crates into the corners, taking extras from above or below. There should be four on the left and two on the right.
Move an extra crate to the room at the bottom, then unblock the left exit by pushing the crate left. Add a fourth crate to the top and bottom rows, leaving a gap open on the top and bottom. Use the four crates on the left to fill the center row (leaving space for the two remaining crates from the top).
Floor 16
Floor 17

 Starting with the top-most crate, move all crates except for the bottom-left one space to the right. This should end up with a crate just above the entrance of the lower loop - push that crate down one space. Now, move the lower-left crate one space to the right, and the upper crate one space to the left. From here, you can guide the right-most crate to the target, followed by the remaining crates on the left.
Floor 18
 Before you can do anything, you need to prepare the map. At the bottom right corner, push a crate down, and a crate left. Open the center corridor by pushing the middle crate to the center target area. Next, push the crate in the left corridor to the room below, and push the next nearby crate to the right
The top four targets need to be filled first, and they are taken from the right-hand side. Get a crate just off the top-most target - it will need to be moved back and forth as you get two crates into the bottom of the four targets (right, then left), and moved to position only after the third crate is placed.
This leaves you with the set of seven targets below. Fill the top row first, and the bottom second. To do so, you need to clear out the left alcove first by placing it in the top-right target (or the bottom-right holding position if you already filled that spot with another crate). Next, get the two crates at the bottom-left corner of the room in the bottom row, and push the last three crates into position.
Floor 19
 Move the first crate down one space, and continue right. When you reach the bottom two crates, move the lower left one space, and the other up one. This will allow clearing most of the bottom crates.
To unblock the center crates, continue pushing the same crate further up, and take the first left. Push the crate left. The crate needs to be pushed left, and and crate above needs to be pushed up one space. The crate inside the corridor may be brought to the target area. When you return on the left-hand entrance, push the upper crate to the right, and clear the top two crates in the alcove.
When packing, finish the right two columns first, then the bottom row. To fit the final six crates, place them at the top-right corner and bottom-right corner. The last crates should easily be moved into place.
Floor 20
 This level is longer than it is difficult. It may take upto 2000 moves and 500 pushes because you need to circle around the left loop to move most crates to the target (especially the ones inside the target room but need to be moved to a holing position or onto the goal.)
In the right room, start by moving the two upper crates up by one cell. Next, create a path around the left side, and push the upper crates to the right first, and get a crate from the upper-left room to the goal.
To get other crates to the target, you need to move one crate outside the target room, then move it back into the goal. When you do, this allows you to put crates almost anywhere in the room just by shifting the left column. While tempting, it is not necessary to remove more than two crates from the target room.