Namcorules (talk | contribs) (The next ten rounds have now been written for) |
No edit summary |
||
| Line 2: | Line 2: | ||
==Round 11== | ==Round 11== | ||
<center>[[File:FLS Round 11.png]]</center> | <center>[[File:FLS Round 11.png]]</center> | ||
This round contains two | This round contains two Orcs and two Golems, and the randomly-generated powerup appears on the ground to the right of Ptolemy's starting position; also, if either she or an enemy goes through one of the two doorways in the wall on the platforms on the second level, they will come out of the other one. | ||
{{-}} | {{-}} | ||
==Round 12== | ==Round 12== | ||
<center>[[File:FLS Round 12.png]]</center> | <center>[[File:FLS Round 12.png]]</center> | ||
This round contains two Wizards, two Golems and two | This round contains two Wizards, two Golems and two Wraiths (who can disappear and reappear at will, and if they reappear on top of Ptolemy, they shall automatically "bubble" her unless she can get out of their way), and the randomly-generated powerup will appear on the first platform on the fourth level. | ||
{{-}} | {{-}} | ||
==Round 13== | ==Round 13== | ||
<center>[[File:FLS Round 13.png]]</center> | <center>[[File:FLS Round 13.png]]</center> | ||
This round contains two | This round contains two Orcs, one Salamander and one Cleric (who can duplicate himself), and the powerup will appear on the top-right platform; also, if either Ptolemy or an enemy falls down the hole in the ground they shall reappear at the top of the screen (in fact, the Salamander will do this right at the start). | ||
{{-}} | {{-}} | ||
==Round 14== | ==Round 14== | ||
<center>[[File:FLS Round 14.png]]</center> | <center>[[File:FLS Round 14.png]]</center> | ||
This round contains one | This round contains one Orc and three Golems, and the powerup will appear on the second platform on the sixth level; also, if Ptolemy falls into the fifth level of the second platform and kills the Golem, she will ''not'' be able to escape, for she cannot jump high enough to get out of there. After this round, you will be treated to another cutscene of Ptolemy riding on the back of his enormous blue wingless dragon from the right side of the screen but this time with the text of ''BE CAREFUL FOR "WORM"!'' displayed above them, and the "worm" in question is actually an enormous caterpillar with a long tongue. | ||
{{-}} | {{-}} | ||
==Round 15== | ==Round 15== | ||
<center>[[File:FLS Round 15.png]]</center> | <center>[[File:FLS Round 15.png]]</center> | ||
This round contains two | This round contains two Salamanders, two Golems and a Worm (who will emerge from the doorway in the wall on the ground), and the powerup will appear on the second platform on the fifth level; the Worm cannot be killed, but it can kill the enemies for you by wrapping its tongue around (and eating) them. | ||
{{-}} | {{-}} | ||
==Round 16== | ==Round 16== | ||
<center>[[File:FLS Round 16.png]]</center> | <center>[[File:FLS Round 16.png]]</center> | ||
This round contains five | This round contains five Orcs and one Cleric (who can again duplicate), and the powerup appears on the third "step" of the staircase-like platform. | ||
{{-}} | {{-}} | ||
==Round 17== | ==Round 17== | ||
<center>[[File:FLS Round 17.png]]</center> | <center>[[File:FLS Round 17.png]]</center> | ||
This round contains two | This round contains two Orcs, three Salamanders and one Cleric (who can, once again, duplicate himself), and the randomly-generated powerup shall appear on the small platform on the second level; the Orcs, who are suspended in mid-air, also fall to the first level of the main platform at the start. | ||
{{-}} | {{-}} | ||
==Round 18== | ==Round 18== | ||
<center>[[File:FLS Round 18.png]]</center> | <center>[[File:FLS Round 18.png]]</center> | ||
This round contains four Wizards (remember that their spells can shrink | This round contains four Wizards (remember that their spells can shrink Ptolemy), and the randomly-generated powerup shall appear on the left platform. | ||
{{-}} | {{-}} | ||
==Round 19== | ==Round 19== | ||
<center>[[File:FLS Round 19.png]]</center> | <center>[[File:FLS Round 19.png]]</center> | ||
This round contains three | This round contains three Orcs and two Wizards and the randomly-generated powerup appears in the centre of the first platform on the fourth level. | ||
==Round 20== | ==Round 20== | ||
<center>[[File:FLS Round 20.png]]</center> | <center>[[File:FLS Round 20.png]]</center> | ||
This round contains two | This round contains two Orcs and three Salamanders, and the randomly-generated powerup will appear below the second platform on the second level. | ||
{{Footer Nav|game=The Fairyland Story|prevpage=Rounds 1-10|nextpage=Rounds 21-30}} | {{Footer Nav|game=The Fairyland Story|prevpage=Rounds 1-10|nextpage=Rounds 21-30}} | ||
Revision as of 19:48, 21 March 2017
Round 11
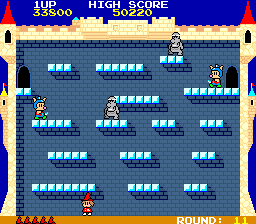
This round contains two Orcs and two Golems, and the randomly-generated powerup appears on the ground to the right of Ptolemy's starting position; also, if either she or an enemy goes through one of the two doorways in the wall on the platforms on the second level, they will come out of the other one.
Round 12
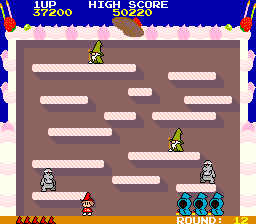
This round contains two Wizards, two Golems and two Wraiths (who can disappear and reappear at will, and if they reappear on top of Ptolemy, they shall automatically "bubble" her unless she can get out of their way), and the randomly-generated powerup will appear on the first platform on the fourth level.
Round 13
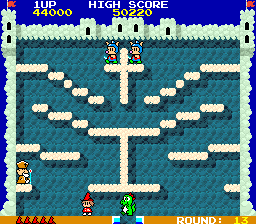
This round contains two Orcs, one Salamander and one Cleric (who can duplicate himself), and the powerup will appear on the top-right platform; also, if either Ptolemy or an enemy falls down the hole in the ground they shall reappear at the top of the screen (in fact, the Salamander will do this right at the start).
Round 14
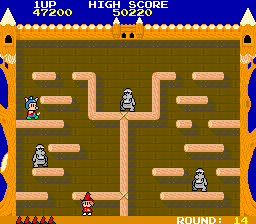
This round contains one Orc and three Golems, and the powerup will appear on the second platform on the sixth level; also, if Ptolemy falls into the fifth level of the second platform and kills the Golem, she will not be able to escape, for she cannot jump high enough to get out of there. After this round, you will be treated to another cutscene of Ptolemy riding on the back of his enormous blue wingless dragon from the right side of the screen but this time with the text of BE CAREFUL FOR "WORM"! displayed above them, and the "worm" in question is actually an enormous caterpillar with a long tongue.
Round 15
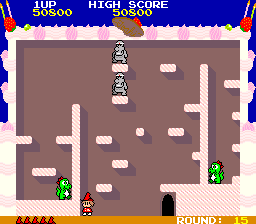
This round contains two Salamanders, two Golems and a Worm (who will emerge from the doorway in the wall on the ground), and the powerup will appear on the second platform on the fifth level; the Worm cannot be killed, but it can kill the enemies for you by wrapping its tongue around (and eating) them.
Round 16
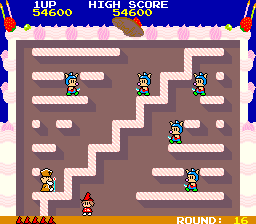
This round contains five Orcs and one Cleric (who can again duplicate), and the powerup appears on the third "step" of the staircase-like platform.
Round 17
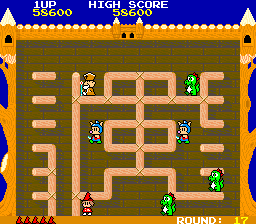
This round contains two Orcs, three Salamanders and one Cleric (who can, once again, duplicate himself), and the randomly-generated powerup shall appear on the small platform on the second level; the Orcs, who are suspended in mid-air, also fall to the first level of the main platform at the start.
Round 18
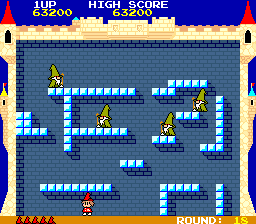
This round contains four Wizards (remember that their spells can shrink Ptolemy), and the randomly-generated powerup shall appear on the left platform.
Round 19
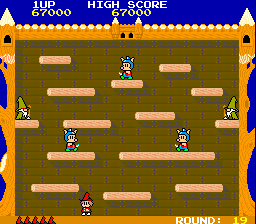
This round contains three Orcs and two Wizards and the randomly-generated powerup appears in the centre of the first platform on the fourth level.
Round 20
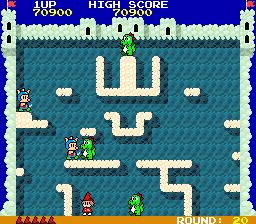
This round contains two Orcs and three Salamanders, and the randomly-generated powerup will appear below the second platform on the second level.