Wing Dungeon

- Items: Roc Feather, Heart Container, Ancient Wood
This is your second real dungeon. Destroy the jars by lifting them with the power bracelet. Use the mystery seeds you find for the owls to get hints about the dungeon. When you re-enter the room, the jars and seeds reappear. If you run out of hearts while you're in the dungeon, leave the dungeon and destroy the bushes for two hearts each time.
Equip the wooden shield and head up. Use the wooden shield against the enemies here. When they lie on the back, hit them with your sword. When all three enemies are slain, head left to the next room. Move the block a follows: Three east, one south, one west, one north, then west into the hole. It should have a red top here. Go through the next door. Push the blocks to get a way then go east and bomb the wall. Go through that hole and open the chest to get the Map. Go back to the west and this time north through the door. Go west then. Avoid the suns here and go to the next room west. Defeat all monsters here and a ![]() small key falls down. Take it and leave the room to the west.
small key falls down. Take it and leave the room to the west.

Use the same way back (i.e., east, east, south, south, east) to the second room. In the room where the blocks are before the door, open it by pushing the both outer top blocks first, then the middle block left or right. Go east here and use the small key. If you need to refill bombs, hearts or mystery seeds go outside (south, south) and destroy the bushes. Else, directly go through the newly opened door.
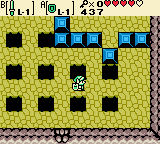
Kill the snakes and bomb the southern wall (see picture). Go down there and through a 2D passage. Climb right on the ladders to the first platform and use the moving block to get to the second platform. On the other screen stay a little bit before the Whomp. When it comes down and goes up afterwards, run through. Get to the moving platform to reach the ladder. In the next room defeat all enemies and open the chest for another ![]() small key. Go back to the room with the wall you've bombed.
small key. Go back to the room with the wall you've bombed.
Push the southernmost block now to the left or right and go through the passage. Open the chest to get the Compass. Go through the door, defeat both enemies and use the small key in the west to go through another door. Jump into the mine cart. Go north to get to the mini boss.

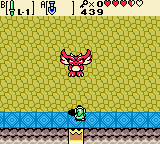
The miniboss of this dungeon is flying around. Go into a corner and when he's falling down, trying to hit you, blow him with your sword. When this is done around five times, he's starting to bump. This means you can hit two times in a row but he'll hit you once. When he got hit around ten times he'll resign. Beware: If he hits the yellow floor (as opposed to the blue edges) the piece where he lands falls out. When the battle is won, take the fairy and go to the next room. There are two entrys that lead to different staircases. Choose the north one. If you want, you can go through the south one just to visit all rooms it but there's nothing interesting.
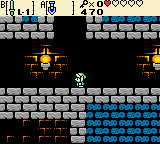
You'll come out a floor below. Go through the southern door and follow the path. Go through the door and in the next room go up the stairs. You come out in a 2D room where you can avoid the Whomp and go through for the Roc Feather. With the Roc Feather, you can jump. Go to the west and jump the first step up (avoid the Whomp). When the Whomp comed down again, jump on it. When it goes up, jump left to the small passage to gain 30 rupees. If you want, you can jump to the overhang to the right of the Whomp by using it as a platform but there seems to be nothing (see picture).

When you're back, use the feather to jump over the colored block two times until it becomes red and the doors open. Be fast, or else the floor will crack. Go through the eastern door. Jump over the holes, be careful with the bats, and jump in the mine cart. While it is running, hit the switch with your sword to not go back but rather land in the northern room. Push the dice west, north, east, north to open the barrier. Bomb up the eastern wall and destroy all enemies there to find a chest with a ![]() small key. Go back into the previous room and jump into the mine cart once more.
small key. Go back into the previous room and jump into the mine cart once more.
Defeat the enemy and jump over the fields until they get the colors of the stones. Take the ![]() small key then, that falls from the ceiling. Go one room west and up the stairs there. If you need hearts, refill them by leaving the dungeon and cutting the bushes, then return via the teleporter in the first room of the dungeon and going northeast.
small key then, that falls from the ceiling. Go one room west and up the stairs there. If you need hearts, refill them by leaving the dungeon and cutting the bushes, then return via the teleporter in the first room of the dungeon and going northeast.
Open the key block to the right and walk along the path. Jump down on the south west side. Go south and jump over the holes. There's another colored field. Jump over it until it is blue, then go back north, then one room west. Leave the miniboss room to the northeast and go along the path again but this time jump into the mine cart. When you arrive, jump over the hole to the right and open the chest to receive a ![]() Gasha Seed. Jump back and go north. Defeat all enemies here, lift the southeast jar and push (not lift) the east jar to the switch. Use the feather to jump when you have to. When the door is opened, go through.
Gasha Seed. Jump back and go north. Defeat all enemies here, lift the southeast jar and push (not lift) the east jar to the switch. Use the feather to jump when you have to. When the door is opened, go through.
Go to the south and defeat all enemies. Copy the figure to the right on the marked floor. You only can move the statues with a color corresponding to the square you can jump over. It's most easy to bring the yellow, then blue, then red statues into position. Grab the ![]() small key that falls down. Go north and through the eastern door.
small key that falls down. Go north and through the eastern door.

You'll come out in a room that is all red. Change the colors by jumping over the button in the middle and defeat quickly the enemies. Repeat this until all are destroyed. Open the chest for the Boss Key. Go back one room and open the north door. Be careful, here are two suns hunting you. Avoid them as good as you can and go through the path to the boss door. Walk through and you're in a room with stairs, an owl and four jars. Climb up the stairs.
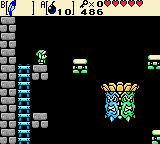
Now you have to fight the boss of the Wing Dungeon. It consists of four faces - a green, blue, violet and red face. Try to throw bombs from above into the red face. Warning: If you hit the wrong face, it can have bad effects.
- Red face: You hit (the Boss drops a heart)
- Blue face: The boss throws circulating fireballs (stand below the boss to not get hit)
- Violet face: The boss falls down but doesn't get hit and fireballs fall from the ceiling
- Green face: The boss throws a few fireballs out (stay on the edge to be far out of range)
If you do nothing and wait, the boss also throws a few fireballs out (stay on the bottom of the edge and get cover from a stone). When it's over, every second time a bomb symbol lies around that's worth four bombs.
When you've hit the boss around five times, he'll finally fall down and leave two ladders and a heart container. Take it and go down the right ladder. Enter the room to the right and take the Ancient Wood. When you collect it, you're teleported out and told you should go south to the Crescent Island to find the Echoing Howl.
