Locating the Zone entrance[edit]
You now have all ten pieces of the laser gun, and it is entirely assembled. It's time to locate the final zone of the entire game, and put an end to the madness. You will find this zone in the very last unexplored location of the house, the portion of the attic closest to the rear of the house.
Room L[edit]

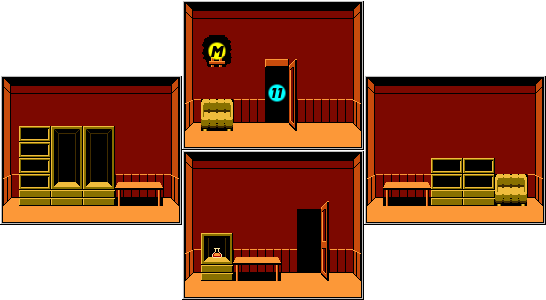
You may or may not have visited room L in the course of your investigation. Up until now, the only purpose it served was as a place to collect a potion and some gun ammo. However, Room L hides an important secret. Access to Room M can only be found by hitting the right location on the West wall of Room L. Create the hole and go through it.
Room M[edit]

Pass through the hole you created in Room L to arrive here. You will find a potion behind the windows along the West wall, a grenade in the cupboard of the East wall, and gun ammo hidden behind the windows on the North wall. You will also have to search the North wall a bit to find the location that hides a ladder which reaches up to the attic. Once you find it, head up to Room O.
Room O[edit]

Room O is the lone room in the rear portion of the attic. It contains a southern door that leads to the hallway, but no other entrances can be found in this small hallway. The only object concealed in the room is a potion next to the South door. Turn and face North and the Zone Detector will be blinking. Open the door, and head inside for the final confrontation.
Into Zone 11[edit]
The zone contains tow major sections. The first portions of this zone may remind you of your experiences in the first zone. You will be required to cross a long bridge with a number of bats floating about. Fish will come flying up from the water below, and then recede into the background and drop back down. They are a danger to you coming or going. You can either stop and wait for them to pass by, or you can try to time a knife stab in order to remove them as a threat.
Once you reach the end of the bridge, you will drop back down to some land before encountering the next portion of the stage which is a sequence of small suspended platforms above the ground. Here, you will encounter the same exploding blue heads that you encountered in Zone 9. The small platforms don't necessarily make the experience any easier. While you might be able to hop from one block to the next, you are still vulnerable to getting hit by the explosions created by the heads. If you can, try and deal with them by walking up to each head and stabbing them with your knife as you progress.
Boss[edit]

You have finally reached the last boss. However, it will appear not to notice you at first. Not even a gun shot will wake it up. The only way to announce your presence to it is to jump up and stab it with your knife. Doing so will not only awaken this lion-like beast, but it will significantly anger it so that it will begin attacking you immediately.
Once the boss awakens, you will automatically switch to using your fully assembled laser gun. The good news is that the boss remains motionless on the ledge, so it will be easy to hit him. The bad news is that this boss fires a continuous stream of fireballs at you, so you won't necessarily be able to stand in one spot for very long without getting hit. Even with the Defense Suit on, this boss can do quite a lot of damage to you with very few hits.
As best as you can, stand on the upper left platform and shoot at the boss. If necessary, drop down to the floor below and wait for the fireballs to follow a more shallow angle before returning to the top and firing straight across the chasm. After you hit the boss with a number of shots, it will be defeated and your older brother will return to normal. Congratulations.

