Controls[edit]
- Joystick: Use the 8-way joystick to direct your Fighting Rays around the screen; they are always moving forward, but you can direct them anywhere.
- Firing Button: Use this button to make your Fighting Ray fire shots at the enemies; you have to press this every time you want to fire a shot at them.
- Bomb Button: Use this button to make your Fighting Ray launch a bomb at the enemies; if it doesn't have any bombs, this button will have no effect.
- 1 or 2 Player Buttons: Push these buttons to begin the game as player 1 (red), or player 2 (blue); if only one player was present, it will say the other player score was 7650 (Namco's goroawase number) on game-over, and it will also say that both players' scores were that value in the attract mode.
Characters[edit]
Fighting Rays[edit]


The Fighting Rays are two starfighters employed by the Resistance to destroy the Master Force, and are controlled by the player during the entirety of the game. Player 1 controls the red Fighting Ray, and player 2 controls the blue one. A life is lost when they are hit by a projectile, an enemy, or an obstacle such as a wall.
Capsules[edit]

Capsules are cylindrical-shaped ships that act as both enemies and powerup containers. They fire pink lasers that point in the direction of the player, and take ten shots to destroy. If you're able to destroy one, they will leave behind one of nine different power-up items, each with their own abilities and traits. Most power-ups are time based and will be stripped from the player after 30 seconds of use (this is indicated on the top corners of the screen), while some are permanent and stay with the players until they die. These power-ups also contain letters on them that indicate what they do. They are listed below:
 The green Wind Shot (W), which is what both players start with at the beginning of the game, is a spread shot that doesn't deal much damage, but covers more area. Collecting additional Wind Shots will increase its range and power.
 The yellow Grow Shot (G) is a pulsating shot that increases in size. While still rather small, they deal a lot of damage and are good for clearing out large formations of enemies in a matter of seconds. Collecting additional Glow Shots increase its size and power.
 The red Homing Shot (H) is time-based, and creates long red lasers that lock onto enemies, similar to the lock-on missiles in RayForce. These are useful for taking out enemies from the edges of the screen, and are great for destroying those that move faster.
 The turquoise 4-Way Shot (F) is time-based, and creates four additional shots each time the fire button is pressed. These shots are powerful, and easily obliterate larger enemies.
 The orange Large (L), as dumb as its name sounds, is a time-based weapon that creates a powerful burst of energy when the fire button is pressed. It only hits enemies that are very close to the player, but is useful for destroying ground-stationed targets or battleships.
 The blue Defense (D) is time based, creates a shield around the player that protects them from enemy projectiles. Useful during later stages when shots are being fired from all corners.
 The navy Speed Up (S) is exactly what it sounds like. These are permanent, and collecting more of them will increase the player's speed. It makes it incredibly hard to get through most levels when maxing out your speed, so it's best to collect only two of them.
 The white Bomber (B) adds an additional screen-clearing bomb to the player's stock.
 The orange Point (P) is not a power-up, but instead adds 3000 points to the player's score. These are often left by larger enemies like battleships or ground turrets.
Enemies[edit]
| Enemy | Name | Description | Points |
|---|---|---|---|
| Flyer | V-shaped craft that swoop in from the top of the screen and launch themselves towards the player. Three shots will kill them. | 200 | |
| Spinner | Small enemies that are easy to take out. They like to wait for the player to stop moving before homing in on them. Three shots will kill them. | 300 | |
 |
Fortress Ship | Large battleships equipped with turret guns, and sometimes laser cannons. Their turrets spew pink shots towards the player, and their laser cannons fire massive pink beams that prove troublesome in later levels. When destroyed, they will sometimes leave behind a Point pickup. | 2000 |
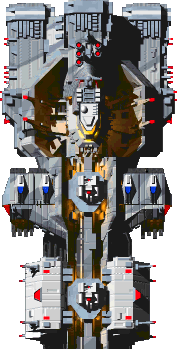 |
Enormous Battleship | Like their name suggests, these gigantic ships are decked out in turrets and other weapons. They have four launchers that fire Bukuro (shown below), 3 turrets that fire fast-moving shots, two larger laser cannons, and a lone cockpit. Destroying the turret guns will sometimes leave behind a Point pickup. It's best to take out the entire ship, as they can easily corner the player with enemies and shots. | 200 x 3 (projectile cannons), 600 x 4 (launchers), 1000 x 2 (laser cannons), 5000 (cockpit) |
| Vinyl Bukuro | Small capsule-like enemies that are fired by Enormous Battleships through their launchers. They take six hits to kill, and sometimes appear in groups that hover over the player before launching themselves at them. | 100 | |
 |
Enormous Moth | Insect-like craft that fire a long streak of projectiles before whisking away. They take twelve shots to destroy, and are found in groups of three. | 1000 |
| Type 1 Kurage | 300 | ||
 |
Flower Saucer | These pink-colored craft, which take a whopping twenty-four shots to destroy, will fire spreads of projectiles, and will also deploy their Flower craft that are attached to their large prongs (below). They're quite rare and only appear in a single level. | 1000 |
| Flower | Small, sunflower-like enemies that are launched from Flower Saucers. They're relatively harmless, and only serve to get in the player's way. They take six shots to kill. | 500 | |
| Falcon | These winged aircraft are similar behavior to the Rates in Namco's previous shooter Star Luster, and are just as nasty. They appear in groups, and will divebomb towards the player Galaxian-style to hit them. A mere three shots will kill them. | 400 | |
| Type 1 Walker | These yellow-colored mechs appear in a single level, and fire fast-moving shots towards the player. They like to hide underneath bushes or trees before revealing themselves and attacking. They can be taken down with three hits. | 400 | |
 |
Type 1 Cannon | Turret guns that fire streams of bullets in the player's direction. These take six shots to destroy, and may sometimes leave behind a Point pickup. | 1000 |
 |
Type 2 Cannon | Slightly-stronger versions of the Type 1 Cannon, which take nine shots to kill. Like their brethren, they may leave behind a Point pickup when destroyed. | 500 |
 |
Bulldog | Meaner and tougher than real bulldogs, these ground-based enemies take a whole twenty-four hits to kill; twelve for its blaster guns, and twelve for the rest of the machine. It's best to take them out quickly, because their firepower will easily get you in trouble. | 2000 |
| Asteroid | Orbiting debris that serve as the remains of a destroyed planet. They take three shots to kill. | 100 | |
 |
Meteorite | Larger asteroids that split into four smaller asteroids when destroyed. Six shots will take them down. | 600 |
 |
Fried Chicken | They may sound delicious, but these asteroids are so massive they're completely invincible. They're more like obstacles than actual enemies, so you'll just have to avoid them. | N/A |
| Axe | Battleaxe-shaped enemies that launch smoke-emitting grenades. They appear in groups of three, and it's wise to clear them out as fast as you can. Six shots will destroy them. | 500 | |
| Type 3 Cannon | Small turret guns attached to indestructible metal plates. They often appear in groups of three or four. Taking only three hits to kill and only firing a few shots, they're not much of a threat. | 500 | |
 |
Uchu Mukade | Giant worms that clearly pay homage to the space slug in The Empire Strikes Back. Appearing in, thankfully, a single level, they take a whole thirty hits to kill, and fire small, circular shots towards the player. They also come from the edges of the screen, so make sure to watch your surroundings when you're getting cornered. | 2000 |
 |
Sogankyo | Large Podracer-like vehicles that emit fast-moving projectiles from their cone-like turret guns. They're usually accompanied by Bikes (shown below), and can be found in groups of two or three at a time. | 500 |
| Bike | Hoverbikes that will move towards the player and fire a barrage of shots. They appear in only one level and make their way towards the screen from the bottom. They also liked to appear in groups, usually of two or three. They're easy to kill with only six shots. | 3500 | |
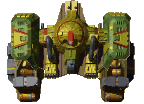 |
Hobby Craft | These massive mechs require a whole thirty hits to destroy, and fire a spread shot from the two turret guns on its sides. When destroyed, its central pod leaps out before crashing on the ground; it is still lethal, so make sure to get out of its way. | 500 x 2 (sides), 1500 (centre) |
 |
Big Mukade | Massive worms that leap out of the sand. They don't fire anything, but are still lethal. They take thirty hits to destroy, so you're better off just avoiding them than trying to kill them. | N/A |
 |
Enormous Cannon | Massive turret guns that fire long streaks of bullets. Found in formations of four, they require twelve shots to destroy. Again, it's best to clear them out as soon as they appear to prevent yourself from being cornered and killed. | 2000 |
| Type 2 Kurage | Octagonal-shaped turret guns that bear a striking resemblance to the Derotas from Xevious. Placed in groups of four, they fire a seemingly-endless stream of shots, so you'll need to take them down as soon as they appear on the screen. Nine shots will do the trick. | 500 | |
| Type 2 Walker | These blue-colored mechs are slightly different from their yellow counterparts, being a bit faster and more aggressive. They're still not very tough, requiring only six shots to destroy. | 400 | |
 |
Beam Gun | Probably the deadliest enemy in the game, these massive flying turret guns will fire gigantic blue lasers from their two blue-colored turrets, which give the player little to no wiggle room if caught in-between. They also fire a seemingly-endless barrage of shots, which makes it near-impossible to avoid them. It's best to try and destroy them when they appear on the screen, but with them requiring thirty shots to destroy, it's a lot easier said than done. | 1500 |
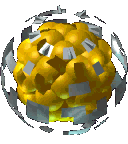 |
Enormous Nucleus | The central core of the Master Force's interstellar base. It takes a whole thirty-six shots to destroy, but it's harmless and won't make any attempt to fire back. Additionally, it will automatically destroy itself should it be too far towards the bottom of the screen for you to shoot it, but you'll miss out on the massive amount of points. | Only the 10 for every hit on it; once you have fired enough shots at it to kill it, it will explode |
Bosses[edit]
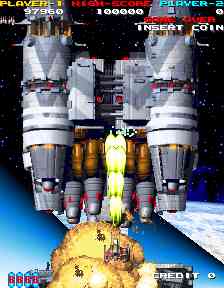
STAGE 1: Uchu Kukan - Once you have fired off enough shots at the cockpit of the last Enormous Battleship for the stage to destroy it, this enormous ship (which had been attached to the back of it) will take off as the first boss battle of the game begins; the eight bombs upon its bottom section will revolve in a clockwise direction while firing eight spreading pink lasers at you, so it is advisable to aim for these first (and these are all worth 500 points when destroyed). However, if you take too long over destroying these, they shall eventually launch themselves at you - and if you cannot fire enough shots at them to destroy them before they hit you, you will have to move out of their way. Once you have destroyed all eight of the bombs (or they have been launched, off the bottom of the screen), it will start firing blue beams at you from its four side-mounted laser cannons - and you can either aim at them (as they are all worth 1000 points when destroyed) or its now-revealed core (which had been hidden by the bombs at the start of the battle, but if you choose to destroy all four of the cannons, you will have to aim for it anyway) next. Once you have fired enough shots at the core to destroy it, the entire ship will explode, as it falls off the bottom of the screen (however, you will not receive the points for any of the laser cannons you did not destroy) and you will receive 20000 points; the screen shall then fade out, and you will receive 10000 points for every bomb you have, and 30000 points for every Point powerup you collected during the stage. You'll then proceed onward to Stage 2.
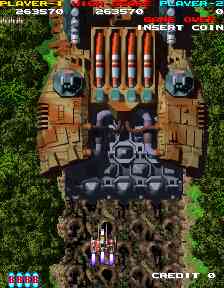
STAGE 2: Jungle Heigen - Once you have fired out enough shots at each of the eight last Falcons of the stage, to kill them, you will come to this enormous tank, which will take off as the second boss battle of the game starts; it initially attacks by firing eight spreading pink lasers at you from its (initially-invulnerable) top-mounted red jewel with four more from its two lower-side-mounted cannons, and (because the red jewel is initially invulnerable), you have no choice but to aim for the latter first (and they are both worth 500 points when destroyed). Once you have destroyed both of the cannons it will activate its four centre-mounted missiles which you'll (again) have no choice but to aim for next and are each worth 1000 points when destroyed (but as with Uchu Kukan, if you take too long to destroy them it will eventually launch them at you, and if you cannot fire enough shots at them to destroy them before they hit you, you will have to move out of their way) - and once you have destroyed all four of the missiles (or they have been launched away off the bottom of the screen), it will activate its two upper-side-mounted bomb launchers, which you (once again) have no choice but to aim for next and are worth 2000 points when destroyed (and the bombs they fire can also be blocked, for 400 extra points apiece). Once you have destroyed both of the bomb launchers, you will have to aim for the red jewel (which is now vulnerable); once you have fired off enough shots at it to destroy it, you'll receive 20000 points as the tank explodes (and is left behind by the Fighting Rays).
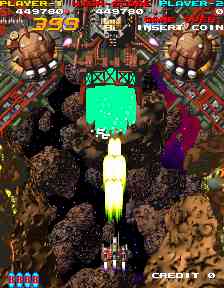
STAGE 3: Inseki Kukan - Once you have fired enough shots at the last Fortress Ship for this stage, to kill it, you will come to this enormous ship, which will take off while facing you as the third boss battle of the game begins; it attacks by firing pink lasers at you, from its five top- and side-mounted cannons (and blue beams from its bottom-mounted cannon), but the second of the top-mounted cannons is initially invulnerable, so it is advisable to aim for the bottom-mounted cannon first (which is worth 3000 points when destroyed, but it will occasionally retreat back into the ship so that you cannot hit it before reemerging). Once you have destroyed the bottom-mounted cannon, you can either aim for the first and third top-mounted cannons (and the two side-mounted cannons) in turn, or go straight for the (now-vulnerable) second top-mounted cannon (the first and third top-mounted cannons are worth 1000 points, when destroyed, while the side-mounted ones are worth 2000 points, and that second top-mounted one is worth 5000 points) - and, once you've destroyed that second top-mounted cannon (regardless of whether you have destroyed the other ones or not), the entire ship will explode (but you will not receive the points for the cannons that you didn't destroy). This is also the first boss in the game that you will not receive 20000 points for completely destroying, which is an unusual occurrence given that it is tougher than those first and second ones.
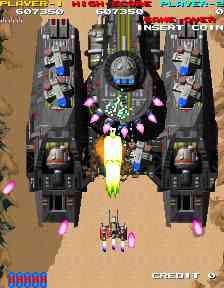
STAGE 4: Sabaku Chitai - Once you have fired off enough shots at each of the stage's last eight Falcons to kill them, you shall come to this enormous tank, which is driving away from the Fighting Rays, as its battle begins; it attacks by firing pink lasers at you (from its six side- and two bottom-mounted cannons), so it is advisable to aim for them first (and the six side-mounted cannons are each worth 800 points when destroyed but the two bottom-mounted ones are only worth 600). Once you've destroyed both of the bottom-mounted cannons, you'll have the opportunity to aim for its engines (which are both worth 500 points, when destroyed, and shall slow it down once you have done so) - and once you destroy all eight of those side- (and bottom)-mounted cannons (regardless of whether you destroyed the engines or not), it shall start firing blue beams and eight spreading pink lasers at you from its seven additional centre-mounted cannons (the first of which is initially invulnerable), so you will have no choice but to aim for the six smaller ones next (which are each worth 300 points, when destroyed). Once you've destroyed all six of them, you will again have no choice but to aim for that (now-vulnerable) larger one (which is worth 8000 points when destroyed); once you have fired enough shots at that larger centre-mounted cannon to destroy it, the entire tank will explode (but, as with Inseki Kukan, you'll again not receive 20000 points for doing so) as it gets left behind the Fighting Rays (and, you will also not receive the points for the cannons you did not destroy). The screen will then yet again fade out, and you will yet again receive 10000 bonus points for every bomb you have (the maximum is 60000) and 3000 points for every Point powerup you collected during the stage (the maximum is 45000) - and you will now proceed onwards to the fifth stage.
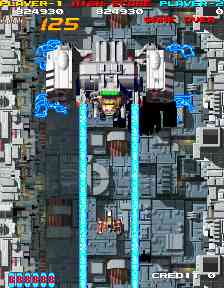
STAGE 5: Kikai Wakusei - Once you've fired out enough shots at each one of this stage's last three Enormous Cannons to kill them, this enormous ship will fly down into view from the top of the screen and stay ahead of the Fighting Rays as its battle starts; it attacks by firing turquoise and pink beams at you from its four front-mounted cannons (while firing spreading pink lasers at you, from its two side-mounted cannons), and its entire body is its vulnerable spot. Once you've fired enough shots at it, it will explode, then fall to the ground as you receive 5000 points - and the screen will then fade out and you will, for a fifth time, receive 10000 bonus point for every bomb you have (the maximum is 70000), and 3000 points for every Point powerup you collected during the stage (the maximum is 60000). You shall then proceed to the sixth stage; however, even if you manage to clear that stage and see the game's ending sequence, you will still have to clear the Extra Stage before the game is over (much like how Bakutotsu Kijūtei had six extra stages that could only be reached by clearing the first thirty in one coin). Remember that if either of you loses your last life on that area, you will not be able to continue - and, if only one person is playing the game alone, another person shall not be able to join in at that point to help him, and it can also get reflected by the text "INSERT COIN" (or "PUSH 1/2P") not appearing under the inactive player's score.
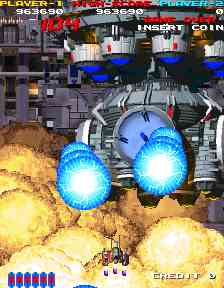
STAGE 6: Teki Zensen Kichi - Once you've collected the Wind Shot or Glow Shot powerup, left behind by the stage's fifth Capsule (if you can), this enormous ship will fly down into view from the top of the screen, and stay ahead of the Fighting Rays, as its battle starts; it first attacks by trying to stay ahead of the Fighting Rays while firing blue bubbles at them, from its bottom section, which you shall have no choice but to aim for first, and it is worth 20000 points when destroyed. Its bottom section will now fall off as it starts firing blue beams at you from its lower centre section, which you shall, again, have no choice but to aim for next (and it is worth 30000 points when destroyed) - and its lower centre section will then fall off and explode as it starts firing homing pink lasers and more blue beams at you from its upper centre section which you will once again have no choice but to aim for next (and it is worth 50000 points when destroyed). Its upper centre section will then fall off as it starts firing even more blue beams and more (smaller) homing pink lasers at you from its top section which you'll yet again have no choice but to aim for next (and it is worth 100000 final points, when destroyed); its top section will now explode and you will receive 10000 points for every bomb you have (the maximum is, again, 70000) along with 100000 points for every life you have remaining (the maximum is 700000, and, the only way for either player to receive this value is for the arcade's operators to set the "FIGHTER" setting in the options menu to "5", and the "EXTEND" setting to "150000 AND 500000 PTS", and one of the players has not died at all during the course of the game, which is a remarkable feat).


