This is a harder one. One thing that some players may miss is the small area of water with a current up.
*Steps. {{clr}}
* Go down to C6 and move the EF right one space. When Alma is away, move it right one more, go down to get the heart and run out to the left and down to the grass.
* When Alma comes down and passes by, move back up, but be sure that the Alma comes back your way. If it gets to the top right area by the wall, it will endlessly walk back and forth up there. Force it to roll at you if you have to.
* Get the heart on G6 and push the EF left of you to C6. When the Alma walks up past you, move it over 2 spaces left and go to E7. When Alma comes right above you, shoot it and push it straight up into the water. The current will take you up one space. Get the 2 hearts and push the EF down 2 spaces.
* Use this time to position EFs. Move the EF you have on B6 down one. Move the one on D5 down and over to H11.
* Alma should revive soon. When it does, allow it to go to the top right area. Stand on C3 to force it to roll left as it enters K3.
* With Alma up top, shoot the Snakey and push it down one, get the heart on E11. Shoot the egg again. Push the EF on B7 to B10 and then over HALF a space. This will both block Medusa and cover Snakey's spot so he'll reappear on C7.
* When Snakey is back, shoot him and push him up straight up to get the hearts on C1 and B2 then quickly cross back down. Alma will block you from the top right Medusa.
* Move the EF on F6 around to J5. When Snakey is back, shoot him and move him up and right to the water on I5 and push the EF to the wall.
* Wait for Snakey to return and push him down to G9 and up into the water to free the other EF. Push this EF over to K8.
* Push the EF on K5 straight up, wait for Alma to go away, and get the last heart.
* Use Snakey to cross over to the chest.{{clr}}
==5-5==
==5-5==
Revision as of 04:06, 14 May 2006
This chapter discusses the solutions to level 5. One thing to take a note of: Every room in level 5 has at least one Alma in it.
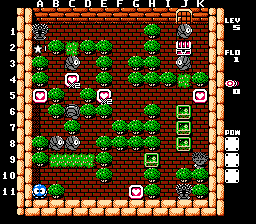
The first level in 5-1 is kind of tricky. You need to time a few things, especially the use of the hole at the end.
To start, make your way right and push the EF on H9 to J9.
Push the EF on J8 right one. Go up and right and get the heart.
Push the EF on J7 down to I11 and push the EF on J6 up to B2. Get the heart along the way.
Wait on the grass spot on C2. When the Alma is on the side, move down, turn and shoot it once. When the Alma below you is away, move down and get the heart and quickly move out of the area.
Go back right and down, get the heart on G11 if you haven't done so, and go to the grass area on C9, facing up. This is the tricky part: Eye the Almas and wait until the rightmost one steps on C8 and shoot it twice. The other Alma will be walking around.
After about 6 seconds, shoot the second Alma and be sure it's stopped on C8. This will cause the first Alma you shoot away to appear on A2.
While the Alma is still in the egg, go up to get the last heart.
Getting the chest is a little tricky. Go up and left of the trees to try to make the Almas roll so they are closer to each other. When you've got a clear path, go to the chest. Template:Clr
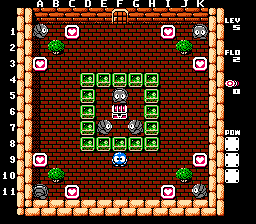
5-2
You will mainly want to get as many of the EFs from the center free as possible in this level. Blocking the corner Almas in is the key.
Immediately push the EF above you up one.
From here you'll want to pin the 3 center Almas all on one side by moving an EF either on D5 or H5 inward. If you time it right, you will have 6 EFs to work with.
Move the 6 EFs and distribute them 2 to a corner. A good trick is to place them next to the hearts. For instance, placing them on C9 and D10 is ideal for the lower left corner. You will have one corner with no EFs. This will be the last corner to take hearts from.
When you're ready, take a heart from a corner and start to run from the Alma. Make sure to take one that's adjacent to one of the side walls and not the top or bottom walls. The Almas will roll at you and you will not escape.
Get the other heart from said corner while the Alma is out and about. Move one of the EFs to the side wall. Try to lure the Alma to the bottom or top wall (depending on the corner) and let it roll in place. Seal it in with the other EF. Repeat this process for the other corners.
For the final corner, you'll just want to grab the hearts and carefully make your way to the chest.Template:Clr
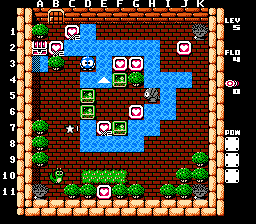
5-3
This one's a little bit harder. You'll need to time a few parts carefully.
Get the heart next to you and run to the grass. Wait for Alma to be clear and go left, get the heart and go through the right arrow.
Make your way to the Gols and shoot the one facing right on D5 twice.
Wait about 6 seconds and shoot the Gol on F5 and move it left to D5. When the first Gol you shot off reappears on B4, push the still-egged Gol up to D3.
Shoot the Gol on E4 and move it left to C4. Shoot the Gol now on B4 and push it up one.
Go back down to where Alma is and when it's away, push the EF all the way into to bottom left corner to free it. Run up to D1. Alma will follow.
When Alma passes to the left of you, move down and shoot it when it's over Medusa. Get the top left 2 hearts and make your way down to the grass patch on H9.
Alma will probably be nearby, so wait for it to go away before proceeding.
Shoot the Gol on I10 and move it right two spaces. Quickly go up and over the Snakey on J6. Shoot and push it down to J11. Get the last heart and move up to the chest. The Gol above Medusa should still be egged. There's nothing to worry about with the 2 top right Gols.
This is a harder one. One thing that some players may miss is the small area of water with a current up.
Go down to C6 and move the EF right one space. When Alma is away, move it right one more, go down to get the heart and run out to the left and down to the grass.
When Alma comes down and passes by, move back up, but be sure that the Alma comes back your way. If it gets to the top right area by the wall, it will endlessly walk back and forth up there. Force it to roll at you if you have to.
Get the heart on G6 and push the EF left of you to C6. When the Alma walks up past you, move it over 2 spaces left and go to E7. When Alma comes right above you, shoot it and push it straight up into the water. The current will take you up one space. Get the 2 hearts and push the EF down 2 spaces.
Use this time to position EFs. Move the EF you have on B6 down one. Move the one on D5 down and over to H11.
Alma should revive soon. When it does, allow it to go to the top right area. Stand on C3 to force it to roll left as it enters K3.
With Alma up top, shoot the Snakey and push it down one, get the heart on E11. Shoot the egg again. Push the EF on B7 to B10 and then over HALF a space. This will both block Medusa and cover Snakey's spot so he'll reappear on C7.
When Snakey is back, shoot him and push him up straight up to get the hearts on C1 and B2 then quickly cross back down. Alma will block you from the top right Medusa.
Move the EF on F6 around to J5. When Snakey is back, shoot him and move him up and right to the water on I5 and push the EF to the wall.
Wait for Snakey to return and push him down to G9 and up into the water to free the other EF. Push this EF over to K8.
Push the EF on K5 straight up, wait for Alma to go away, and get the last heart.
Use Snakey to cross over to the chest.Template:Clr