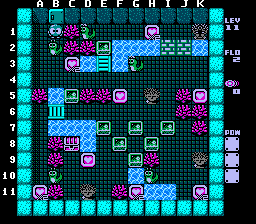
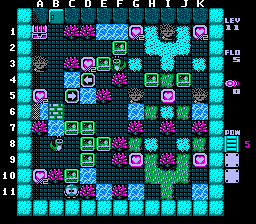
Note: every room in this level has at least one Medusa in it, although it's not like that isn't a common thing already.
11-1[edit]

This level is not really hard. It's just about the studying of arrows and how to distribute the EFs. Instead of a lengthy description, there are some screenshots which show the ideal way of navigating the EFs. Just be sure you avoid E8, F5, H7 as those are inescapable traps.
- To start the level, push the EF on C10 to A10 and the one on B4 to B1.

- From here, it's probably easiest to distribute the EFs on J3 and I4 to the lower right corner. Refer to the diagram to the right to see how to move the EFs. The diagram shows the EFs from step one already in place. The arrows aren't as tricky to navigate for this phase.
- When you're done, you can get the hearts on I1 and K4.

- Now you'll want to get the EFs onto A2 and B11. Refer to the diagram to the right to see how to move the EFs. The diagram shows the EFs from step two already in place. This part is a little trickier with the arrows. Getting the EFs to B6 so you can get them to their final destinations will require you to navigate around the long way on the bottom.
- When finished, get the 2 hearts and the chest.
11-2[edit]

This one's tougher. There are a few points where you need to be very speedy.
- Get the nearby heart and push the EF on C5 down one. Use the Snakey on B2 to cross down and push the EF on C6 to H6.
- Push the EF on E7 straight down. Push the EF on G7 up two and get the heart. Push the EF on F7 down to D10 and get that heart.
- This needs to be done quickly: Shoot the Snakey on B10, move it right one, walk around and push it down one. Get the corner heart.
- Push the EF on H8 right two. Push the EF now above you up two. Push the EF now on J8 down one.
- This part's a little tricker: Shoot the Snakey on B2 and move it down to C6. Go down and around to B6. The egg will hatch.
- This needs to be done quickly: Use another shot to get the Snakey down to the water spot on G10. Quickly get the heart below you, tap the EF up one and shoot the Snakey to your right and push it all the way right. Get the heart. Move the EF you freed up to H4.
- This needs to be done very quickly: Shoot the B2 Snakey, move it over to F4. Go around and push it up into the water. Shoot the Snakey to your right and move it in-between J1 and J2 (half space). Go left and get the heart and push the EF on E2 down two. Go back and shoot the egg again when you're clear. The half space trick gives you a little extra time. Move that last EF down to K8.
- When the Snakeys are back, do a similar process as before to maneuver them, but this time push the Snakey all the way right and get the last heart. Get the chest.
11-3[edit]

This one's kind of tough mainly due to some tricks you have to do with the EFs on half spaces. The EF distribution at the beginning is important.
- To distribute the EFs: Move the EF on F7 left two. Move the EF on G8 to D9. Move the EF on H8 up to H3. Move the EF on F4 left two. Move the EF on E3 up two. Get the heart on F2. Move the EF on F5 to B5. Move the EF on F3 to C8.
- Push the Snakey on H10 down one.
- Move the EF on A7 straight down, get the two hearts in the lower area. You'll get the arrow power. Use it on the arrow on A8 and shoot the Snakey above you twice. Move right for safety and push the EF on A10 up to A4.
- Here's kind of an odd step: Push the EF on F8 up half, go up and around and push it to the right onto I7.5 and then down to I8.
- When Snakey appears on F6, push him down two, move the EF on I8 right half and shoot the egg again when you're clear.
- When Snakey returns, put him up on K4, go down and get the heart and shoot the egg again from K8. Move the half step left and go up and out.
- When Snakey returns, put him up on K2 this time. Get the last heart and the chest.
11-4[edit]

This room is surprisingly simpler than the previous ones.
- Push the EF on F3 right one. Push the EF on F6 down one. Push the EF on E5 left one. Push the EF on G6 right one and up to H2. Push the EF on G3 left one and up to F1. Get the heart on D1.
- Go across the breaking bridge on I3 and head down. Move the EF on J8 to F10. Shoot the Snakey and move it left two.
- Shoot the other Snakey and push it down one. Quickly get the heart on I11 and shoot the egg again from over here. Move the EF on F10 to B10 and wait for Snakey to appear up on J2. When it does, move the EF left one.
- Go up, move the Snakey on J2 up one and get the heart. Go back left across the cracked bridge.
- Cross B2 with the Snakey on C2 and head down. Move the B5 Snakey down two, get the heart, then tap the egg down into the water. Wait on B6.
- When the Snakey returns, cross back up, move the Snakey on C2 right and into the water. Get the chest.
11-5[edit]

This last level is tougher. It's very tricky with the EF distribution at the beginning.
- Get the heart. To distribute the EFs correctly, follow these steps in order: Move the one on C7 up one. Move the one on D7 right one. Move the one now on C6 left one. Move the one now on E7 left one. Move the one on E8 down two. Move the one on D9 right one. Move the one on D8 left one then up two. Finally, move the one on D7 over to F5.
- Cross B7 with the Snakey below it and push the EF up to B3. Move the EF on C6 down one then back up to B6.
- When the Snakey returns, cross D5 with it. Get the heart and move the EF on F2 right one. Go back left and move the EF on E3 up one.
- Shoot the Snakey and push it right one. Move the EF on G2 right two.
- Move the EF on H4 left one. Move the EF on J4 right one. Move the EF on E2 right to H2.
- Shoot the Snakey and push it up to J1. Get the corner heart and shoot the egg again when clear. Move the EF on H2 up one. Get the heart.
- Cross down on D5 when the Snakey is back. Use the other Snakey to cross B7 and move the EF up two. When it returns, move it into the water on C4 and push the EF left. Get the heart for a bridge power.
- Use the bridge on D10. Move the 3 nearby EFs to G8, K8, and H5. (Order of doing this doesn't matter)
- This needs to be done quickly: Move that B8 Snakey to J5. You must do it with one shot. Get the last heart.
- Use the other Snakey and put it on A2. Get the chest.
Level 11 boss[edit]

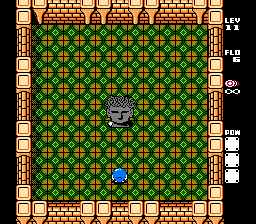
The level ends with a fight against a giant Medusa. The Medusa will teleport to random locations around the room. While it's flashing, it cannot be harmed. After it teleports somewhere, it will stay still for a brief moment and then shoot fast shots out up, then right, then down, then left. It'll pause and then shoot out shots in all four directions at once then teleport again. The best strategy is to stand on its left side as it teleports in and shoot from there as that's where the last shot comes out. Just keep shooting and move out of the way after you see the downwards shot. You can usually score an extra hit or two before the 4-way shot comes out. The Medusa will explode when defeated.