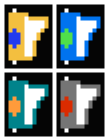
! Short Sword || Normal Sword || Dragon Slayer || Splendor
! Short Sword || Normal Sword || Dragon Slayer
|- align="center"
|- align="center"
| [[Image:Deadly Towers Short Sword.png]] || [[Image:Deadly Towers Normal Sword.png]] || [[Image:Deadly Towers Dragon Slayer.png]] || [[Image:Deadly Towers Splendor.png]]
| [[Image:Deadly Towers Short Sword.png]] || [[Image:Deadly Towers Normal Sword.png]] || [[Image:Deadly Towers Dragon Slayer.png]]
|-
|-
| You begin the game with this, the weakest sword.
| You begin the game with this, the weakest sword.
| This sword is slightly better than the Short Sword, but it will cost you.
| This sword is slightly better than the Short Sword, but it will cost you.
| You can have this fantastic sword for free if you can find it.
| You can have this fantastic sword for free if you can find it.
| This sword is the only weapon that possesses the power to beat Rubas, but you won't find it until the end of the game, after all seven bells have been burned, and you are ready to face the evil wizard himself.
| With the Double Shot, you will be able to fire two swords on the screen at one time. This comes in handy if your first sword sails off past an enemy. You will still have the ability to throw another sword instead of needing to wait for the first sword to disappear.
| With the Double Shot, you will be able to fire two swords on the screen at one time. This comes in handy if your first sword sails off past an enemy. You will still have the ability to throw another sword instead of needing to wait for the first sword to disappear.
| The Parallel Shot allows you two fire two swords in parallel simultaneously. While this increases the likelihood that you will hit an enemy with one of the swords, it tends to slow down your ability to fire since you may have to wait for the other sword to leave before you can fire off another pair of swords.
| The Parallel Shot allows you two fire two swords in parallel simultaneously. While this increases the likelihood that you will hit an enemy with one of the swords, it tends to slow down your ability to fire since you may have to wait for the other sword to leave before you can fire off another pair of swords.
| This sword is the only weapon that possesses the power to beat Rubas, but you won't find it until the end of the game, after all seven bells have been burned, and you are ready to face the evil wizard himself.
Heart Circles extend your maximum life points by ten, up to 299 maximum.
Offensive
Swords
Short Sword
Normal Sword
Dragon Slayer
You begin the game with this, the weakest sword.
This sword is slightly better than the Short Sword, but it will cost you.
You can have this fantastic sword for free if you can find it.
Gloves
Glove
Normal Glove
Gauntlet
Gloves will slightly increase the speed at which you can throw swords.
Normal Gloves allow you to throw swords a little faster than regular Gloves.
You can throw swords at the fastest speed with the Gauntlets.
Power-ups
Double Shot
Parallel Shot
Splendor
With the Double Shot, you will be able to fire two swords on the screen at one time. This comes in handy if your first sword sails off past an enemy. You will still have the ability to throw another sword instead of needing to wait for the first sword to disappear.
The Parallel Shot allows you two fire two swords in parallel simultaneously. While this increases the likelihood that you will hit an enemy with one of the swords, it tends to slow down your ability to fire since you may have to wait for the other sword to leave before you can fire off another pair of swords.
This sword is the only weapon that possesses the power to beat Rubas, but you won't find it until the end of the game, after all seven bells have been burned, and you are ready to face the evil wizard himself.
Defensive
Helmets
Chain Helmet
Iron Helmet
Hyper Helmet
This helmet gives the lowest level of protection, but it's better than nothing.
This helmet is an improvement over the Chain Helmet, but it will cost you.
This is the greatest helmet in the land, but it has been hidden away for a great warrior to find.
Shields
Shield
Lion Shield
Shield of Kings
You can purchase this basic shield made of bronze fairly easily.
The Lion Shield offers much more defense, but with a much bigger price tag.
Only a true warrior can possess the Shield of Kings. It offers the greatest protection, but you must find it first.
Armor
Leather Armor
Plate Armor
Hyper Armor
Leather Armor is the most basic armor that you can buy, but it will keep you alive longer than wearing no armor.
Plate Armor is much more sturdy than Leather and can absorb some of the damage inflicted by tremendous blows, but it can be expensive.
Very few monsters possess the power to damage you at full strength while you are wearing Hyper Armor, but finding it can be dangerous.
Other
Crystals
Color
Description
Blue
The blue crystal is said to have the power to reduce all visible enemies' life points.
Green
The green crystal has the ability to freeze time and stop enemies in their tracks. However, you will also be unable to draw your sword for the duration.
Orange
This crystal will give you an indication of when the dungeon exit is nearby. The floor of any of the eight surrounding rooms will change color to indicate that presence of the exit.
Red
One of the most useful crystals, the red crystal has the power to instantly warp you to the location of a dungeon exit. Extremely useful if you become lost, try to keep one of these handy if you plan on exploring many dungeons.
Scrolls
Color
Description
Blue
Using the blue scroll in a dungeon causes you to warp to a random location within the same dungeon. Due to the complexity of the dungeons, use of this scroll is not advisable. You may even become trapped!
Green
The green scroll has the power to warp you back to the starting location of the game; the lowest layer of the castle. The best time to use this scroll is after you have burned all seven bells.
Orange
Reading the orange scroll will instantly warp you to the Cliff Wall, before the Holy Flame. One of the most useful scrolls, use them after you've defeated a tower bell guardian to avoid a slow trip back down the mountain.
Red
The red scroll contains the power to destroy every enemy in a room… that is, every enemy in the room of a dungeon. It will not work outside of a dungeon.
Necklaces
Color
Description
Blue
One of the most powerful defense items in the whole game, the blue necklace has the ability to make you completely invincible for a short period of time. This is extremely useful to have during the final encounter with Rubas.
Green
The green necklace has the ability to increase your defensive powers for a period of time.
Orange
Like the green necklace, the orange necklace will also increase your defense, but for a much shorter period.
Red
The true powers of the red necklace are not fully understood. Some believe that it's power is linked with death.
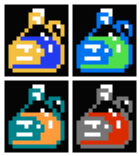
Potions
Color
Description
Blue
A blue potion will fully restore all of Prince Myer's missing life points. Bring them to important battles.
Green
The green potion will restore up to 200 of Prince Myer's missing life points.
Orange
Drink a orange potion to receive 100 points of restored life.
Red
The red potion restores the least life points of all, 50 at most, but it is cheap and easy to find. Stock up on them early in the game.
Misc.
Magic Key
Fire Magic
Magic Mace
Hyper Boots
This key grants you the ability to safely pass between the invincible knights which guard a door in the castle five layers up from the starting point.
Use of Fire Magic will illuminate the door in the room of a dungeon which lies on the path that leads to the exit.
The Magic Mace erects a barrier of flames around Prince Myer. He will be unable to use his sword during this time, but enemies that crash into the barrier will be destroyed.
Hyper Boots increase the speed at which Prince Myer can move about. The effect is not dramatic, but it is certainly appreciable.
Figurine
Cup
Evil Shield
Evil Bell
A figurine has the power to freeze all humanoid enemies. You may still use your sword after activating this item.
Using the cup will instantly refill your wallet with a maximum 250 Ludder. There also exists an evil cup which drains your wallet of all your money.
The Evil Shield is sold in stores. It resembles a regular shield, but when you equip it, it will be as if you are wearing no shield at all.
There are seven evil bells spread across the seven deadly towers. Prince Myer must claim all of them and burn them in the holy flame in order to challenge Rubas.