This one's not quite as tough, though there's one very weird trick you have to do near the end to complete it.
* Steps. {{clr}}
* Move the EF to B4. Move the other one to A3 and get the heart on A1.
* Shoot the Gol on J3 and move it down to K10.
* Get the heart on I6, shoot the Gol to your left and move it to A8. Get the heart on A10.
* This needs to be done quickly: Shoot the Gol on F9 twice and go up, right, then down. Get the heart on I9, push the EF left, get the other 2 hearts, push the EF to D9 and stop.
* Here comes that trick to do: When the Gol reappears, shoot it and push it to I10.5. Do NOT go all the way down to I11.
* Get the heart on F1 then the last 2 hearts on F5 and F7.
* Shoot the Gol on A8, go down and get the chest. For some reason, the Gol on I10.5 will have its fireballs deflected by the half space of the chest and tree. If it was fully on I11, the fireball would hit you.{{clr}}
==10-4==
==10-4==
Revision as of 03:31, 21 May 2006
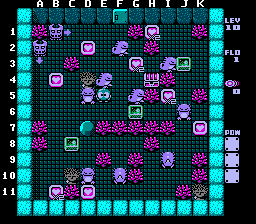
This chapter discusses the solutions to level 10. One thing to take a note of: Every room in level 10 has at least one Gol in it.
This level is tricky. You'll need to watch the Dons a few times for certain steps.
Eye the Don as you get the heart on G3 and immediately shoot the Gol on I3 twice. While the Gol is gone, go to the right, get the heart on I5, and push the EF on J3 all the way left to D3.
Shoot the Gol on F2 and use it to trap the upper Don against the top left tree. Get the D2 heart.
Shoot the Gol on I3 and quickly maneuver it up to B2. Get the heart on H1.
Maneuver the EF on G6 to trap the other Don up against the tree.
Shoot the Gol on G5 and quickly maneuver it down to B10. Get the heart down there.
Move the EF on C8 down one. Move the Gol on F10 to I11. Get the heart on D11. Move the Gol on I9 to K8. Get the heart. Quickly move the Gol on J6 over to C4. Get the last heart.
Take the lower path to work your way to the chest. To get past the Gol on I11, just move in and quickly move out and go when its fireball passes. Go up the J column and around to the chest.Template:Clr
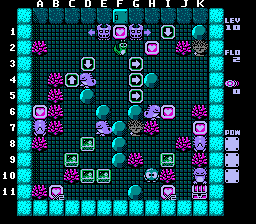
10-2
This one's pretty tough. You'll need to move the 4 EFs a certain way and you'll perform some speedy moves while evading the upper Dons.
Get the nearby heart and move the EF on I9 left one then up to G8.
Go left and get the heart on B11. This next sequence will need you to move the EFs in a certain order. Watch that Don up above. Proceed in this manner:
Move the EF on C9 right two. Move the one on D8 up one. Go down and around.
Move the one on D10 up one. Move the one on E10 left one. Go up and around.
Move the one on E9 down one. Move the one on D9 left one. Go down and around.
Move the one on D10 up two then left one. Move the one on C9 right one. Move the one above you up to C3. That's the end of the sequence.
This part needs to be done quickly. There's no easy way to time it. You need to shoot the Gol on D4, move it to I5, shoot the Gol on H6 twice, then move the egg up to I1.5 and trap the Don on J1 before the egg hatches.
Get the hearts on H2 and I6. Move back left and push the EF on C3 up one. Go stand under the Snakey.
This part will need you to time the Don. When it moves right and taps the upper heart, move the EF on C2 left one and run back under the Snakey. When it's clear, move under the same EF.
When Don is clear, quickly go down and get the heart on A6 and move back up. When Don comes back, trap him in on A1 with the EF.
Even though it's now available, save the heart on F1 for last. Go back down to the EFs on D9 and E10. Move the one on D9 up and over right to J3 and then move it a half space right.
Move the one on E10 in the same manner, but down to I7. Get the heart on K7. Go get the last heart on F1 and make your way down. Shoot the Gol above the chest and get the chest.Template:Clr
10-3
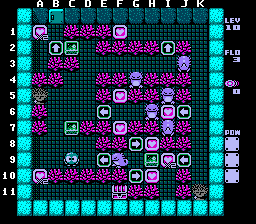
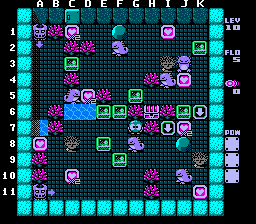
This one's not quite as tough, though there's one very weird trick you have to do near the end to complete it.
Move the EF to B4. Move the other one to A3 and get the heart on A1.
Shoot the Gol on J3 and move it down to K10.
Get the heart on I6, shoot the Gol to your left and move it to A8. Get the heart on A10.
This needs to be done quickly: Shoot the Gol on F9 twice and go up, right, then down. Get the heart on I9, push the EF left, get the other 2 hearts, push the EF to D9 and stop.
Here comes that trick to do: When the Gol reappears, shoot it and push it to I10.5. Do NOT go all the way down to I11.
Get the heart on F1 then the last 2 hearts on F5 and F7.
Shoot the Gol on A8, go down and get the chest. For some reason, the Gol on I10.5 will have its fireballs deflected by the half space of the chest and tree. If it was fully on I11, the fireball would hit you.Template:Clr