* Go across the breaking bridge on G3 and move the EF on H4 down one. Go back over the same bridge and go down and over across the bridge on J6. Move the same EF all the way left to A5.
* Go across the breaking bridge on G3 and move the EF on H4 down one. Go back over the same bridge and go down and over across the bridge on J6. Move the same EF all the way left to A5.
* Go down and through the left arrow. Push the Snakey on B10 up one and get the heart.
* Go down and through the left arrow. Push the Snakey on B10 up one and get the heart.
* Go up to C5. This step you'll need to time carefully: When the Don comes down and taps the EF, cross up with the Snakey, get the heart on the left, cross back, and go up. When the Don is clear, get the heart on D1.
* Go up to C5. This step you'll need to time carefully: When the Don comes down and taps the EF, cross up with the Snakey, get the heart on the left, get back on the egg and cross up. When the Don is clear, get the heart on D1.
* Go down to F6. This step you'll also need to time carefully: Shoot the Snakey and start pushing it down. When the right Don clears, use it to cross the water on G11, get the heart and cross back. Move the EF on J8 right one.
* Go down to F6. This step you'll also need to time carefully: Shoot the Snakey and start pushing it down. When the right Don clears, use it to cross the water on G11, get the heart and cross back. Move the EF on J8 right one.
* When the Snakey returns, use it to cross on K7 and move the EF all the way down. Get the heart on I10. You'll get a bridge power.
* When the Snakey returns, use it to cross on K7 and move the EF all the way down. Get the heart on I10. You'll get a bridge power.
Revision as of 06:28, 21 May 2006
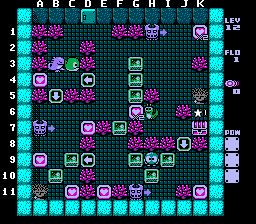
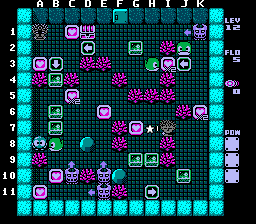
This chapter discusses the solutions to level 12. One thing to take a note of: Every room in level 12 has at least one Don Medusa in it.
The first level of Don Medusa haven is tricky in how to distribute the EFs. There's one part you'll need to be speedy.
Move the EF on G9 left one, go down and move it to G10.
Move the EF on F7 up and over to I2. Move the EF on G4 to J5. Get the G6 heart and move the EF on G5 to K4.
This part needs to be done quickly: Shoot the Snakey and move it up to J1, get the heart. When you're clear, shoot the egg again. Push the EF on I2 up to trap Don to the right. Push the EF on G3 to Snakey's spot on H6. The Moby will suck you along the way, so compensate for that.
Move the EF on I1 right one to fully trap the Don.
Shoot the Gol on B3 and push it down two, get the heart when you're clear, then push it down to trap the Don on A7. Get the D7 heart.
Move the EF on C9 left one. Move the one on B10 left one. Move the one now on B9 up and over to A8. Get the heart.
Move the EF on H6 to E6. Go down and move the one on I9 right one. Go back up and around and move the one now on J9 down one and then left one. Use the 3 EFs here to trap the Don on all sides. Get the hearts on E11 and K11.
Go through the left arrow and move the EF on E6 right one and maneuver it down and left to B11. Get the last heart.
Shoot the Gol and make your way over to the chest.Template:Clr
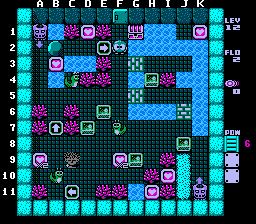
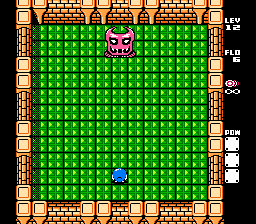
12-2
You'll need to really time the Dons at a few points here. Some real close calls.
Move the EF on E6 down one. Move the one on D7 down two. Move the one now on E7 down and over to C10. Get the heart on F9. When the Don on the right is clear, move the EF on G9 to C8.
Go across the breaking bridge on G3 and move the EF on H4 down one. Go back over the same bridge and go down and over across the bridge on J6. Move the same EF all the way left to A5.
Go down and through the left arrow. Push the Snakey on B10 up one and get the heart.
Go up to C5. This step you'll need to time carefully: When the Don comes down and taps the EF, cross up with the Snakey, get the heart on the left, get back on the egg and cross up. When the Don is clear, get the heart on D1.
Go down to F6. This step you'll also need to time carefully: Shoot the Snakey and start pushing it down. When the right Don clears, use it to cross the water on G11, get the heart and cross back. Move the EF on J8 right one.
When the Snakey returns, use it to cross on K7 and move the EF all the way down. Get the heart on I10. You'll get a bridge power.
Go across the cracked bridge on J6. Wait on H4. When the left Don clears, quickly go right and deploy the bridge on J2. Go up. When the left Don clears, get the last heart and go back.
Keep watching the Don as you make your way up to the chest.Template:Clr