(2 intermediate revisions by one other user not shown)
Line 1:
Line 1:
{{wikify}}
{{Header Nav|game=Gauntlet (NES)}}
{{Header Nav|game=Gauntlet (NES)}}
==Maps==
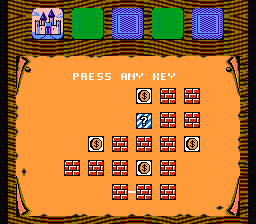
[[Image:Gauntlet NES map example.png|frame|One of the between-level maps. The white lines between blocks indicate your route.]]
At the end of each level a map of the world is shown. You can use this map to chart your progress and see which rooms are conected together. Some rooms have more than one exit, and not all rooms are connected. The treasure rooms are shown with a $ in the map. Clue rooms which contain a clue to the final combination are shown with
Unlike [[Gauntlet|the original Gauntlet]], this game has a fixed set of 100 levels and a definite ending. The levels are divided into five worlds.
?. The final conbination is explain in the Collected Wisdom of World Five. These maps are considered accurate.
===World One: The Castle===
At the end of each level a map of the world is shown. You can use this map to chart your progress and see which rooms are connected together. Some rooms have more than one exit, and not all rooms are connected. The treasure rooms are shown with a $ in the map. Clue rooms which contain a clue to the final combination are shown with ?. The final combination is explained in the Collected Wisdom of World Five. These maps are considered accurate.
Your journey begins in the Castle World. Since it exists on the edge of the Veil, other mortals have ventured into the Castle. Many explorers have risked life and limb to bring back what little we know about the Castle.
The dark reaches of this Forest world are unknown to mortals. Rumors and fables abound. Most of what is known comes from the tales told of the ancient time when chaos rules.
<pre>
L20 L37 - L38 - L39 Hint: The clue is in a
| | \ | treasure chest.
L21 $36 L40 - $41
| \ |
L23 L22 L33 - L34 - L35
| / | | |
$24 ?20 L32 - L30 - L31
| / |
L25 - L27 - L28 - $29
</pre>
===World Three: The Lost Caverns===
The cave-like rooms of the caverns are haunted by many of the horrendous fiends from the Unseen.
<pre>
L56 - $55 - ?54 - L53
| \ | Hint: You may find a room
L59 - L60 - L57 L52 - L51 in world three with
\ | | treasure and bombs
$62 - L58 L50 - $49 - L48 that you cannot get.
\ | | |
L61 L45 - L44 L47
| | |
L42 - L43 - L46
</pre>
===World Four: The Unseen===
The world of the Unseen holds a formidable challenge. Could you possibly be blind? The walls are not there yet they are in this watery world.
<pre>
L63 - L64
|
L65 Hint: Invisible walls may be
/ | destructible walls as well.
$78 - L77 ?66 - $67
| | \ |
L74 - L75 - L76 L68
| | |
L73 - L72 - L71 - ?70 - L69
</pre>
===World Five: Volcana, Lair of the Guardian===
Lava flows on all sides. You know this is the last leg of the journey, but the Guardian awaits.
<pre>
?90 - L91 - $92 - L93
| / | Hint: You have to find
L88 - L89 L95 - L94 - L97 your way to room 94
| | | | which leads to the
L85 L86 - L87 L96 L99 L98 Guardian.
| / |
L84 L82 - ?81 L100
| | |
L83 - L79 - L80
</pre>
==Secrets==
World one is now done.
Recommended path for World 1.
1-2-3-4-5-6-7-8-9-10-11-12-13-14-15-16-19
Lvl 1 - In the upper right hand corner (by all the ghosts) their is a secret exit to level 5. Shoot the walls to find it.
Lvl 5 - Lots of gold in the upper left hand room. If you have an extra key you should use it here. Just to the right of the treasure room is a secret exit to level 9. You have to shoot a wall to find it but it's there.
Lvl 7 - The treasure chest contain temporary invisibility. Don't waste your key.
Lvl 9 - The 1st locked room contains food, and reflective shots. The 2nd locked room holds death, a potion, and a key.
Lvl 10 - There is a false wall to the left of the 1st door so don't bother using a key. Also don't hit any of the magic tiles near the bottom of the room, they don't open up the way to the potion. Use the lone magic tile on the right side of the map instead.
Lvl 11 - The treasure chest contains reflective shots. In the area with the 3 magic tiles, hit the upper left one to open the way to legvel 12.
Lvl 12 - Awesome! This level rocks. It has a ton of stuff. 5 potions, food, lots of gold, and an extra armor potion. The locked chest contains a magic tile which makes some walls in the center of the map disappear. Shoot the lone wall in the center to reveal another magic tile. Step on that to get rid of some more walls. Shoot the new wall, standing all by its lonesome self, to exit.
Lvl 14 - Hit all the magic tiles to get a key and to openthe way to both exits. The one to the left goes to 15. The one to the right goes to 17.
Lvl 15 - Hit all the magic tiles to open the way to level 16. The exit
in the upper left is to 18. The treasure chest contains a stupid
treasure so don't waste your key.
Lvl 16 - There are four treasure chests. You only need 2 keys tho. Once you've hit the magic switch in either 1 or 3 go to the food room. Between the two plates of food is a fake wall. Shoot it to reveal another magic tile. Step on it to open the way to the exit and the clue.
<pre>
1 2
3 4
</pre>
# contains a magic tile which open the bottom wall of the food area.
# contains a poison potion.
# contains a magic tile which opens the top wall of the food area.
# contains an extra magic potion!
Lvl 17 - Both exits go to 18. The treasure on the bottom portion of the map contains food while the treasure on the top contains 1 treasure chest... whoopie...
Lvl 18 - This is an original Gauntlet level from the arcade. Only 1 secret
here. In the upper right portion of the room shoot a wall to reveal 10 super shots. It's along the very outter edge of the wall and has 3(?) other blocks touching it.
One of the between-level maps. The white lines between blocks indicate your route.
Unlike the original Gauntlet, this game has a fixed set of 100 levels and a definite ending. The levels are divided into five worlds.
At the end of each level a map of the world is shown. You can use this map to chart your progress and see which rooms are connected together. Some rooms have more than one exit, and not all rooms are connected. The treasure rooms are shown with a $ in the map. Clue rooms which contain a clue to the final combination are shown with ?. The final combination is explained in the Collected Wisdom of World Five. These maps are considered accurate.