Jump to navigation
Jump to search
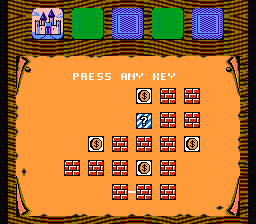
One of the between-level maps. The white lines between blocks indicate your route.
(→Characters: moved Characters to Gauntlet/Characters) |
(Corrected a few typos/misspellings.) |
||
| (10 intermediate revisions by one other user not shown) | |||
| Line 1: | Line 1: | ||
{{ | {{Header Nav|game=Gauntlet (NES)}} | ||
[[Image:Gauntlet NES map example.png|frame|One of the between-level maps. The white lines between blocks indicate your route.]] | |||
Unlike [[Gauntlet|the original Gauntlet]], this game has a fixed set of 100 levels and a definite ending. The levels are divided into five worlds. | |||
The | |||
At the end of each level a map of the world is shown. You can use this map to chart your progress and see which rooms are connected together. Some rooms have more than one exit, and not all rooms are connected. The treasure rooms are shown with a $ in the map. Clue rooms which contain a clue to the final combination are shown with ?. The final combination is explained in the Collected Wisdom of World Five. These maps are considered accurate. | |||
{{Footer Nav|game=Gauntlet (NES)|nextpage=World 1}} | |||
Clue rooms which contain a clue to the final combination are shown with | |||
?. The final | |||
Five. These maps are considered accurate. | |||
Latest revision as of 19:12, 5 March 2018

Unlike the original Gauntlet, this game has a fixed set of 100 levels and a definite ending. The levels are divided into five worlds.
At the end of each level a map of the world is shown. You can use this map to chart your progress and see which rooms are connected together. Some rooms have more than one exit, and not all rooms are connected. The treasure rooms are shown with a $ in the map. Clue rooms which contain a clue to the final combination are shown with ?. The final combination is explained in the Collected Wisdom of World Five. These maps are considered accurate.