(reorganized sections) |
|||
| Line 1: | Line 1: | ||
{{Header Nav|game=Mega Man X}} | {{Header Nav|game=Mega Man X}} | ||
{{floatingtoc|left}} | |||
[[File:Mega Man X Armored Armadillo Title.png| | [[File:Mega Man X Armored Armadillo Title.png|frame|Armored Armadillo!]] | ||
Armored Armadillo's stage takes place deep underground, and is full of a bunch of robots wanting to meet you. It features a fun sequence where you get to ride on a cart and on top of this, you'll also be able to grab a heart tank and a sub-tank (if you're fast enough, that is). | Armored Armadillo's stage takes place deep underground, and is full of a bunch of robots wanting to meet you. It features a fun sequence where you get to ride on a cart and on top of this, you'll also be able to grab a heart tank and a sub-tank (if you're fast enough, that is). | ||
== | {{-}} | ||
[[File:Mega Man X Arm Arm Cart 1.png| | == Gallery stage == | ||
[[File:Mega Man X Arm Arm Cart 1.png|frame|The first mine cart ride.]] | |||
Begin by going to the right and jumping on the red mine cart. It will immediately accelerate and begin to go down the track. Don't even worry about shooting any enemies; just let the mine cart obliterate anything that steps in its path. Towards the end, however, is a gap, so jump off of the cart as it's about to fall in to make it to safety. | Begin by going to the right and jumping on the red mine cart. It will immediately accelerate and begin to go down the track. Don't even worry about shooting any enemies; just let the mine cart obliterate anything that steps in its path. Towards the end, however, is a gap, so jump off of the cart as it's about to fall in to make it to safety. | ||
{{-}} | {{-}} | ||
[[File:Mega Man X Arm Arm Dig Machine.png|frame|left|Immediately jump back on the wall once the dig machine starts...]] | |||
[[File:Mega Man X Arm Arm Sub-Tank.png|frame|...then collect the Sub-Tank after it heads down the path.]] | |||
Keep going to the right until you come to a larger gap: slide down the left side and once you hit the ground, you'll be greeted by a friendly (but killer) dig machine. Immediately scale the wall again and stay there, having the dig machine pass you. Once it has, drop down and go into the area the dig machine was in; inside, you'll find a nice Sub-Tank. Take it and follow the path the dig machine took, encountering bats and helmet robots a long the way. | Keep going to the right until you come to a larger gap: slide down the left side and once you hit the ground, you'll be greeted by a friendly (but killer) dig machine. Immediately scale the wall again and stay there, having the dig machine pass you. Once it has, drop down and go into the area the dig machine was in; inside, you'll find a nice Sub-Tank. Take it and follow the path the dig machine took, encountering bats and helmet robots a long the way. | ||
<!-- | |||
<gallery mode=packed heights=250px> | <gallery mode=packed heights=250px> | ||
File:Mega Man X Arm Arm Dig Machine.png|Immediately jump back on the wall once the dig machine starts... | File:Mega Man X Arm Arm Dig Machine.png|Immediately jump back on the wall once the dig machine starts... | ||
File:Mega Man X Arm Arm Sub-Tank.png|...then collect the Sub-Tank after it heads down the path. | File:Mega Man X Arm Arm Sub-Tank.png|...then collect the Sub-Tank after it heads down the path. | ||
</gallery> | </gallery> | ||
--> | |||
{{-}} | {{-}} | ||
[[File:Mega Man X Arm Arm Cart 2.png|frame|The second mine cart ride.]] | |||
[[File:Mega Man X Arm Arm Cart 2.png| | |||
Eventually, you'll get to another red mine cart, so jump on this one and enjoy the ride (just let the cart do all of the work). Once you get to the end, you'll come upon another large gap. Make sure you have Flame Wave equipped and then jump down, where you'll land right behind another dig machine. | Eventually, you'll get to another red mine cart, so jump on this one and enjoy the ride (just let the cart do all of the work). Once you get to the end, you'll come upon another large gap. Make sure you have Flame Wave equipped and then jump down, where you'll land right behind another dig machine. | ||
{{-}} | {{-}} | ||
[[File:Mega Man X Arm Arm Destroying Digger.png|frame|left|Start incinerating it with Flame Wave...]] | |||
[[File:Mega Man X Arm Arm Heart Tank.png|frame|...Once it's gone, collect the Heart Tank that's on the ledge.]] | |||
Start shooting it with Flame Wave until it's finally destroyed, then continue down the path, where you'll see a Heart Tank on a ledge. Jump up on the ledge and take it, dropping back down and continuing down the path. It is also possible to slide infront of it, allowing you to get to the Heart Tank without using the Flame Wave | Start shooting it with Flame Wave until it's finally destroyed, then continue down the path, where you'll see a Heart Tank on a ledge. Jump up on the ledge and take it, dropping back down and continuing down the path. It is also possible to slide infront of it, allowing you to get to the Heart Tank without using the Flame Wave | ||
<!-- | |||
<gallery mode=packed heights=250px> | <gallery mode=packed heights=250px> | ||
File:Mega Man X Arm Arm Destroying Digger.png|Start incinerating it with Flame Wave. | File:Mega Man X Arm Arm Destroying Digger.png|Start incinerating it with Flame Wave. | ||
File:Mega Man X Arm Arm Heart Tank.png|Once it's gone, collect the Heart Tank that's on the ledge. | File:Mega Man X Arm Arm Heart Tank.png|Once it's gone, collect the Heart Tank that's on the ledge. | ||
</gallery> | </gallery> | ||
--> | |||
{{-}} | {{-}} | ||
[[File:Mega Man X Arm Arm Cart 3.png|frame|Last ride.]] | |||
[[File:Mega Man X Arm Arm Cart 3.png| | |||
You'll come upon the last red mine cart, so jump on it and sit back (yet again). At the end of the track, you'll see some robot birds: this means that the exit is near, so start shooting the birds and prepare yourself for a long jump. Once you get to the end of the track, the cart will fly off; immediately jump, which will cause you to land on a ledge (or a wall) on the other side of the area. Step into the dungeon and prepare to fight Armored Armadillo. | You'll come upon the last red mine cart, so jump on it and sit back (yet again). At the end of the track, you'll see some robot birds: this means that the exit is near, so start shooting the birds and prepare yourself for a long jump. Once you get to the end of the track, the cart will fly off; immediately jump, which will cause you to land on a ledge (or a wall) on the other side of the area. Step into the dungeon and prepare to fight Armored Armadillo. | ||
{{-}} | {{sidebar | ||
==Armored Armadillo== | |float=left | ||
|width=256px | |||
|title=Stage interactions | |||
|contents=If you defeated Boomer Kuwanger already, in this section of the stage there will be many more bird-robots. | |||
}}{{-}} | |||
==Maverick boss: Armored Armadillo== | |||
This guy should be a pushover with his weakness, the Electric Spark, but his annoying rolling attack may sometimes cause problems. He'll start the fight off by rolling into a ball and crashing around the room, which is one of his two basic attacks. In this form, he moves fast, but his pattern is easy to spot (he'll go across the room in a diagonal pattern) and his movements are easy to dodge. Eventually, he'll go back into his normal form, so shoot him with the E. Spark, and watch as his armor disappears! | This guy should be a pushover with his weakness, the Electric Spark, but his annoying rolling attack may sometimes cause problems. He'll start the fight off by rolling into a ball and crashing around the room, which is one of his two basic attacks. In this form, he moves fast, but his pattern is easy to spot (he'll go across the room in a diagonal pattern) and his movements are easy to dodge. Eventually, he'll go back into his normal form, so shoot him with the E. Spark, and watch as his armor disappears! | ||
| Line 47: | Line 51: | ||
{{-}} | {{-}} | ||
<gallery | <gallery widths=256px heights=224px> | ||
File:Mega Man X Arm Arm Fight Start.png|The beginning of the fight; shoot him once with the E. Spark to make his armor disappear. | File:Mega Man X Arm Arm Fight Start.png|The beginning of the fight; shoot him once with the E. Spark to make his armor disappear. | ||
File:Mega Man X Arm Arm Corner.png|Hide in one of the corners once he starts shooting his plasma bolts. | File:Mega Man X Arm Arm Corner.png|Hide in one of the corners once he starts shooting his plasma bolts. | ||
| Line 53: | Line 57: | ||
{{-}} | {{-}} | ||
== | === Special weapon=== | ||
Rolling Shield! This fires a large round orb at enemies, and on contact with one, will explode. If it hits a wall, it will simply bounce off the wall. | Rolling Shield! This fires a large round orb at enemies, and on contact with one, will explode. If it hits a wall, it will simply bounce off the wall. | ||
<gallery> | |||
File:Mega Man X Rolling Shield.png|You get Rolling Shield! | |||
File:Mega Man X Rolling Shield Shot.png|Rolling Shield demo. | |||
</gallery> | |||
[[File:Mega Man X Arm Arm Pass Code.png|frame|center|Password so far: 7752 1532 7654]] | |||
[[File:Mega Man X Arm Arm Pass Code.png|frame| | |||
{{Footer Nav|game=Mega Man X|prevpage=Spark Mandrill|nextpage=Launch Octopus}} | {{Footer Nav|game=Mega Man X|prevpage=Spark Mandrill|nextpage=Launch Octopus}} | ||
Revision as of 07:36, 11 May 2018

Armored Armadillo's stage takes place deep underground, and is full of a bunch of robots wanting to meet you. It features a fun sequence where you get to ride on a cart and on top of this, you'll also be able to grab a heart tank and a sub-tank (if you're fast enough, that is).
Gallery stage

Begin by going to the right and jumping on the red mine cart. It will immediately accelerate and begin to go down the track. Don't even worry about shooting any enemies; just let the mine cart obliterate anything that steps in its path. Towards the end, however, is a gap, so jump off of the cart as it's about to fall in to make it to safety.


Keep going to the right until you come to a larger gap: slide down the left side and once you hit the ground, you'll be greeted by a friendly (but killer) dig machine. Immediately scale the wall again and stay there, having the dig machine pass you. Once it has, drop down and go into the area the dig machine was in; inside, you'll find a nice Sub-Tank. Take it and follow the path the dig machine took, encountering bats and helmet robots a long the way.

Eventually, you'll get to another red mine cart, so jump on this one and enjoy the ride (just let the cart do all of the work). Once you get to the end, you'll come upon another large gap. Make sure you have Flame Wave equipped and then jump down, where you'll land right behind another dig machine.


Start shooting it with Flame Wave until it's finally destroyed, then continue down the path, where you'll see a Heart Tank on a ledge. Jump up on the ledge and take it, dropping back down and continuing down the path. It is also possible to slide infront of it, allowing you to get to the Heart Tank without using the Flame Wave

You'll come upon the last red mine cart, so jump on it and sit back (yet again). At the end of the track, you'll see some robot birds: this means that the exit is near, so start shooting the birds and prepare yourself for a long jump. Once you get to the end of the track, the cart will fly off; immediately jump, which will cause you to land on a ledge (or a wall) on the other side of the area. Step into the dungeon and prepare to fight Armored Armadillo.
Maverick boss: Armored Armadillo
This guy should be a pushover with his weakness, the Electric Spark, but his annoying rolling attack may sometimes cause problems. He'll start the fight off by rolling into a ball and crashing around the room, which is one of his two basic attacks. In this form, he moves fast, but his pattern is easy to spot (he'll go across the room in a diagonal pattern) and his movements are easy to dodge. Eventually, he'll go back into his normal form, so shoot him with the E. Spark, and watch as his armor disappears!
Now he's very vulnerable, and he'll resort to shooting some plasma bolts from his cannon. Simply scale one of the walls and hide in the corner until he's done, in which he'll then go into his ball form and attempt to crash into you. When he's heading toward you, just drop down and stay there, and dash out of the way when necessary. He'll then come out of this form, so shoot him again with his weakness. He'll then go back into his ball form and then come out of it again, repeating this until he's finally defeated. It should also be noted that he cannot be harmed when he's in his ball form, so just shoot him when he's out of it.
-
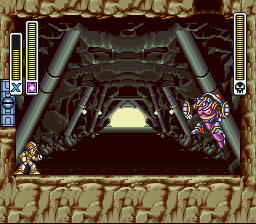
The beginning of the fight; shoot him once with the E. Spark to make his armor disappear.
-
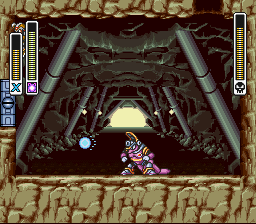
Hide in one of the corners once he starts shooting his plasma bolts.


Special weapon
Rolling Shield! This fires a large round orb at enemies, and on contact with one, will explode. If it hits a wall, it will simply bounce off the wall.
-

You get Rolling Shield!
-

Rolling Shield demo.


