Muschebear (talk | contribs) m (→Map A) |
Muschebear (talk | contribs) (→Map A) |
||
| Line 2: | Line 2: | ||
=== Map A === | === Map A === | ||
[[Image: | [[Image:SMB2 World 1-1 Map.png|thumb|right|Click on the image for the unedited NES map]] | ||
[[Image:SMB2 World1-1 mapA.png|left]] | [[Image:SMB2 World1-1 mapA.png|left]] | ||
Climb mountains, cross valleys and oceans, and brave the darkness. You're off on a wild and crazy adventure. Some powerful enemies are waiting for you to appear, so watch your every step! | Climb mountains, cross valleys and oceans, and brave the darkness. You're off on a wild and crazy adventure. Some powerful enemies are waiting for you to appear, so watch your every step! | ||
Revision as of 04:09, 5 February 2011
Map A

Climb mountains, cross valleys and oceans, and brave the darkness. You're off on a wild and crazy adventure. Some powerful enemies are waiting for you to appear, so watch your every step!
If you're new to the game and just starting out, give each character a try and get to know their movements at the very beginning of the game. Once you pass through the door below, the real fast-action run starts. The first area will be an easy win.
Map B
Part 1
(1) Enter Sub-space. Climb the ivy to reach the hilltop. Grab the grass closest to you, and you will be rewarded with a potion that sends you into Sub-space. When you get there, look for a power-up Mushroom.
(2) Jump carefully As you approach this waterfall, you'll see two logs falling at different intervals. You can get to the other side by hitching a ride on them, but watch out. Timing is critical; don't jump until you see the tip of the first log. Watch your footing as you cross over to the other side.
Part 2
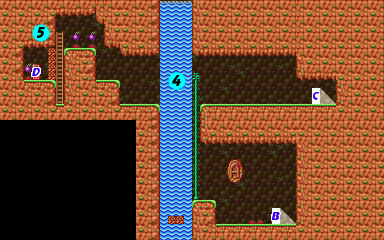
(3) Discover another route. Pass through the door labeled B and you will arrive at the bottom of Map C. On the second floor, the door C takes you to the bottom of the vine that leads to Map D, but by blasting the wall to the left, you can take a shortcut to Map E.
A second mushroom. Once you exit through door C and return to this part of the map, you will find a potion in the first tuft of grass to the right of the door. Deposit it between the patches of grass to the right to find the second Mushroom, as well as a great opportunity to collect coins for the Bonus Game.
Another short-cut. It's even possible to by pass Map C altogether! You will see a Tweeter bouncing around the outside of door B. Pick him up and drop him on the log bridge to the left. Then jump on top of him and squat down for a Power Jump. When Tweeter makes a really high jump, leap off of him to the ledge above. If you ride him to the left, you will arrive near some grass that contains a 1-up!
Map C

(4) Dash across the waterfall. Pretty soon you're going to run up against a roaring waterfall. Any one of the characters should be able to cross it, some more easily than others, and find a shortcut to the mini-boss. Just be sure that you are running fast before you jump; miss the other side you'll lose a life, even if your health meter is full.
(5) Blast the wall away! You can't get to the shortcut until you blast through this wall. Pull out the patch of grass on your right and you'll get a bomb. When it starts to flash, throw it. Be careful though, if you're timing's not right, the wall will still be standing. Once you gain access to door D, pass through it and you will arrive on the right side of Map E. From there, you'll need to leap up to the top of the mountains, and run to the left, even though your character will disappear off the top of the screen.
Map D

(6) Beware of Hoopster. You'll start at the bottom of this map, and you'll need to jump your way up to the vines at the top. Power jumps are helpful here. Once you reach the vines, watch out for Hoopster when you leap from one vine to another. If he's above you, he won't let you climb up. But he can help; jump when he's below you and get a free lift.
Map E
(7) Heeeere's Birdo! The first mini-boss is Birdo. She sometimes, but not always, spits eggs to attack you. If you want to beat this bothersome bird, hop on top of a flying egg and pick it up by pressing ![]() . Once you've caught the egg, stand a safe distance away and wait for your chance to strike. Hit her three times and she'll release the crystal that lets you pass through the mouth of the gate and advance to World 1-2.
. Once you've caught the egg, stand a safe distance away and wait for your chance to strike. Hit her three times and she'll release the crystal that lets you pass through the mouth of the gate and advance to World 1-2.


