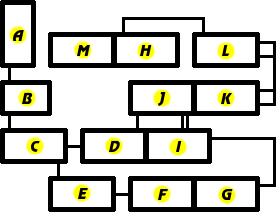
| Section | Map | Legend | Enemies |
|---|---|---|---|
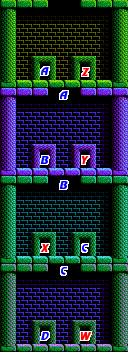
| A | See below | A,B,C,D: Correct doors W,X,Y,Z: Incorrect doors |
|
| B |  |
D: From section A E: To section C |
Cerberus |
| C |  |
E: To section B F: Nectar G: Info H: To section E V: To section D |
Bat |
| D |  |
V: To section C U: To Template:~ (one-way) T: To section J |
Eagle |
| E |  |
H: To section C I: Info J: Password K: To section F |
Bat |
| F |  |
K: To section E | Shadow Eagle Monkey |
| G |  |
L: To section H (right side) M: To section I N: To section H (right side) O: Spring of Recovery |
Eagle Giant Snake |
| H |  |
L: To section G (outer) N: To section G (inner) P: Empty T: From section L U: Info V: To section M |
Ghost |
| I |  |
M: To section G Q: To section J (upper) R: To section J (lower) |
Eagle |
| J |  |
Q: To section I (upper) R: To section I (lower) S: Info T: To section D |
Bat Ghost |
| K |  |
Q: To section L (lower) R: To section L (upper) |
Bat Ghost |
| L |  |
Q: To section K (lower) R: To section K (upper) S: Nectar T: To section H |
Eagle |
| M |  |
V: To section H (left) P: To section H (right) W: To Template:~ |
Big Amazon Small Amazon |

Descending into Tartarus
Choosing the correct door
When you first arrive in Tartarus, you will descend into the top room of section A, shown to the right. On this map, as with all of the other maps above, red letters indicate doors that you should avoid going through, while blue letter indicate door worth exploring. In the case of section A, you must correctly guess which of two doors is the correct door to enter through four rooms. Choosing the correct door will advance you to the next room.
If you choose to enter any of the wrong doors, you will be taken to a fight against a stronger version of a boss you previously fought. If you enter through door Z, you must fight a golden Cyclops. Behind door Y is another version of the Graeae witches. If you pass through door X, you will find three short Amazons and one tall Amazon. And behind door W is not one, but two Dark Pegasuses. If you go through any of those doors, you will be forced to defeat whatever is on the other side before a door will open on the right and allow you to return to the room you came from.
In order to guess the correct doors, you must recall a hint that was given to you in Template:~. A woman told you that "Left, Left, Right, Left" was the path you needed to take to enter Tartarus. Indeed, if you enter doors A, B, C, and D, you will arrive in section B which contains a fight against a new boss, Cerberus. Cerberus behaves a bit like the Bull and the Lion; he stands back until you get close enough to him, and then he charges you. The Cerberus in this game is a little inaccurate, in that it only has two heads. It takes four hits to defeat each head. However, if you do not defeat the second head in a short enough period of time, the first head will grow back!
Defeating Cerberus can be a bit of a challenge. The best strategy is to stand in one place, and jump in advance of his charge. Strike him on the head with your sword so he bounces back, and jump up in the air almost as soon as you land to prepare for his next movement. If you get the timing down, you should be able to strike him continuously in the head eight times while simply jumping in place. Once he is defeated, door E will open on the left side of the room, allowing you to advance to section C.