| style="background:black" |[[File:Tower_of_Druaga_Green_ring.png]]||This ring will alow you to pass through a [[File:Tower_of_Druaga_Will'o_Wisp_Blue.png|16px]]. A valuable treasure indeed.
| style="background:black" |[[File:Tower_of_Druaga_Green_ring.png]]||This ring will allow you to pass through a [[File:Tower_of_Druaga_Will'o_Wisp_Blue.png|16px]]. A valuable treasure indeed.
|-
|-
! AC
! AC
| Stand still for any period of time approximately 5 to 10 seconds in length. The sword may NOT be drawn.
| Stand still for 5-10 seconds.
|-
|-
! GB
! GB
Line 40:
Line 40:
|-
|-
! AT
! AT
| Defeat the [[File:Tower_of_Druaga_Knight_Mirror.png|16px]] within five seconds of collecting the [[File:Tower_of_Druaga_Key.png]].
| Defeat the [[File:Tower_of_Druaga_Knight_Mirror.png|16px]], then collect the [[File:Tower_of_Druaga_Key.png]]. All must be done without defeating the [[File:Tower_of_Druaga_Ghost_Druid.png|16px]].
|-
|-
! ATp
! ATp
| You must use the pickax to destroy the walls in such a way that a [[File:Tower_of_Druaga_Will'o_Wisp_Blue.png|16px]] gets stuck spinning around one single pillar.
| Use the pickaxe to destroy a wall so that a [[File:Tower_of_Druaga_Will'o_Wisp_Blue.png|16px]] gets stuck spinning around a pillar.
|}
|}
{{-}}
{{-}}
Line 53:
Line 53:
! colspan="2" | <font color="red">Treasure: Potion of Energy Drain</font>
! colspan="2" | <font color="red">Treasure: Potion of Energy Drain</font>
|-
|-
| style="background:black" |[[File:Tower_of_Druaga_Potion_energy_drain.png]]||Once again, this is a treasure that you should avoid at all costs. Do not collect this.
| style="background:black" |[[File:Tower_of_Druaga_Potion_energy_drain.png]]||Once again, this is a treasure that you should avoid at all costs. Do not collect this.
|-
|-
! AC
! AC
| Enter this code on the joystick: {{nes|Right|Dpad}} {{nes|Right|Dpad}} {{nes|Right|Dpad}} {{nes|Right|Dpad}} {{nes|Right|Dpad}} {{nes|Right|Dpad}} {{nes|Right|Dpad}} {{nes|Left|Dpad}} {{nes|Right|Dpad}} {{nes|Right|Dpad}} {{nes|Right|Dpad}} {{nes|Right|Dpad}} {{nes|Right|Dpad}} {{nes|Right|Dpad}} {{nes|Right|Dpad}}
| Tap {{nes|Right|Dpad}} x7 {{nes|Left|Dpad}} x1 {{nes|Right|Dpad}} x7
|-
|-
! GB
! GB
| Enter this code on the D-Pad: {{gb|Right|Dpad}} {{gb|Right|Dpad}} {{gb|Right|Dpad}} {{gb|Right|Dpad}} {{gb|Right|Dpad}}.
| Tap {{gb|Right|Dpad}} x5
|-
|-
! AT
! AT
| The dragon must breath flame from off-screen.
| The dragon must breathe fire from offscreen.
|-
|-
! ATp
! ATp
| A [[File:Tower_of_Druaga_Dragon_Silver.png|16px]] must breath flames such that he destroys three walls in the process.
| Make the [[File:Tower_of_Druaga_Dragon_Silver.png|16px]] breathe fire while he destroys 3 walls in the process.
|}
|}
{{-}}
{{-}}
Line 75:
Line 75:
! colspan="2" | Treasure: Bible
! colspan="2" | Treasure: Bible
|-
|-
| style="background:black" |[[File:Tower_of_Druaga_Bible.png]]||In this world, the Bible is an upgrade to the Book of Light. Possession of this book lights up the floors in the remainder of the tower.
| style="background:black" |[[File:Tower_of_Druaga_Bible.png]]||The Bible is an upgrade to the Book of Light. Possession of this book illuminates the floors in the remainder of the tower.
|-
|-
! AC
! AC
| Defeat every [[File:Tower_of_Druaga_Wizard.png|16px]] before you kill any [[File:Tower_of_Druaga_Slime_Blue.png|16px]].
| Defeat every [[File:Tower_of_Druaga_Wizard.png|16px]] before defeating any [[File:Tower_of_Druaga_Slime_Blue.png|16px]].
|-
|-
! GB
! GB
| Defeat every [[File:Tower_of_Druaga_Wizard.png|16px]]. (It does not matter when you kill a [[File:Tower_of_Druaga_Slime_Blue.png|16px]].)
| Same as AC, but it does not matter if you defeat a [[File:Tower_of_Druaga_Slime_Blue.png|16px]].
|-
|-
! AT
! AT
| You must defeat the enemies in an alternating fashion - [[File:Tower_of_Druaga_Slime_Blue.png|16px]][[File:Tower_of_Druaga_Wizard.png|16px]][[File:Tower_of_Druaga_Slime_Blue.png|16px]][[File:Tower_of_Druaga_Wizard.png|16px]][[File:Tower_of_Druaga_Slime_Blue.png|16px]][[File:Tower_of_Druaga_Wizard.png|16px]][[File:Tower_of_Druaga_Slime_Blue.png|16px]]
| Defeat the enemies in an alternating fashion - [[File:Tower_of_Druaga_Slime_Blue.png|16px]][[File:Tower_of_Druaga_Wizard.png|16px]][[File:Tower_of_Druaga_Slime_Blue.png|16px]][[File:Tower_of_Druaga_Wizard.png|16px]][[File:Tower_of_Druaga_Slime_Blue.png|16px]][[File:Tower_of_Druaga_Wizard.png|16px]][[File:Tower_of_Druaga_Slime_Blue.png|16px]]
|-
|-
! ATp
! ATp
| When the timer reaches 7650 (Namco's special number), 4 [[File:Tower_of_Druaga_Treasure.png]] will appear. At that time, draw your sword and walk towards the chests. Only one of the four chests will allow the sword to appear "above" the chest. All the other chests will obscure the sword. ''Only'' open the chest that allows the sword to be seen.
| When the timer reaches 7650 (Namco's special number), 4 [[File:Tower_of_Druaga_Treasure.png]] will appear. At that time, draw your sword and walk towards the chests. Only one of the four chests will allow the sword to appear "above" the chest. All the other chests will obscure the sword. Only open the chest that allows the sword to be seen.
|}
|}
{{-}}
{{-}}
Line 93:
Line 93:
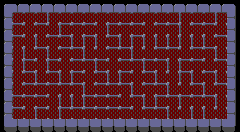
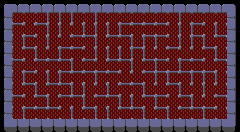
== Floor 24 ==
== Floor 24 ==
[[File:Tower of Druaga Floor 24.png|frame|Floor 24]]
[[File:Tower of Druaga Floor 24.png|frame|Floor 24]]
| style="background:black" |[[File:Tower_of_Druaga_Balance.png]]||Collection of this treasure is vital for the collection of the Hyper Gauntlet. Without it, the [[File:Tower_of_Druaga_Treasure.png]] on Floor 26 will become the Evil Gauntlet, which prevents Gil from drawing his sword.
| style="background:black" |[[File:Tower_of_Druaga_Balance.png]]||Collection of this treasure is vital for the collection of the Hyper Gauntlet. Without it, the [[File:Tower_of_Druaga_Treasure.png]] on Floor 26 will become the Evil Gauntlet, which prevents Gil from drawing his sword.
|-
|-
! AC
! AC
| Swing your sword at where you started.
| Swing the sword at the starting point.
|-
|-
! AT
! AT
| Pass through a [[File:Tower_of_Druaga_Will'o_Wisp_Blue.png|16px]] from the bottom, moving up.
| Cross paths with a [[File:Tower_of_Druaga_Will'o_Wisp_Blue.png|16px]] while facing up.
|-
|-
! ATp
! ATp
| You must open the [[File:Tower_of_Druaga_Door.png]] from the exact same direction that you collected the [[File:Tower_of_Druaga_Key.png]] from (e.g. if you walked left to collect the key, you must walk left to open the door.) You may need to use your pickax.
| Open the [[File:Tower_of_Druaga_Door.png]] from the same direction you collected the [[File:Tower_of_Druaga_Key.png]] from. You may need to use the pickaxe.
|}
|}
{{-}}
{{-}}
Line 118:
Line 118:
! GB
! GB
| Ironically, there is a normal Helmet on this level that is not found in other versions. Defeat every enemy to collect it.
| Ironically, there is a normal Helmet on this level that is not found in other versions. Defeat every enemy to collect it.
|-
! AT
| Stay at the same column of the [[File:Tower_of_Druaga_Door.png]], and draw the sword until the timer turns red. You will find an empty treasure box.
|-
|-
! ATp
! ATp
Line 133:
Line 136:
|-
|-
! AC
! AC
| First collect the [[File:Tower_of_Druaga_Key.png]]. Then defeat a [[File:Tower_of_Druaga_Druid.png|16px]]. (Alternatively, you may kill up to three [[File:Tower_of_Druaga_Druid.png|16px]], but not all four, and then collect the [[File:Tower_of_Druaga_Key.png]].)
| Collect the [[File:Tower_of_Druaga_Key.png]], then defeat a [[File:Tower_of_Druaga_Druid.png|16px]]. (Alternatively, you may defeat up to 3 [[File:Tower_of_Druaga_Druid.png|16px]], but not all 4, then collect the [[File:Tower_of_Druaga_Key.png]].)
|-
|-
! GB
! GB
| Same as AC, but you must collect the [[File:Tower_of_Druaga_Key.png]] before defeating any [[File:Tower_of_Druaga_Druid.png|16px]].
| Same as AC, but collect the [[File:Tower_of_Druaga_Key.png]] before defeating any [[File:Tower_of_Druaga_Druid.png|16px]].
|-
|-
! FC
! FC
| Collect the [[File:Tower_of_Druaga_Key.png]] before killing all of the [[File:Tower_of_Druaga_Druid.png|16px]] to make the [[File:Tower_of_Druaga_Treasure.png]] appear.
| Collect the [[File:Tower_of_Druaga_Key.png]] before defeating all of the [[File:Tower_of_Druaga_Druid.png|16px]].
|-
|-
! AT
! AT
| Do not block the spells from any [[File:Tower_of_Druaga_Druid.png|16px]] with your shield until you open the [[File:Tower_of_Druaga_Door.png]].
| Open the [[File:Tower_of_Druaga_Door.png]] without blocking any spells.
|-
|-
! ATp
! ATp
| You must put out the flames that are cast by any [[File:Tower_of_Druaga_Sorcerer.png|16px]] with your sword for a total of five times.
| Extinguish a flame 5 times.
|}
|}
{{-}}
{{-}}
Line 155:
Line 158:
! colspan="2" | Treasure: Red Necklace
! colspan="2" | Treasure: Red Necklace
|-
|-
| style="background:black" |[[File:Tower_of_Druaga_Red_necklace.png]]||This necklace will allow Gil to pass harmlessly through the fire of a [[File:Tower_of_Druaga_Sorcerer.png|16px]]. However, the spells themselves (unless blocked) and the [[File:Tower_of_Druaga_Sorcerer.png|16px]], if touched, are still lethal.
| style="background:black" |[[File:Tower_of_Druaga_Red_necklace.png]]||This necklace will allow Gil to pass harmlessly through the fire of a [[File:Tower_of_Druaga_Sorcerer.png|16px]] and [[File:Tower_of_Druaga_Slime_Dark_Yellow.png|16px]]. However, the spells themselves (unless blocked), [[File:Tower_of_Druaga_Sorcerer.png|16px]], and [[File:Tower_of_Druaga_Slime_Dark_Yellow.png|16px]], if touched, can still kill Gil.
|-
|-
! AC
! AC
| With the possession of the Green Ring, pass through a [[File:Tower_of_Druaga_Will'o_Wisp_Blue.png|16px]]
| Cross paths with a [[File:Tower_of_Druaga_Will'o_Wisp_Blue.png|16px]].
|-
|-
! GB
! GB
| Pass through a specific [[File:Tower_of_Druaga_Will'o_Wisp_Red.png|16px]]. Gil will take damage doing this, as the Green Ring will not protect him from [[File:Tower_of_Druaga_Will'o_Wisp_Red.png|16px]].
| Cross paths with a [[File:Tower_of_Druaga_Will'o_Wisp_Red.png|16px]]. Gil will take damage doing this, as the Green Ring will not protect him from [[File:Tower_of_Druaga_Will'o_Wisp_Red.png|16px]].
|-
|-
! AT
! AT
| Use the Silver Pickax until it breaks.
| Use the Silver Pickaxe until it breaks.
|-
|-
! ATp
! ATp
| Pass through the slow moving [[File:Tower_of_Druaga_Will'o_Wisp_Blue.png|16px]].
| Cross paths with the slow moving [[File:Tower_of_Druaga_Will'o_Wisp_Blue.png|16px]].
|}
|}
{{-}}
{{-}}
Line 180:
Line 183:
|-
|-
! AC
! AC
| Stand on the [[File:Tower_of_Druaga_Door.png]] and draw your sword.
| Stand on the [[File:Tower_of_Druaga_Door.png]] and draw the sword.
|-
|-
! GB
! GB
Line 186:
Line 189:
|-
|-
! AT
! AT
| Remain in contact with a [[File:Tower_of_Druaga_Roper_Green.png|16px]] for approximately 3 to 5 seconds until the [[File:Tower_of_Druaga_Treasure.png]] appears.
| Remain in contact with a [[File:Tower_of_Druaga_Roper_Green.png|16px]] for 3-5 seconds.
|-
|-
! ATp
! ATp
| A [[File:Tower_of_Druaga_Roper_Green.png|16px]] must pass through the [[File:Tower_of_Druaga_Door.png]] while you are standing on it. Ropers cannot kill you if you do not drawn the sword, they can only zap your energy down to 1. If you draw the sword after that they can finish you off. The same with Druaga.
| Cross paths with a [[File:Tower_of_Druaga_Roper_Green.png|16px]] while standing on the [[File:Tower_of_Druaga_Door.png]].
|}
|}
{{-}}
{{-}}
Line 208:
Line 211:
|-
|-
! AT
! AT
| From the starting position, draw your sword, and press {{nes|Start}}. (Press it once more to unpause the game, and you should collect the Gold Pickax immediately.)
| Draw the sword, press {{nes|Start}} to pause the game, then press again to unpause.
|-
|-
! ATp
! ATp
| Use up the Silver pickax if you have it. Then walk to the lone pillar in the middle of the stage, and walk around it in a clockwise direction three times. You can still obtain this treasure if you lost the silver pickax previously.
| Destroy the Silver Pickaxe if you have it. Then, walk to the pillar in the middle of the stage and walk around it in a clockwise direction 3 times. (You can still obtain this treasure if you lost the Silver Pickaxe previously)
|}
|}
{{-}}
{{-}}
Line 224:
Line 227:
|-
|-
! AC
! AC
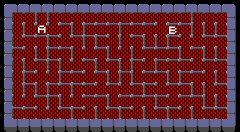
| Walk over point A or point B (as illustrated on the map) three times.
| Walk over point A or point B (as illustrated on the map) three times. If you walk over point A, it appears you must walk up and down to get it to work.
|-
|-
! GB
! GB
| Exit the stage normally. Then defeat the giant dragon mini-boss. Beware the dragon's flames which also extend back to surround its body.
| Exit the floor normally. Then defeat the giant dragon mini-boss. Beware the dragon's flames which also extend back to surround its body.
|-
|-
! AT
! AT
| Do not use your Pickax even once until the [[File:Tower_of_Druaga_Door.png]] is opened.
| Do not use your pickaxe even once until the [[File:Tower_of_Druaga_Door.png]] is open.
|-
|-
! ATp
! ATp
| You must stand still, draw your sword , and manage to defeat a [[File:Tower_of_Druaga_Druid.png|16px]]. Try to set yourself up so that you are standing in front of a [[File:Tower_of_Druaga_Druid.png|16px]] as it is appearing, and let go of the joystick before you draw your sword.
| Defeat a [[File:Tower_of_Druaga_Druid.png|16px]] while standing still.
The Bible is an upgrade to the Book of Light. Possession of this book illuminates the floors in the remainder of the tower.
AC
Defeat every before defeating any .
GB
Same as AC, but it does not matter if you defeat a .
AT
Defeat the enemies in an alternating fashion -
ATp
When the timer reaches 7650 (Namco's special number), 4 will appear. At that time, draw your sword and walk towards the chests. Only one of the four chests will allow the sword to appear "above" the chest. All the other chests will obscure the sword. Only open the chest that allows the sword to be seen.
Collection of this treasure is vital for the collection of the Hyper Gauntlet. Without it, the on Floor 26 will become the Evil Gauntlet, which prevents Gil from drawing his sword.
AC
Swing the sword at the starting point.
AT
Cross paths with a while facing up.
ATp
Open the from the same direction you collected the from. You may need to use the pickaxe.
Ironically, there is a normal Helmet on this level that is not found in other versions. Defeat every enemy to collect it.
AT
Stay at the same column of the , and draw the sword until the timer turns red. You will find an empty treasure box.
ATp
There is a treasure on this floor but it only appears when you've exited the floor. Thus, it is impossible to claim. But using a GameShark to always obtain a floor's treasure on the PlayStation it turns out to be just another pair of Jet Boots.
This magic gauntlet allows Gil to draw his sword much quicker than before. If you did not collect the Balance, the treasure will contain the Evil Gauntlet and prevent you from drawing your sword, which must never be picked up. You will lose it while you are zapped to a lower floor.
AC
Collect the , then defeat a . (Alternatively, you may defeat up to 3 , but not all 4, then collect the .)
GB
Same as AC, but collect the before defeating any .
This necklace will allow Gil to pass harmlessly through the fire of a and . However, the spells themselves (unless blocked), , and , if touched, can still kill Gil.
AC
Cross paths with a .
GB
Cross paths with a . Gil will take damage doing this, as the Green Ring will not protect him from .
Treasure: Gate Detection Book (a. k. a. Book of Gates)
Without this book, the real won't appear on Floor 29 and the on Floor 30 won't be visible to you so you will unable to advance to Floor 31. The possession of this book allows the doors in the remainder of the tower become visible.
AC
Stand on the and draw the sword.
GB
Similar to AC, but may differ slightly; it didn't appear to work at first.
This pickaxe is considerably sturdy. This can also destroy walls. It has unlimited uses. If it is used on outer walls, it's lost for good. Causes a to appear on the 52nd floor later on.
AC
Spin the joystick clockwise 3 times in this order:
GB
There are two s on this level, but only one is real and one is fake. You must stand on the real , and return to your original starting position. Since you don't know which one is real, you need to try each one.
AT
Draw the sword, press to pause the game, then press again to unpause.
ATp
Destroy the Silver Pickaxe if you have it. Then, walk to the pillar in the middle of the stage and walk around it in a clockwise direction 3 times. (You can still obtain this treasure if you lost the Silver Pickaxe previously)
Possession of this potion is required to open the on Floor 31.
AC
Walk over point A or point B (as illustrated on the map) three times. If you walk over point A, it appears you must walk up and down to get it to work.
GB
Exit the floor normally. Then defeat the giant dragon mini-boss. Beware the dragon's flames which also extend back to surround its body.
AT
Do not use your pickaxe even once until the is open.