| Pass through a [[File:Tower_of_Druaga_Will'o_Wisp_Red.png|16px]], pick up a [[File:Tower_of_Druaga_Key.png]], and then pass through a [[File:Tower_of_Druaga_Will'o_Wisp_Red.png|16px]] once more. - Note: it might not be just "any" [[File:Tower_of_Druaga_Will'o_Wisp_Red.png|16px]]; just in case, pass through all of them.
| Pass through a [[File:Tower_of_Druaga_Will'o_Wisp_Red.png|16px]], pick up a [[File:Tower_of_Druaga_Key.png]], and then pass through a [[File:Tower_of_Druaga_Will'o_Wisp_Red.png|16px]] once more. - Note: it might not be just "any" [[File:Tower_of_Druaga_Will'o_Wisp_Red.png|16px]]; just in case, pass through all of them.
|-
! GB
| The method is actually the same as the AC reveal method. It's just helpful to know that the "red" wisps are the ones with a horizontal line running through them.
|-
|-
! AT
! AT
Line 62:
Line 59:
|-
|-
! ATp
! ATp
| Defeat the [[File:Tower_of_Druaga_Ghost_Wizard.png|16px]], pass through the [[File:Tower_of_Druaga_Door.png]], cross paths with a [[File:Tower_of_Druaga_Dragon_Silver.png|16px]], open the [[File:Tower_of_Druaga_Door.png]], cross paths with a quick [[File:Tower_of_Druaga_Will'o_Wisp_Red.png|16px]], and cross paths with a slow [[File:Tower_of_Druaga_Will'o_Wisp_Red.png|16px]].
|
# Defeat the [[File:Tower_of_Druaga_Ghost_Wizard.png|16px]].
# Pass through the [[File:Tower_of_Druaga_Door.png]].
# Pass through the [[File:Tower_of_Druaga_Dragon_Silver.png|16px]].
# Open the [[File:Tower_of_Druaga_Door.png]].
# Cross paths with a fast [[File:Tower_of_Druaga_Will'o_Wisp_Red.png|16px]].
# Cross paths with a slow [[File:Tower_of_Druaga_Will'o_Wisp_Red.png|16px]].
|}
|}
{{-}}
{{-}}
Line 78:
Line 81:
|-
|-
! GB
! GB
| Just in case you truly want to make this potion appear, the correct order is listed here. Note that there are two types of slimes, one that is round on top, and one that has a point on top. First you kill all of the round slimes in the order white, black, gray. Then you kill all of the point slimes in the order gray, white, black.
| Defeat all of the round slimes in order, white, black, gray, then defeat all of the point slimes in order, gray, white, black.
|-
|-
! AT
! AT
| Simply stand on the starting point for a number of seconds. In other words, move.
| Stand on the starting point for several seconds.
|-
|-
! ATp
! ATp
| The deadly potion will appear without condition right from the start. You must move ''immediately'' in order to avoid collecting it.
| The [[File:Tower of Druaga Treasure.png]] will appear right from the start. Move ''immediately'' in order to avoid collecting it.
|}
|}
{{-}}
{{-}}
Line 97:
Line 100:
! AC
! AC
| Defeat the magicians on this floor in the exact order that they are listed above (Red Knights are irrelevant).
| Defeat the magicians on this floor in the exact order that they are listed above (Red Knights are irrelevant).
|-
! FC
| Same as AC, with the only exception is that all four magicians will be the same alternating colors as you go.
|-
|-
! GB
! GB
Line 102:
Line 108:
|-
|-
! AT
! AT
| Collect the [[File:Tower_of_Druaga_Key.png]] without blocking a single spell.
| Collect the [[File:Tower_of_Druaga_Key.png]] without blocking any spells.
|-
|-
! ATp
! ATp
| Defeat the magicians in the following order: [[File:Tower_of_Druaga_Druid.png|16px]] [[File:Tower_of_Druaga_Wizard.png|16px]] [[File:Tower_of_Druaga_Sorcerer.png|16px]] [[File:Tower_of_Druaga_Mage.png|16px]]
| Defeat the magicians in the following order: [[File:Tower_of_Druaga_Druid.png|16px]][[File:Tower_of_Druaga_Wizard.png|16px]][[File:Tower_of_Druaga_Sorcerer.png|16px]][[File:Tower_of_Druaga_Mage.png|16px]]
|}
|}
{{-}}
{{-}}
Line 115:
Line 121:
! colspan="2" | Treasure: Excalibur
! colspan="2" | Treasure: Excalibur
|-
|-
| style="background:black" |[[File:Tower_of_Druaga_Excalibur.png]]||The Excalibur is the best sword in the game, and this sword does in fact increase your strength. However, the treasure is locked with a magical spell. Should you attempt to open the [[File:Tower_of_Druaga_Treasure.png]] without the Antidote, you will merely find the Death Potion. If you have not obtained the Balance, this treasure will contain the Evil Sword which will do minimal damage to enemies and avoid obtaining it. You will lose it for good when you are zapped to a lower floor.
| style="background:black" |[[File:Tower_of_Druaga_Excalibur.png]]||The Excalibur is the best sword in the game, and this sword does in fact increase your strength. However, the treasure is locked with a magical spell. Should you attempt to open the [[File:Tower_of_Druaga_Treasure.png]] without the Antidote, the timer will count down much faster which gives you less time to complete the floor. If you have not obtained the Balance, this treasure will contain the Evil Sword which will do minimal damage to enemies and avoid obtaining it. You will lose it for good when you are zapped to a lower floor.
|-
|-
! colspan="2" | Treasure: Antidote
! colspan="2" | Treasure: Antidote
Line 125:
Line 131:
|-
|-
! FC
! FC
| Same as in AC. The only difference is that the Evil Sword does increase your strength like the Excalibur. You cannot defeat Druaga with the wrong sword though.
| Same as AC. The only difference is that the Evil Sword does increase your strength like the Excalibur. You cannot defeat Druaga with the wrong sword though.
|-
|-
! GB
! GB
| The order in which you defeat the knights does not matter, but you must not kill the knight which represents the red knight: the dark grey one that moves quickly, and does not have horns.
| The order in which you defeat the knights does not matter, but you must not defeat the Red Knight: the dark gray one that moves quickly, and does not have horns.
|-
|-
! AT
! AT
| Repeatedly tap direction keys shortly as you work your way to collect the [[File:Tower_of_Druaga_Key.png]].
| Tap direction keys quickly as you work your way to collect the [[File:Tower_of_Druaga_Key.png]].
|-
|-
! ATp
! ATp
| Defeat the knights on this floor in the following order: [[File:Tower_of_Druaga_Knight_Blue.png|16px]] [[File:Tower_of_Druaga_Knight_Black.png|16px]] [[File:Tower_of_Druaga_Knight_Mirror.png|16px]] [[File:Tower_of_Druaga_Knight_High-Power.png|16px]] [[File:Tower_of_Druaga_Lizardman.png|16px]] [[File:Tower_of_Druaga_Knight_Red.png|16px]]. Shake your sword at the [[File:Tower_of_Druaga_Treasure.png]] that recently appeared, this will cause the [[File:Tower_of_Druaga_Treasure.png]] at the start point to appear. Collect the one at the start point first, then the one you shook your sword at.
| Defeat the knights in the following order: [[File:Tower_of_Druaga_Knight_Blue.png|16px]][[File:Tower_of_Druaga_Knight_Black.png|16px]][[File:Tower_of_Druaga_Knight_Mirror.png|16px]][[File:Tower_of_Druaga_Knight_High-Power.png|16px]][[File:Tower_of_Druaga_Lizardman.png|16px]][[File:Tower_of_Druaga_Knight_Red.png|16px]]. Swing the sword at the [[File:Tower_of_Druaga_Treasure.png]] that recently appeared, this will cause the [[File:Tower_of_Druaga_Treasure.png]] at the starting point to appear. Collect the one at the start point first, then the one you swung the sword at.
|}
|}
{{-}}
{{-}}
Line 140:
Line 146:
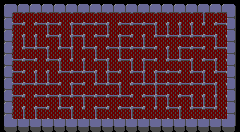
== Floor 46 ==
== Floor 46 ==
[[File:Tower of Druaga Floor 46.png|frame|Floor 46]]
[[File:Tower of Druaga Floor 46.png|frame|Floor 46]]
| style="background:black" |[[File:Tower_of_Druaga_Blue_necklace.png]]||Possession of this necklace grants you immunity from the flame breath of dragons. Unlike the way the rings work, you will not lose protection from sorcerer's fires.
| style="background:black" |[[File:Tower_of_Druaga_Blue_necklace.png]]||Possession of this necklace grants you immunity from the flame breath of dragons. Unlike the way the rings work, you will not lose protection from sorcerer's or dark yellow slime's fires.
|-
|-
! AC
! AC
| Head to a corner, and walk through all four corners of the floor, and return to your original corner.
|
# Head to any outer wall.
# Walk through all 4 corners.
# Return to the outer wall where you started.
|-
|-
! GB
! GB
Line 153:
Line 162:
|-
|-
! AT
! AT
| You must slay the [[File:Tower_of_Druaga_Dragon_Black.png|16px]] only when a flame from a [[File:Tower_of_Druaga_Slime_Dark_Yellow.png|16px]] is on the screen.
| Defeat the [[File:Tower_of_Druaga_Dragon_Black.png|16px]] only when a flame from a [[File:Tower_of_Druaga_Slime_Dark_Yellow.png|16px]] is on the screen.
|-
|-
! ATp
! ATp
| Draw your sword and keep it in contact with the [[File:Tower_of_Druaga_Quox.png|16px]] for at least three seconds.
| Draw the sword and keep it in contact with the [[File:Tower_of_Druaga_Quox.png|16px]] for 2-3 seconds.
|}
|}
{{-}}
{{-}}
Line 162:
Line 171:
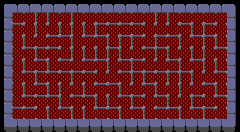
== Floor 47 ==
== Floor 47 ==
[[File:Tower of Druaga Floor 47.png|frame|Floor 47]]
[[File:Tower of Druaga Floor 47.png|frame|Floor 47]]
| Keep touching a [[File:Tower_of_Druaga_Will'o_Wisp_Red.png|16px]] for a few seconds until the [[File:Tower_of_Druaga_Treasure.png]] appears.
| Touch a [[File:Tower_of_Druaga_Will'o_Wisp_Red.png|16px]] for several seconds.
|-
|-
! ATp
! ATp
| Simply defeat the [[File:Tower_of_Druaga_Roper_Blue.png|16px]].
| Defeat the [[File:Tower_of_Druaga_Roper_Blue.png|16px]].
|}
|}
{{-}}
{{-}}
Line 188:
Line 197:
|-
|-
! AC
! AC
| Walk through all four corners of the floor. You are not required to return the original corner this time.
| Walk through all 4 corners.
|-
|-
! GB
! GB
| Appears to be something different from AC version.
| Same as AC, but additionally, defeat a slime afterwards.
|-
|-
! AT
! AT
| You must destroy all of the walls around the center posts closest to each corner (thereby leaving a 2x2 grid of open squares in each corner).
| Destroy all of the walls around the center posts closest to each corner (thereby leaving a 2x2 grid of open squares in each corner).
|-
|-
! ATp
! ATp
| Cross paths with a [[File:Tower_of_Druaga_Lizardman.png|16px]], and then defeat a [[File:Tower_of_Druaga_Knight_Red.png|16px]].
| Cross paths with a [[File:Tower_of_Druaga_Lizardman.png|16px]], then defeat a [[File:Tower_of_Druaga_Knight_Red.png|16px]].
|}
|}
{{-}}
{{-}}
Line 210:
Line 219:
|-
|-
! AC
! AC
| Touch the [[File:Tower_of_Druaga_Door.png]] without the [[File:Tower_of_Druaga_Key.png]], and then proceed to kill a [[File:Tower_of_Druaga_Wizard.png|16px]].
| Pass through the [[File:Tower_of_Druaga_Door.png]], then defeat a [[File:Tower_of_Druaga_Wizard.png|16px]].
|-
|-
! AT
! AT
| Actually, there is no method to reveal this treasure.
| There is no method to reveal the [[File:Tower of Druaga Treasure.png]].
|-
|-
! ATp
! ATp
| All of the slimes on this stage must die by impaling themselves on your sword. You are not allowed to move while killing them.
| All of the slimes must defeat themselves on the sword.
|}
|}
{{-}}
{{-}}
Line 229:
Line 238:
|-
|-
! AC
! AC
| Walk all along the outer wall of the entire floor. Use the pickax to remove any barriers in your way.
| Walk along all of the outer walls.
|-
|-
! FC
! FC
| Simply move past the upper right corner and the lower left corner of the outer wall.
| Move past the upper right corner and the lower left corner.
|-
|-
! GB
! GB
| Exit the stage normally. Defeat the last mini-boss, a giant ghost, to receive the potion.
| Exit the floor normally. Defeat the last mini-boss, a giant ghost, to receive the potion.
|-
|-
! AT
! AT
Line 241:
Line 250:
|-
|-
! ATp
! ATp
| Defeat, in order, a [[File:Tower_of_Druaga_Ghost_Wizard.png|16px]], a [[File:Tower_of_Druaga_Ghost_Druid.png|16px]], and a [[File:Tower_of_Druaga_Ghost_Mage.png|16px]]
| Defeat the ghosts in the following order: [[File:Tower_of_Druaga_Ghost_Wizard.png|16px]][[File:Tower_of_Druaga_Ghost_Druid.png|16px]][[File:Tower_of_Druaga_Ghost_Mage.png|16px]].
If you were foolhardy enough (or required) to pick up the Potion of Death on the previous floor, make sure you obtain this potion to undo the time speed-up effects.
This mace only serves as a trophy. Normally, it has no effect and is not needed to collect the Ruby Mace. There are version-specific exceptions to this.
AC
Pass through a , pick up a , and then pass through a once more. - Note: it might not be just "any" ; just in case, pass through all of them.
AT
In this version, you must collect the Sapphire Mace in order to collect the Ruby Mace later on. Collect the without ever touching a single .
As with every balance, this one is needed to keep the Excalibur on the next floor from becoming the Evil Sword which does little or no damage to any enemy.
AC
Defeat the magicians on this floor in the exact order that they are listed above (Red Knights are irrelevant).
FC
Same as AC, with the only exception is that all four magicians will be the same alternating colors as you go.
GB
The order in which you defeat the magicians does not matter.
The Excalibur is the best sword in the game, and this sword does in fact increase your strength. However, the treasure is locked with a magical spell. Should you attempt to open the without the Antidote, the timer will count down much faster which gives you less time to complete the floor. If you have not obtained the Balance, this treasure will contain the Evil Sword which will do minimal damage to enemies and avoid obtaining it. You will lose it for good when you are zapped to a lower floor.
Treasure: Antidote
This is the truly hidden treasure. Without revealing it, you will never be able to collect the Excalibur, which is needed to beat the game.
AC
Defeat the knights as they are listed above (There is a on this floor but it isn't necessary to defeat it).
FC
Same as AC. The only difference is that the Evil Sword does increase your strength like the Excalibur. You cannot defeat Druaga with the wrong sword though.
GB
The order in which you defeat the knights does not matter, but you must not defeat the Red Knight: the dark gray one that moves quickly, and does not have horns.
AT
Tap direction keys quickly as you work your way to collect the .
ATp
Defeat the knights in the following order: . Swing the sword at the that recently appeared, this will cause the at the starting point to appear. Collect the one at the start point first, then the one you swung the sword at.
Possession of this necklace grants you immunity from the flame breath of dragons. Unlike the way the rings work, you will not lose protection from sorcerer's or dark yellow slime's fires.
AC
Head to any outer wall.
Walk through all 4 corners.
Return to the outer wall where you started.
GB
Defeat the .
AT
Defeat the only when a flame from a is on the screen.
ATp
Draw the sword and keep it in contact with the for 2-3 seconds.
Without this potion, you will be unable to open the on Floor 49. However, since the treasure on Floor 49 is a harmful one, you may choose to skip this particular treasure.