Part 1[edit]

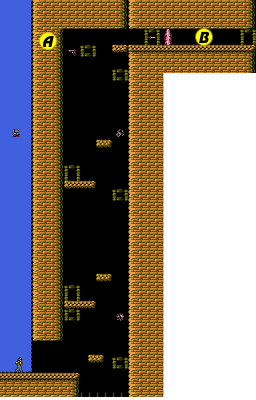
This stage contains considerably more traps, and a greater variety of human enemies. Be careful when attempting to jump on top of the vertically floating platforms; sometimes it is easier to land on them by leaping off the rope when you're directly above them.
- Point A
- You may have noticed the 1-Up icon outside the wall to the left during your ascent. It may not be immediately clear how to obtain it, but you can exploit some of the mechanics of the game. Fire your grappling hook into the left wall by the pistol near the top of the tower. As you climb up the rope and to the wall, be sure to tap
 while you are rising on the hook, and push to the left. You will actually jump through the wall and end up falling down the outside. You should be able to maneuver yourself over the 1-Up and pick it up as you fall.
 - Point B
- This area can be extremely dangerous. Rifle wielding enemies will appear out of the right door. They squat down as they shoot, so you can't duck under the bullets, and there's no room to jump over them. Fight fire with fire, and take out the enemies that appear from this door with your pistol as soon as you see them.
Part 2[edit]
- Point C
- Climbing up this next area can be a chore, considering how persistent the spear traps are. To start, fire your grappling hook so that it flies through the lower left corner of the wall at the bottom. The spear will fly as you climb upwards, so time your ascent with the appearance of the spear. Before the next one arrives, let go of the rope and squat down to avoid the next spear. As soon as you get the chance, immediately fire your grappling hook and jump up to reach the platform above you. Don't miss the chance to break the wall to the left down with two Mines to collect the Meat and Mines contained in the wall. Then get ready to repeat the process over again and avoid the spears between the next platforms.
- Point D
- This platform can be a little difficult to land on, but it's well worth it if you do. It will take you to a ledge containing Meat and the rare holy Crystals which can be hard to come by. After you collect the items, feel free to simply drop down to point E.
- Point E
- Running through this hallway triggers a trap which causes the ceiling to collapse, closing off any chance to return. You will see one flame jet appear near the beginning. Time your run through the tunnel when that flame jet disappears. As you run, you will see another flame jet, and this time, you can't afford to wait to avoid it. If you slow down, you will be crushed by the ceiling, so run through the flame and take the damage.
- Point F
- When you reach the area with the stone tossing natives, it is best to ignore them as much as possible and proceed directly to the bottom. There, not only will you find a chance to restore your health with some Meat, but you will also find red enemies that provide you with a supply of knives, just like the ones at the top do, only you will be much safer attacking them on the floor.
Boss: Hermit[edit]

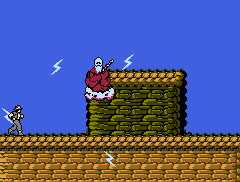
The boss of this stage is a Hermit who doesn't play fair. He rides on top of a floating cloud which gives him the ability to float in just about any vicinity of the screen. In addition to that, he has the ability to summon four swiftly moving lightning bolts that seek out your location at the time they were summoned.
Once again, your two best bets for fighting the Hermit are your Pistol or the Bolas. The Bolas make a good choice since the Hermit is typically over your head. As long as you accurately predict his motion on the cloud, you can toss a few Bolas out at him and take him down rather quickly.
If you'd prefer to go with a more straight-shooting approach and use your Pistol, you'll have to do a bit of work to line yourself up with him. Jumping won't work. You can use the ledge in the middle of the screen to get off the ground and see more eye-to-eye with him. However, if you climb up, he has a tendency to drop down. That's just fine, however. If he does drop down, drop down to the ground with him, and fill him with lead from your Pistol. As long as you keep on eye on your health meter and the lightning he summons, you should be able to remove the Hermit rather quickly.
