- Akuma no Kyuden (悪魔の宮殿? Devil's Palace)
1: This stage introduces you to a new form of an old enemy that drops arrows straight down over your head. Take them out whenever you see one appear before you advance so as not to allow them to overwhelm you. In addition to these flying enemies, green boulders bounce through the stage. Other than their color, they are identical to the boulders you've faced in the past, so beware the pieces that break apart when you shoot them. You'll need to cast blizzard at least twice to get through two lava waterfalls. Don't worry too much about your heath until you get past the second waterfall, but be sure to grab a red potion from one of the flying enemies beyond it. Then be very careful on your way to the exit in order to keep as much health as you can.
2: Be careful walking into this section; if you walk forward, you're likely to fall into a gap and die. More arrow dropping demon skeletons occupy the sky. You can attempt to go entirely over the top, but you'll have a lot of demons to contend with. Activate Overdrive if you take that route. Alternatively, you can drop down the right side of the first column, cut through the blocks at the bottom and come up the right side. It's a little safer, but not by much. Make your way to the upper right platform.
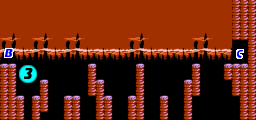
3: As soon as you arrive, three skeleton demons will be flying right for you, so be prepared to take them out before you proceed, using Overdrive for extra protection. After you start to advance, the next flying demon should drop a blue potion if you defeat it, so try to kill it so it drops the potion where you can collect it.
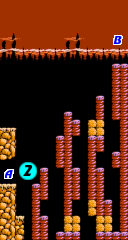
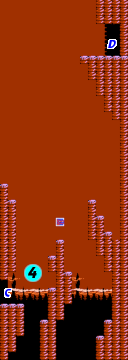
4: The next section will look like the last, but as you begin to make your way up, a green serpentine creature will appear. It's behavior will resemble the fire snakes from the previous stage. You must destroy it in order to proceed. Upon defeating it, it drops the Dragon transformation spell which will enable you to fly up to the top of the area and advance. As you do, another serpentine creature will appear, but you can effectively ignore it and travel straight up to the exit. Press ![]() to transform back into a human in order to leave the area.
to transform back into a human in order to leave the area.
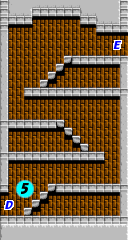
5: It's back to demons and boulders in this small cramped space. The good news is that the boulders down respawn, so once you rid the first two at the bottom, you're done. The demons on the way up can be a bit tricky to remove since they fly through the platforms. At the very top is a green serpentine creature which can mostly be ignored.
6: As you jump into this area, another green serpentine will attack you. Don't ignore this one. Destroy it and it will leave behind a Dragon transformation spell which will make getting through this area, as well as collecting the valuable items it contains, much easier. Along the bottom, you'll find not one, but two mana extending wings. Be sure to grab them. Just before the exit, higher up near the ceiling, you can also grab an extra life. More serpentines will appear to harass you as you travel through, but you don't need to fight them, just dodge them.
7: Back indoors you must walk across a dangerous stretch of corridor that includes lava, the large dragon skeletons that you encountered back in Stage 2, along with a new enemy. The new enemy resembles two gigantic urns which appear on either side of Randy once he travels far enough along a platform. In order to clear one of them away, you must push them far enough away before they explode. Overdrive magic can help you push them back tremendously. You'll need to overcome two sets of them between lava pools. By themselves, no danger is too difficult to manage, but combined, they are a threat. Utilize Overdrive when you can, but switch back to Blizzard when you need to. The first skeleton dragon tends to drop a red potion, and the second tends to drop a blue potion.
8: At this point, you can see stairs climb to the next portion of the Stage. However, you may notice a 1-up in the lava below. This is an easy pick-up, but that's not all it is. If you look closely, you should notice a gap in the floor below. To collect the 1-up, you'll need to cast Blizzard, and then use Overdrive to chip through the lava. Overdrive should also break the ice in the gap, allowing you to fall down to a secret room below.
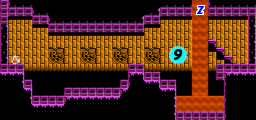
9: If you manage to drop down into the secret room, you'll fall through a lava flow into a pool below. You'll need to cast blizzard just to stand. Immediately to the left is a large bouncing helmet that you should remove with a combination of Overdrive a shots. Further in, you'll encounter two dragon skeletons which protect a mana extending wing on the way, and a health container on the far right side of the room. Collect them both for a boost in power, and then head back to the left. Cast Blizzard to make it up through the gap, and cast Blizzard again once you make it back up to the previous room. Then climb the stairs to the room above to continue.
10: Upon arriving, you are immediately met with a flying demon and a bouncing helmet. Use Overdrive to attack them from a safe distance, but watch out for getting pushed back and falling down to the previous room. To make it across this room, you'll need to use Blizzard to solidify the lava, and then switch back to overdrive to have the advantage over the helmets and demons that you encounter. Once you pass the lava, a lone dragon skeleton guards the exit.
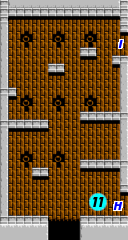

11: You must climb this short column, watching out for flying demons and helmets as you make your way up. Lean on Overdrive to give yourself an edge against the enemies. The last helmet just below the exit tends to drop a red potion.
12: A flying demon and two bouncing helmets greets you in the next room. User Overdrive and regular shots to remove them. What lies beyond is extremely challenging. You will face a mix of flying demons, giant urns, and bouncing helmets. As a result, there will be a tremendous amount of projectiles flying through the screen here, mixed with a good number of gaps to fall through if you get pushed backwards. Keep Overdrive going throughout your progress through this room.
13: You're very close to the boss room. A short climb up will lead you to face off with the Embodiment of Evil. However, there's good reason to head below first. Let gravity take you down to bottom. If you remove enemies that you encounter as you go, they won't be present to harass you as you climb back up.
14: You'll find a mana extending wing at the bottom, which also has a nice side effect of refueling your magic power. It's guarded by a dragon skeleton, so be sure to remove it before you collect the wing. Start making your way back up. When you are above the entrance to the room, be on the lookout for a second wing along the left side. Blast your way through the breakable blocks above the floating platform, and then be on the lookout for another dragon skeleton. You'll want to tangle with this one, as it tends to drop a red potion when you defeat. You'll want that just before you head into the boss room.
Boss: Embodiment of Evil[edit]
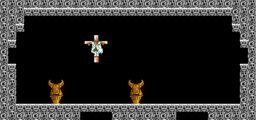
This seemingly simple boss can be incredibly hard to defeat. There are strategies that you can employ against it, or you can try to get lucky with one incredibly simple one. The Embodiment of Evil is effectively a skull that can split itself into three parts, all of which come together to shield a brain. The brain is the weak spot, and the only aspect of the boss which can take damage. The three parts will rotate around the brain, deflecting regular shots. All the while, it fires twin projectiles at your direction, at a fairly steady rate. Occasionally, the brain will stop moving, and the skull parts will come together before separating. On other occasions, it abandons its high location and starts to chase you around the room, forcing you to run away and jump over it to avoid taking damage.
To beat this strange creature, you have a couple of choices. You can try to hit it with either Thunder or Breaker. Thunder will likely drain you magic faster than you can defeat it, even if you have the magic staff to cut the cost of each spell in half. You can cast four times as many Breakers, but this is a long slow strategy that requires you to aim upward at the brain and fire at just the right times to strike it. There are few other viable strategies against it, save one.
It is possible, although somewhat difficult, to destroy the brain by simply using Overdrive and holding still. On either side of the room are two small alcoves off of the floor, but within jumping height. If you plan to use this method, don't activate Overdrive immediately. Every time the brain gets hit, it reverses direction, so if you hit it too soon, it will just fly away. If you wait a while for the brain to approach and then activate Overdrive, you are likely to get the brain caught in a loop as it volleys back and forth whenever it gets struck by your spell. After a while it will choose to chase you down, but tucked away in the alcove, it's difficult for the brain to reach you, and it will likely stop at just the right range for Overdrive, at it's max distance in the beginning, to continuously strike the brain. If you manage to find this sweet spot, and avoid taking too much damage from projectiles, you can destroy the brain within the first minute of fighting it and move on to the final stage. It does take a little luck to pull this off successfully.
Once you defeat the boss, walk to the left. After you pass below the cross, a hole will open up in the floor. The cross will fall into the pit, and Randy will jump in after it, attempting to catch up with it. When he does, they both disappear in a flash of light. It's not readily apparent, but Randy retrieves the cape adorning the figure on the cross, which is a magical item that reduces the damage you take by half.

