1: You begin the trek through the final stage at the top of a long vertical chamber. As you make your way down, the bouncing organic blobs from the second stage will rain down on you. There are also a number of breakable blocks on your way to the bottom. Overdrive will quickly take care of both the blobs and the blocks. On your way down, don't forget to collect an easy extra life near the bottom.
2: There happens to be an exit in the middle of the left side of this chamber (marked with a Z on the map). No manner of jumping will get you over to it, but it is possible to reach if you're truly dedicated. There are two locations where a pair giant urns will appear on either side of you. One is where the 2 appears, and the other is at the very bottom. If you successfully destroy the right urn, it will likely leave a Dragon transformation spell behind. By collecting it, you can easily fly to this hard-to-reach exit. If you head through, you'll appear on the right side of the room with the 7 label. There you will find a mana extending wing. You can actually head to the right and shortcut your way through the stage, but that's not recommended, as there are a large number of power-ups that you are going to want, and would otherwise miss. If you make it here, collect the wing, and then turn around and proceed through the stage normally to maximize your power before you face the final boss.
3: Eyes that drop dangerous blue tears dot this corridor. Overdrive can be used to remove them from your way without getting too close to them. However, there's another pair of urns that appear at the very beginning of this room. Destroying the right one may cause another Dragon transform spell to appear. Collecting it will enable you to fly through the area as a dragon, which doesn't necessarily allow you to do anything unique, but can make getting through the area a bit easier. Drop down the stairs on the right side.
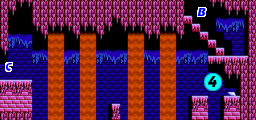
4: More eyes appear through this room, including one on the very platform that you need to drop down to, so be careful. There is a mana extending wing in the right corner which you should collect carefully. Getting through this short room can actually be quite challenging. With just one sliver of a platform between two pairs of lava waterfalls, you'll need to use Blizzard to freeze the lava, and carve a path through the columns and reach safety before the ice melts back to lava. To add to the danger, many more eyes are in the way. There are a couple of different ways to approach this, but one of the safest is to use Breaker to blast rows through the ice, and hopefully take out any eyes in the process.
5: As you approach the first two small platforms a fire creature will begin to fly through the area. Attack it as soon as you seen it, and it will drop a Dragon transform spell for you to collect. Grab it to make progress through this long corridor significantly easier. As you fly through the room, there are no less than four wings to collect. As a dragon, grabbing these, and clearing away any enemies, will be a breeze. This will provide a substantial boost to your mana count. Get to the right, press ![]() to undo the transformation, and climb the stairs.
to undo the transformation, and climb the stairs.
6: When you arrive, you'll notice a set of stairs above. Take a quick detour up there to point 7, and then return here. As you begin to move forward, the flying skulls from the first stage make a return appearance, and they are quite relentless. Overdrive can help defend you against them, but it's not perfect. After you pass the first set of breakable blocks on the ceiling, a metal golem will appear, like the one you first met in the fourth stage that dropped the first Dragon transform spell. It is slow, but it fires projectiles aggressively. Watch out for the gap on your right, make sure you don't get pushed into it. If you jump across it, the golem will teleport itself to follow you, but you're still ultimately safer attacking from there. If you defeat it, it will drop a red potion.
The skulls will reappear as you make your way to the left. When you drop down to the lower portion of the hallway, another golem will appear. Don't hesitate to spam this one with powerful spells like Breaker or Thunder, since it drops a blue potion to replenish your mana when you defeat it.
7: On the left side of this room, you'll find an extra life. Whether you transformed into a dragon to reach this room and used it as a shortcut, or climbed up from the room below, be sure to grab the extra life before you drop down the stairs to continue on your way.
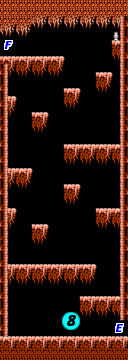
8: You appear to have entered a nest of large spider-like creatures. They move quickly and jump about randomly. Overdrive does a good job protecting you from them and clearing the path ahead of you as you climb to the top of the area. Don't miss another easy 1-up doll at the top of the room before you continue through the exit on the left.
9: This long hallways boils down to lots of spiders and two challenging Golems. You can use Overdrive to help clear away the spiders, as they are low to the ground and your regular attack tends to go over them. When each Golem appears, stop and hammer them with Overdrive and regular shots, or Breaker if you have a lot of magic. Once you clear away the second Golem, it will drop a red potion, so be sure to collect that before you continue on to the left and head down the stairs.
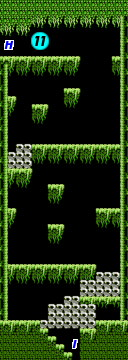
10: This is, undoubtedly, one of the most difficult corridors to cross that you've encountered throughout the game. Tons of small platforms, plenty of gaps, and a generous helping of spiders and flying skulls creates a navigational nightmare. One unlucky strike will send you falling through the large gaps in the floor. The trick to surviving this path is using Blizzard to freeze the skulls in place (although it has no effect on the Spiders). As long as you have enough Mana, you can make the process of getting through this area in one piece substantially easier than if you had to deal with all of the skulls flying through the area.
11: An eye greets you as soon as you arrive here. Remove it and start to make your way down to the bottom. Compared to when you first encountered the large spiders, this chamber is much easier since spiders will spawn above you as you continue to fall away from them. Overdrive can both remove the spiders and help clear away the breakable blocks that lie between you and the exit at the bottom.
12: You're close to the end, but the game is going to do everything that it can to prevent you from getting across, including introducing two new enemies, one of which flies around and can't be harmed. The small green cluster that flies around is impervious to damage. All you can do is lure it to one area of the screen and then move to another. It's possible to lure it entirely off the screen and out of the game.
The biggest threat by far, however, are the large faces that cling to certain walls. They spit projectiles continuously. Clearing the faces out of the way is the only chance you have to continue on. The first face you encounter can be removed with Overdrive when it's brand new and extending its farthest. To defeat the next face, you may need to cast Blizzard to free the lava below, but be careful if you activate Overdrive so that it doesn't create a hole for you to fall through the ice.
On the way to the third face, you'll see an extra life. To take out the third face, you should activate Twin Fire and jump over to the extra life doll, and land as far to the left of the platform as you can. Then squat down and spam Twin Fire, not just to hit the face, but to stop the projectiles. The fourth face can be taken out with Twin Fire as well, but after you cast Blizzard to freeze the lava so that you have a solid platform to stand on.
After having survived four faces and the green floating clusters, you have one face left. It is situated in the absolute most difficult location, where the only safe place you can survive a hit is directly in front of the face, where you will surely get struck. Standing anywhere else risks the likelihood of dropping through the gap. You'll need to either attack it at point blank with Twin Fire, or stand on the lower platform, lure his projectiles down, jump up, shoot at it with Breaker, and then drop back down before the upward projectile hits you, and repeat this pattern until the face is defeated, creating a door to the next room.
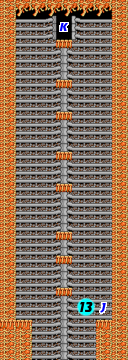
13: Resembling a rib cage, you must climb all the way to the top where a door awaits you. This is a very difficult room to clear, but there's a few things to know which can help you. First, Thunder is a great way to remove the arrow dropping demons that occupy the area. In fact, the lowest two demons will drop a red and blue potion, so try to cast Thunder when they are far enough to the right so you can catch the potions as they fall. Rely on Thunder if you have the mana to remove more demons as you encounter them. Second, Blizzard will stop the onslaught of flying skulls, and you're going to need to stop them if you want to have any chance of safely jumping from one platform to the next. Have Blizzard ready to go when it starts to wear off.
With the skulls frozen, climbing your up the platforms is generally fairly easy except for two platforms early on. From the first platform to the second is a normal jump, but the space between the second and third is so limited, you have to ensure that you jump on the absolute edge of the second platform in order to get out from under the third so you can land on it. However, the distance from the third platform to the fourth can feel impossibly far to jump. The truth is, you can nudge Randy onto the platform by hugging up against it as you jump. It make take a few tries, but Randy's feet will eventually touch the top of the platform. From there, the remaining jumps are like the first one, and you should be able to access the door to the final boss at the very top.
Boss: Black Slayer[edit]
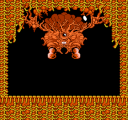
After slipping through the door, you arrive in a singular room, with a large alien creature hanging from the ceiling. This creature will attack you in a number of ways, including launching claws into the air which home in on your location, releasing spiders to attack you on the ground, and swinging a center tentacle around in an effort to strike you.
In order to defeat this monstrosity, you must do enough damage to five different locations on its body and destroy them all. The five parts are its mouth below the eye, the two mandibles on either side of its mouth, and the two limbs that extend from the sides and then retract. There are a number of ways to attack them, but two are particularly more effective than others. If you have a lot of mana, close to or over 200, you should absolutely use Thunder. Not only can it hurt any exposed part of the boss, it will also instantly eliminate any spiders and claws on the screen. The trick to using it is to jump on one side of the screen or the other, and fire it at just the right height so the beam of lightning strikes as many parts as possible. If you have less mana, you can replace Thunder with Breaker. It's not nearly as powerful, and doesn't clear the room of threats, but it can strike multiple pieces of the boss if you fire it at the right height and with the right timing. You will occasionally have to switch back to regular fire to eliminate nearby spiders.
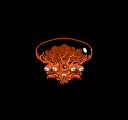
After you destroy all five portions of the boss, it will explode, but it won't die. A Dragon transform spell will appear, which you must grab to proceed to the second portion of the battle. The Black Slayer is free from the ceiling and can float around. As a dragon, however, this fight is substantially easier than the first phase. All you need to do is get level with the orb in between its eyes and pummel it with dragon fire. Once struck enough times, the monster will explode again and be destroyed for good. Then you will get to watch the ending and the credits. Congratulations on beating one of the hardest NES games ever created.

