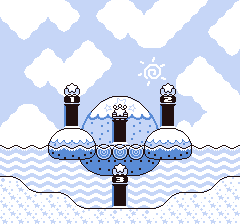
Ripple Field, unlike the two previous islands, is mostly submerged in water, resulting in a lot of underwater parts of the level that you must travel through. There are three stages like before, but they continue to get longer and more complex. Kine also makes his first appearance here, and his wonderful performance underwater makes him very helpful throughout the level.
Stage 1[edit]
Section 1[edit]

The start of the stage is another straightforward horizontal scrolling area. The terrain is significantly more varied, with a pool, palm trees that act as platforms and steep, sloped hills. The enemies here are also manageable if you don't blindly rush through the stage.
(1) Right of the bat, a Waddle Dee will run up behind you. Quickly turn around as soon as you start to make it stop in its tracks, then quickly defeat it.
(2) This series of palm trees bear coconuts that drop down when you get close. They explode when they hit the ground, so be careful not to get caught in the blast. Alternatively, you can choose to cross the path by flying above the palm trees, but you must contend with many Glunks on the treetops if you do so.
(3) A screen shaking landing marks the introduction of Rocky. Swallowing it will net you a new copy-ability, Stone! With this ability, you can turn into solid rock and crush enemies below you. You will also automatically roll down hills while in Stone form, which you can test on the slopes further down this section.
Section 2[edit]

Much of this section takes place underwater. Your movement is slower while swimming, and some of your copy-abilities are less powerful. If you lack one, your only attack will be shooting weak puffs of air. However, you can stay in the water for as long as you want, so don't worry about running out of air. A big wall blocks your path to the exit, so you must reach it by going through Section 3.
(4) Be quick to grab the Health Drink as soon as you destroy the Star Block below it. Take too long and it will fall into the spikes below!
Section 3[edit]
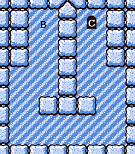
You are required to pass through this U-shaped room to reach a blocked-off area in Section 2 where the exit is located. There are only Glunks in this area, but there are a lot of them. Defeat them one by one or simply ignore them until you reach the door.
Stage 2[edit]
Section 1[edit]

The first section of the stage is a large drop down a narrow shaft. There are very few obstacles here, just jump right in and fall until you reach the bottom. While falling, try to stick toward the sides and then maneuver toward the center once you pass the second Star Block.
(1) There is a Gordo halfway through this section as well as two Waddle Dees holding Floaties gliding down the shaft. Quickly hover above them until both Waddle Dees fall beneath the Gordo, then weave between the Gordo and the Waddle Dees to fall safely down the rest of the section.
Section 2[edit]
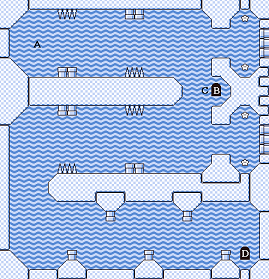
This section takes entirely underwater, with no place to surface. There are many pipes coming out of the walls of the stage which emit strong currents that push you away, sometimes into a bed of spikes. Kirby alone is not strong enough to swim against the currents, so try to stay as close to the pipes as you pass the currents to avoid getting forced into the spikes. Door B takes you to an optional boss fight, which while not necessary, is immensely helpful for clearing the rest of this stage.
Section 3 - Mid-Boss: Master Green[edit]

Before you start the battle, it is advisable to abandon any Animal Friend you currently have, since the Animal Friend introduced here is going to be a lot more helpful than either Rick or Coo. Master Green has quite a few attacks. It is able to launch electric bolts at you which cannot be inhaled or charge its body with electricity, damaging you if you're too close. It can also throw a single star at you or create a spark wave that slides across the floor. Attack it whenever it is vulnerable, and try to keep a distance from it so you don't get hit by the discharge attack. If you don't have a copy-ability, you must inhale the stars it throws at you and spit them back at it to defeat it.
After Master Green is defeated, you can inhale and swallow it to get the Spark copy-ability. With Spark, you can discharge energy all around you. If you don't already have an Animal Friend, you will also be introduced to Kine the Fish! Being an aquatic animal, Kine is much slower on land and can't jump in midair, but he is much better in the water. While partnered with Kine, you can now inhale while underwater and swim against strong currents. This makes Section 2 a bit easier, as well as letting you get the Small Stars that were blocked by the currents from before.
Section 4[edit]

You will find yourself in an almost pitch-black room when you arrive in this section. You can still see the silhouette of the enemies in this section, but the darkness can cause you to miss certain secrets. However, if you have both Kine and the Spark ability, you can discover its hidden use. With the Kine and Spark combination, you can shoot lightbulbs at enemies, but you can also hold ![]() to light up the lightbulb, illuminating the room! This helpful ability is not limited to this stage only, so keep that in mind next time you find yourself in a dark room.
to light up the lightbulb, illuminating the room! This helpful ability is not limited to this stage only, so keep that in mind next time you find yourself in a dark room.
Section 5[edit]

This is a hidden room with 5 Small Stars, which will likely net you an extra life if you've collected the ones back in Section 2. You can only see the entrance to it if you light up the room with the Kine-Spark combination, but you can still enter the room without it as long as you know where the door is.
Section 6[edit]

The final section of the stage has more solid ground, which is actually detrimental if you're partnered with Kine. The slower walk speed and lack of multiple jumps make platforming on land less convenient. Stick to jumping instead of running when moving across land with Kine. To reach the goal door with Kine, you must jump to the lowest thin platform and jump from there to the door.
Stage 3[edit]
Section 1[edit]

There are two methods to cross the first section of the stage. If you're alone or with either Rick or Coo, you can make your way through the stage on top of the thin platforms, being careful not to get hit by the enemies on the ground. If you are with Kine, it is more preferable to stay underwater, being able to swim straight to the door and being better at dealing with enemies underwater.
Section 2[edit]
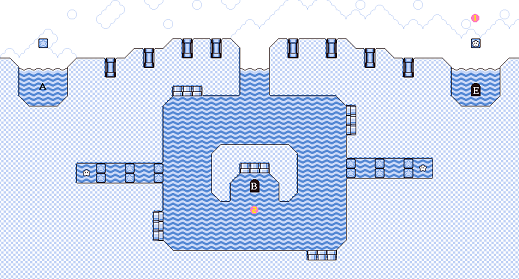
While you can travel all the way to the right to reach the door and get to the last section of the stage right away, you can get a Rainbow Drop if you are accompanied by Kine. Jump down the gap at the center to enter an underwater section where you will be pushed by a strong current that runs anti-clockwise throughout the whole area. Without Kine, you won't be able to do anything here, so you must be partnered with him if you wish to access most of this stage.
(1) There is a Rocky standing on the Star Block above the door to section 5. If you don't have the Stone ability required to get Ripple Field's Rainbow Drop, you can get one here.
(2) Door B can only be reached if you have Kine's improved swimming capabilities, as it is blocked by a strong current rushing outwards.
Section 3[edit]
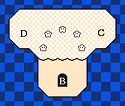
This is another dark room that can be illuminated if you have the Spark ability and is accompanied by Kine. There are five Small Stars here, but more importantly there is also the entrance to the Rainbow Drop room of Ripple Fields hidden in this chamber. You can see its location if you have illuminated the room, but you can still enter it even if the room hadn't been lit up.
Section 4 - Rainbow Drop[edit]
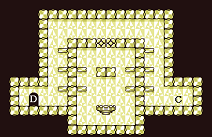
The two blocks in this room requires you to use the Stone ability to break them, but using the Stone ability while partnered with Kine also works. Unfortunately, if you were to discover this room on your own, you would probably still have the Spark ability. There is a Rocky in section 2 as mentioned previously, so you might have to backtrack there to obtain it.
Section 5[edit]
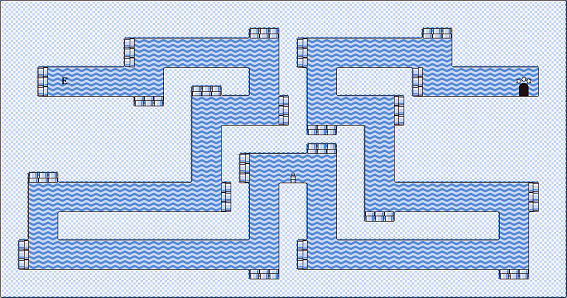
The final section of this stage is just one large curvy tunnel of water. You will be pushed forward by the strong currents without Kine, and there are multiple Sir Slippies that inhabit the area that you can easily bump into if you are going too fast. Luckily, there is a Health Drink for you halfway through the stage, but you can miss it if you go over it as it drops.
Boss: Sweet Stuff[edit]
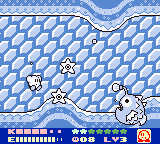
The boss of Ripple Fields is fittingly a giant anglerfish, and the entire battle will take place underwater. While this means it is harder to evade its attacks without Kine, this also means you can dodge in any direction. Sweet Stuff can use its angler to summon unnamed starfish as well as Squishies to attack you. Its angler can also be used to fire rays at you. Finally, it can simply charge at you with its whole body. Once it drops below half health, it will start to summon Gordos, and its angler rays will be fired more rapidly.
There are many ways to damage Sweet Stuff. Any copy-ability and even your weak air puffs can damage it directly. However, if you lack a copy-ability, it is much safer to launch its starfish back at it. While you can simply accomplish this by inhaling and spitting them out with Kine, you can also do this alone with Kirby's air puffs. Be sure to keep moving constantly to dodge its rays and charge attack, as well as its Gordos once you reach its second phase.
With Sweet Stuff finished, the clouds clear some more, revealing the fourth island, the cold and slippery Iceberg!
Bonus Chance[edit]
This Bonus Chance takes place entirely underwater, along the path where Sweet Stuff was fought. The screen will scroll forward much faster, and you must swim around to collect the Small Stars. Gordos serve as obstacles in this minigame, and will stop the minigame if you touch them.
