There are eight different playable vehicles in Hostile Territory and one extra in Warzones, making it easier to find the characteristics that best fit your driving style. You will be given an opportunity to choose a vehicle from the your unlocked stock before each mission. While playing, you will be faced with time limits, rugged terrain and dogged enemies. There are different aspects to each vehicle which are best suited to one or another of these challenges. Depending on your current mission, you may need a stronger vehicle, which means it will be slower, or you may need a good climber and be willing to give up handling. Vehicle choice can make or break the success of your mission, so consider your driving style and what needs to be accomplished before making your decision.
Each vehicle has a distinct set of specifications based on speed, acceleration, handling and weight.
- Speed: On flat, straight terrain, the top speed the vehicle is capable of reaching.
- Acceleration: The speed with which the vehicle can attain top speed.
- Handling: How well the vehicle responds to player direction. This is not a gauge of responsiveness, as some of the lighter vehicles are overly-responsive and have been given a low handling ratings.
- Weight: The ability to withstand damage.
Each vehicle also has a team role and one or two countermeasures. In Hostile Territory, each vehicle gets one countermeasure, while in Warzones, they get two. In each section, "Countermeasure 1" is the one both games have, and "Countermeasure 2" is the Warzones-specific one. The second countermeasure in Warzones is unlocked for each vehicle after completing the last Smuggler's Mission. Every vehicle gets five uses of its countermeasure(s), which are unlocked at different times for each vehicle after beating certain missions. Countermeasures help you deal with law enforcement or rivals that are chasing you. Team missions are played with two allies against a rival gang of three. Each vehicle's role dictates its strategy during the competition, either to snag loot, beat up other cars, protect you or cherrypick back at the other gang's dropoff point.
Super Buggy[edit]

| |
| Speed | 8 |
|---|---|
| Acceleration | 8 |
| Handling | 7 |
| Weight | 7 |
| Team Role | Forward |
| Countermeasure 1 | Speed Burst |
| Countermeasure 2 | Acid |
- Unlockable
- Vehicle: Starting Vehicle
- Countermeasure 1: Mission 2
You start with the Super Buggy on a new game, and it's considered a general purpose vehicle. It has decent stats in all categories, and with Speed Burst unlocked you'll find it much easier to escape from enemies or get back up to speed after a crash or spinout. One great advantage of the Super Buggy is its stable landing. Use the levelout properly in the air, and this car can land even the most awkward jumps very well. Although its handling is rated relatively low, its controls are not very sensitive, which can be an advantage for players who are having a hard time with precision steering.
As your teammate, the Super Buggy will attempt to pick up and deliver cargo for you. When you encounter a law enforcement Super Buggy, they employ the strategy of running up alongside you trying to push you off course. This car will be almost totally useless on the missions that require you to take out another vehicle, and harder to work with on missions where you take down radar towers. The vehicle is too light to do much damage to another car, and doesn't have an offensive countermeasure in Hostile Territory and doesn't get one until you beat the game in Warzones. The radar tower missions are doable, but just running into a tower does significant damage to the car.
In the hands of an experienced player with good route knowledge and driving skill, the Super Buggy is second only to the ATV for turning in low times on most missions. For less capable or newer players, it is a good practice vehicle on the early missions, but should be passed over in favor of stronger, better climbers in the later missions.
D-5 Hondo[edit]
| |
| Speed | 7 |
|---|---|
| Acceleration | 7 |
| Handling | 8 |
| Weight | 7 |
| Team Role | Guard |
| Countermeasure 1 | Oil Slick |
| Countermeasure 2 | Vertical Boost |
- Unlockable
- Vehicle: Training Mission 3 (Hostile Territory), Mission 11 (Warzones)
- Countermeasure 1: Mission 8 (Hostile Territory), Mission 15 (Warzones)
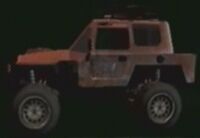
The Hondo is a slow, rugged little vehicle. It only exceeds the Buggy in one category, because it doesn't hop around as much on small bumps and jumps. Since they have the same weight, this is really attributed to the Hondo not being able to achieve speeds at which the terrain will throw you around. There is really nothing good to say about this vehicle, except for it being able to take a fair amount of damage and its decent countermeasures, the Oil Slick and the Vertical Boost. The Hondo is basically outclassed in every regard by the Sahara Special, so you'll only want to use this vehicle on earlier missions where you are taking too much heat from the law enforcement. In its favor, the Oil Slick is a great way to temporarily lose the enemies that will have no trouble keeping up with you, as long as they are directly behind. Be careful not to use this while in a long turn, or you'll end up crossing your own tracks and spinning yourself out.
In its team role, the Hondo attempts to ward off rival gang members that are trying to bash you or steal your cargo. The vehicle does a decent job at this, although as with any guard, you'll find yourself getting entangled with him often enough if you are doing a lot of tight turns and 180° turns. On the opposite team, the Hondo is most noticeable as the vehicle that comes out of nowhere over a rise for a head-on collision. Guards should be picked last, as all the other roles are more critical, and the Hondo itself is nearly worthless, so don't expect to spend much time driving this vehicle when it's not required.
ATV Monster[edit]
| |
| Speed | 9 |
|---|---|
| Acceleration | 9 |
| Handling | 6 |
| Weight | 6 |
| Team Role | Forward |
| Countermeasure 1 | Speed Burst |
| Countermeasure 2 | Repel Sphere |
- Unlockable
- Vehicle: Mission 10
- Countermeasure 1: Mission 14
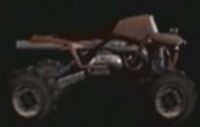
The ATV, like the Super Buggy is a forward with Speed Burst countermeasure. For practical purposes, this is the fastest vehicle in the game. Its top speed is only surpassed by the Du Monde, although with the terrain in the game, you'll rarely be able to open up the Du Monde to see those higher end velocities. The ATV is also the smallest, lightest vehicle in your fleet. As such, it has extremely touchy handling and even the smallest bump can send it flying off course. While this may seem similar to the Du Monde, the ATV has far greater acceleration, so any slowdowns you experience are much less noticeable.
In team missions, the ATV will act as a forward and try to bring back contraband for you. Even though its stats are different from the Buggy, the same inefficient AI is in control, so they are equivalent choices. Where you may see a difference is when the other side uses the ATV instead of the Buggy. In that case, you'll find it much harder to tag the ATV if you're trying to steal its contraband. It presents a smaller target, has better acceleration and will make more unpredictable movements due to uneven terrain.
Even though this vehicle is easily destroyed and hard to control, there is none better if you're going for speed. For nearly every mission in the game, provided you have it unlocked, the ATV with Speed Burst will get the job done faster. On the few missions where you need to destroy other vehicles or radar towers, it's not the right choice, but by and large the ATV dominates the field in terms of time to completion. Unless you don't mind extremely difficult and frustrating levels, this vehicle is for experienced players only.
Special Du Monde[edit]

| |
| Speed | 10 |
|---|---|
| Acceleration | 6 |
| Handling | 5 |
| Weight | 7 |
| Team Role | Corner |
| Countermeasure 1 | Oil Slick |
| Countermeasure 2 | Cloaking Device |
- Unlockable
- Vehicle: Mission 18 (Hostile Territory), Training Mission 3 (Warzones)
- Countermeasure 1: Mission 21 (Hostile Territory), Mission 5 (Warzones)
Although this vehicle has the theoretical top speed of the game, you'll never experience it during a mission in Hostile Territory. Even in Joyridin' mode it's hard to accomplish simply due to micro-terrain jostling the car. In Warzones, the vehicle is made much easier to handle, and is the second car unlocked, so you'll be able to get more use from the Du Monde in the GameCube version. On the PlayStation 2, however, you'll want to stay away from it except when you have to drive it, on the mission where you unlock it. This car is so unusable, that you'll rarely even see the law enforcement putting it into play. It's very light and gets banged around easily. Because most of the game is played off-road, the Du Monde's handling will only be a hindrance to you in Hostile Territory, though you may find some uses for it in Warzones. The unlockable North America map in Warzones has a lot of paved roads, on which the Du Monde can also perform well.
In a team role, the Du Monde is a corner, sitting on the rival gang's drop off location to cherrypick incoming deliveries. Even in this function, the car is outclassed by the Baja Truck, which you acquire much earlier in Hostile Territory and early on in Warzones. Corners pick up cargo from enemy rivals mostly by head on collision, as the AI doesn't often attempt to juke on its way into drop offs. For this kind of loot snag, you'll want a hardy vehicle to absorb the damage, and the light sports car just doesn't stack up. The one positive aspect of this vehicle is the Oil Slick, which is one of the best countermeasures for losing pursuers right on your tail.
Baja Truck[edit]

| |
| Speed | 8 |
|---|---|
| Acceleration | 9 |
| Handling | 9 |
| Weight | 9 |
| Team Role | Corner |
| Countermeasure 1 | Bombs |
| Countermeasure 2 | Vertical Boost |
The Baja Truck is likely to be your vehicle of choice until you unlock the Sahara. Stronger, faster and a better climber than the Buggy, Hondo or Du Monde, this truck makes sense for the Georgia Desert levels. The Baja becomes an even more attractive addition to your fleet a few missions after you get it, when you unlock the Bombs countermeasure, the only offensive one in Hostile Territory and the first one available in either game. As a testament to its versatility, even though this is one of the earliest vehicles, it is completely possible to finish the game using nothing but the Baja. It has a low profile to decrease the chance of rolling, and provides good stability on uneven terrain and jumps. Its detractors are a slightly slower top speed in comparison to later vehicles, and its unresponsive steering, which makes it feel like you're sliding around on all your turns.
Even if you don't use the Baja yourself, it is an invaluable teammate during the rival gang missions. Many missions have multiple pieces of contraband and even on single-item levels it's sometimes hard to always get and keep possession of the contraband. As a corner, the Baja will be able to retrieve items that get away from you from the enemies trying to make deliveries. Unlike the Du Monde, the Baja will be able to deal some damage and get up to speed quickly to attempt its own delivery. Because you'll spend most of the time as your team's forward, having a corner is arguably the most critical teammate position for your strategy.
Sahara Special[edit]
| |
| Speed | 8 |
|---|---|
| Acceleration | 8 |
| Handling | 8 |
| Weight | 9 |
| Team Role | Guard |
| Countermeasure 1 | Smoke Screen |
| Countermeasure 2 | Acid |
- Unlockable
- Vehicle: Mission 13 (Hostile Territory), Mission 18 (Warzones)
- Countermeasure 1: Mission 17 (Hostile Territory), Mission 20 (Warzones)
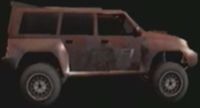
The Sahara Special is slightly stronger and slightly faster than the Baja Truck, with a higher degree of maneuverablity to boot. Where you'll see the difference mainly, is in the Sahara's top speed, climbing prowess and durability. When you take a head on charge from a Hondo, you'll likely make him explode while only losing a portion of your own health. Although it has some strong characteristics, it falls short in two areas, which are climbing speed and stability. Although there's isn't much the Sahara can't climb, don't count on setting any speed records while doing so. Also, be prepared to watch your vehicle fall over onto its side on a regular basis, as it's very top-heavy. This vehicle is recommended for missions requiring tight cornering in the hills, and not for the broad, sweeping turns needed in the Vietnam levels.
The Sahara plays the role of guard on team missions, which is the least necessary position. Guards fight the opposite team's backs and any other rival that is trying to snag your loot. Unfortunately, there are so many vehicles trying to do you harm during one of these levels, you can really only rely on yourself. On the opposite team, there is usually a guard who will be making your life difficult when you're trying to get the contraband away from someone. Probably the most disappointing aspect of the Sahara is its miserable Smoke Screen countermeasure. This is truly a useless feature, as it doesn't throw anyone off your tracks, even if they're right behind you. In multiplayer modes, your arrow still points to the vehicle releasing the Smoke Screen and they still show up on the map.
Grenadier[edit]
| |
| Speed | 8 |
|---|---|
| Acceleration | 6 |
| Handling | 9 |
| Weight | 10 |
| Team Role | Back |
| Countermeasure 1 | Bombs |
| Countermeasure 2 | Cloaking Device |
- Unlockable
- Vehicle: Mission 24
- Countermeasure 1: Mission 25
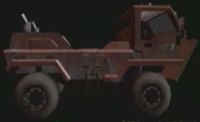
This vehicle is everything the Sahara Special should have been. It's faster, stronger and has a useful countermeasure. Unfortunately, you don't get the Grenadier until the beginning of the Georgia Winter missions. Although it's rated low on acceleration according to the in-game statistics, you'll find any deficit here to be negligible when you're actually playing. Its only real weaknesses are a wide turning radius and slow maneuvering. Don't expect to do any brilliant cornering in the Grenadier or be able to juke oncoming cops either. The good news is, you'll definitely be the victor in any head to head battles. Even though it's taller than the Sahara, it's also wider, so you don't have to worry as much about rolling your vehicle. This is your go-to vehicle on missions where you need to destroy the enemy, as it has the most effective mix of speed and weight.
In team roles, Grenadiers are backs. A back's sole mission is to harass the rival gang's forward. This role is indispensable on single-item team missions. In a choice between this vehicle and the other back, the Kavostov, the Grenadier's speed makes it the better choice. The back will help ensure there is contraband waiting to be picked up when you get to it. Beware of the law enforcement Grenadiers, which are often set to approach you from the front at speed. A cop in this vehicle has the speed to catch you and the weight to put a lot of hurt on you.
Kavostov[edit]
| |
| Speed | 6 |
|---|---|
| Acceleration | 10 |
| Handling | 10 |
| Weight | 10 |
| Team Role | Back |
| Countermeasure 1 | Smoke Screen |
| Countermeasure 2 | Repel Sphere |
- Unlockable
- Vehicle: Mission 27
- Countermeasure 1: Mission 29
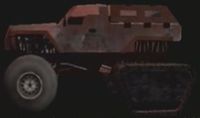
This is the biggest, meanest vehicle of them all, with tank treads in the back instead of tires. Don't let the statistics fool you though – all the "10"s in the world don't make up for its abysmal speed. In most cases the Kavostov is completely unusable due to time constraints on missions. It can turn well, can climb anything, and it would take a tank to stop it, but none of that matters when you can't get from point A to point B without the timer running down. You won't get this vehicle until the end of the game, so you're not missing much anyway. In addition to these negatives, it also comes equipped with the useless Smoke Screen as its countermeasure.
The Kavostov is a back, just like the Grenadier, which means it will go after the rival gang's forward, or you if it's on the other side. If you want a back on your team however, the Grenadier is a much better choice, as it will actually be able to catch the rival forward in order to mete out its punishment. Team missions are actually the only place where the Kavostov is somewhat useful. Choose the half-track for your own vehicle and play the corner position. You'll be able to take on any oncoming rivals, many times resulting in a fiery explosion for your opponent. Hand off the contraband to your own teammate, or if the way is clear deliver it yourself, and you'll find it creates a workable strategy.
Hover Sled[edit]
| Speed | 9 |
|---|---|
| Acceleration | 5 |
| Handling | 9 |
| Weight | 4 |
| Team Role | |
| Countermeasure 1 | Speed Burst |
| Countermeasure 2 | Vertical Boost |
- Unlockable
- Vehicle: Get a "GREAT" rating in all Smuggler's Missions.
This vehicle in Warzones is rather useless and tends to get stuck in the ground for some reason. It's good for straightaways and doing timed point A to point B missions. That's about it. It is very fast but the acceleration is rather lacking unless on a flat surface but is decent on mild to moderate off road environments. In the team settings it makes a decent forward for getting contraband. You can jump over people which makes it useful. Takes almost no damage though.
Stats comparison chart[edit]
| Vehicle | Speed | Acceleration | Handling | Weight | Team Role | CM 1 | CM 2 |
|---|---|---|---|---|---|---|---|
| Super Buggy | 8 | 8 | 7 | 7 | Forward | Speed Burst | Acid |
| D-5 Hondo | 7 | 7 | 8 | 7 | Guard | Oil Slick | Vertical Boost |
| ATV Monster | 9 | 9 | 6 | 6 | Forward | Speed Burst | Repel Sphere |
| Special Du Monde | 10 | 6 | 5 | 7 | Corner | Oil Slick | Cloaking Device |
| Baja Truck | 8 | 9 | 9 | 9 | Corner | Bombs | Vertical Boost |
| Sahara Special | 8 | 8 | 8 | 9 | Guard | Smoke Screen | Acid |
| Grenadier | 8 | 6 | 9 | 10 | Back | Bombs | Cloaking Device |
| Kavastov | 6 | 10 | 10 | 10 | Back | Smoke Screen | Repel Sphere |
| Hover Sled | 9 | 5 | 9 | 4 | Speed Burst | Vertical Boost |