Jump to navigation
Jump to search
Sprout Tower Level 1
Sprout Tower Level 2
Sprout Tower Level 3
(new screenshots added) |
(Fixed the levels of the tower) |
||
| Line 5: | Line 5: | ||
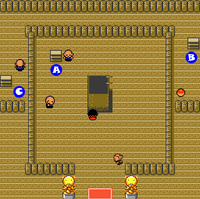
==Level 1== | ==Level 1== | ||
[[Image:Pokemon-GSC-Johto-SproutTower1.png|thumb|200px|left|Sprout Tower Level 1]] | [[Image:Pokemon-GSC-Johto-SproutTower1.png|thumb|200px|left|Sprout Tower Level 1]] | ||
Talk to the people on the first level, then go | {| | ||
|- | |||
| First time: Talk to the people on the first level, then go up staircase A. | |||
| | |||
| | |||
|- | |||
|- | |- | ||
|[[Image:Pokemon GSC Sage.png|left]] | | valign="top" | Second time: Pick up the Parlyz Heal to your south, then proceed around the outside of the Tower to battle Sage Chow. Go up staircase C. | ||
|Sage | | width="30px" | [[Image:Pokemon GSC Sage.png|left]] | ||
| width="30%" | Sage Chow: | |||
* {{bp|Bellsprout|3|54}} | * {{bp|Bellsprout|3|54}} | ||
* {{bp|Bellsprout|3|54}} | * {{bp|Bellsprout|3|54}} | ||
* {{bp|Bellsprout|3|54}} and [[Image:Pokébuck.png]]96 | * {{bp|Bellsprout|3|54}}<br />and [[Image:Pokébuck.png]]96 | ||
|} | |} | ||
{{-}} | {{-}} | ||
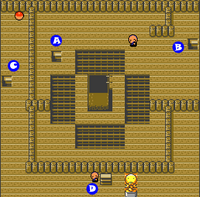
==Level | ==Level 2== | ||
[[Image:Pokemon-GSC-Johto- | [[Image:Pokemon-GSC-Johto-SproutTower2.png|thumb|200px|left|Sprout Tower Level 2]] | ||
{| | {| | ||
|- | |- | ||
| valign="top" width="60%"| First time: There is one trainer between you and staircase B, which will take you back down to Level 1. | |||
| width="30px" | [[Image:Pokemon GSC Sage.png|left]] | | width="30px" | [[Image:Pokemon GSC Sage.png|left]] | ||
| width="30%" | Sage | | width="30%" | Sage Nico: | ||
* {{bp|Bellsprout|3|54}} | * {{bp|Bellsprout|3|54}} | ||
* {{bp|Bellsprout|3|54}} | * {{bp|Bellsprout|3|54}} | ||
* {{bp|Bellsprout|3|54}}<br />and [[Image:Pokébuck.png]]96 | * {{bp|Bellsprout|3|54}}<br />and [[Image:Pokébuck.png]]96 | ||
|- | |- | ||
| valign="top" | Second time: Get the X Accuracy to the north, then swing around the corner for a battle. Go up staircase D. | |||
| width="30px" | [[Image:Pokemon GSC Sage.png|left]] | | width="30px" | [[Image:Pokemon GSC Sage.png|left]] | ||
| width="30%" | Sage Edmond: | | width="30%" | Sage Edmond: | ||
| Line 40: | Line 37: | ||
* {{bp|Bellsprout|3|54}} | * {{bp|Bellsprout|3|54}} | ||
* {{bp|Bellsprout|3|54}}<br />and [[Image:Pokébuck.png]]96 | * {{bp|Bellsprout|3|54}}<br />and [[Image:Pokébuck.png]]96 | ||
|} | |} | ||
{{-}} | {{-}} | ||
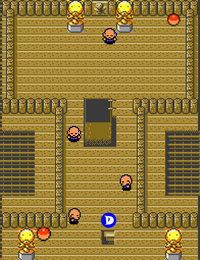
==Level | ==Level 3== | ||
[[Image:Pokemon-GSC-Johto- | [[Image:Pokemon-GSC-Johto-SproutTower3.png|thumb|200px|left|Sprout Tower Level 3]] | ||
{| | {| | ||
|- | |- | ||
| rowspan="3" valign="top" | Grab the Potion to your left, then prepare to run the gauntlet. You can bypass the third trainer by not walking in front of him, but you can always use the experience points. | |||
| width="30px" | [[Image:Pokemon GSC Sage.png|left]] | | width="30px" | [[Image:Pokemon GSC Sage.png|left]] | ||
| width="30%" | Sage Jin: | | width="30%" | Sage Jin: | ||
* {{bp|Bellsprout|6|108}}<br />and [[Image:Pokébuck.png]]192 | * {{bp|Bellsprout|6|108}}<br />and [[Image:Pokébuck.png]]192 | ||
|- | |- | ||
|[[Image:Pokemon GSC Sage.png|left]] | |[[Image:Pokemon GSC Sage.png|left]] | ||
| Line 60: | Line 56: | ||
* {{bp|Bellsprout|7|126}} | * {{bp|Bellsprout|7|126}} | ||
* {{bp|Hoothoot|7|87}}<br />and [[Image:Pokébuck.png]]224 | * {{bp|Hoothoot|7|87}}<br />and [[Image:Pokébuck.png]]224 | ||
|- | |- | ||
| | |As you approach the right side of the shaking pillar, you'll see your Rival beating the Sage. He lectures you briefly on weak and strong Pokémon, then uses an Escape Rope to vanish. You can acquire an Escape Rope in the corner, then approach the Sage. When you defeat him, you'll get HM05 (Flash), which you need for the Dark Cave. | ||
| width="30px" | [[Image:Pokemon GSC Sage.png|left]] | | width="30px" | [[Image:Pokemon GSC Sage.png|left]] | ||
| width="30%" | Sage Li: | | width="30%" | Sage Li: | ||
| Line 70: | Line 63: | ||
* {{bp|Bellsprout|7|126}} | * {{bp|Bellsprout|7|126}} | ||
* {{bp|Hoothoot|10|123}}<br />and [[Image:Pokébuck.png]]320 (Reward: HM05 - Flash) | * {{bp|Hoothoot|10|123}}<br />and [[Image:Pokébuck.png]]320 (Reward: HM05 - Flash) | ||
|} | |} | ||
{{-}} | {{-}} | ||
Revision as of 02:32, 23 August 2007

Tip: To win easily get a Pidgey and train it to Level 9, when it will learn Gust, which is super-effective against Grass-type Pokémon. A level-5 or level-6 Pidgey will earn enough experience to be level 9 by the time you reach the top.
Level 1

| First time: Talk to the people on the first level, then go up staircase A. | ||
| Second time: Pick up the Parlyz Heal to your south, then proceed around the outside of the Tower to battle Sage Chow. Go up staircase C. |  |
Sage Chow:
|
Level 2

| First time: There is one trainer between you and staircase B, which will take you back down to Level 1. | |
Sage Nico:
|
| Second time: Get the X Accuracy to the north, then swing around the corner for a battle. Go up staircase D. | |
Sage Edmond:
|
Level 3

| Grab the Potion to your left, then prepare to run the gauntlet. You can bypass the third trainer by not walking in front of him, but you can always use the experience points. | |
Sage Jin:
|
|
Sage Neal:
| |
|
Sage Troy:
| |
| As you approach the right side of the shaking pillar, you'll see your Rival beating the Sage. He lectures you briefly on weak and strong Pokémon, then uses an Escape Rope to vanish. You can acquire an Escape Rope in the corner, then approach the Sage. When you defeat him, you'll get HM05 (Flash), which you need for the Dark Cave. | |
Sage Li:
|
Pokémon Found
| Morning | Day | Night |
|---|---|---|
Items
- Parlyz Heal
- X Accuracy
- Escape Rope
- HM 05