m (Final Fantasy/Walkthrough/Chapter 9 moved to Final Fantasy/The Crystal of Air: Proper title) |
(cleanup) |
||
| (45 intermediate revisions by 29 users not shown) | |||
| Line 1: | Line 1: | ||
{{ | {{Header Nav|game=Final Fantasy}} | ||
[[File:Final Fantasy I (NES) Chp9.jpg|thumb|right|Lufenia and the desert]] | |||
'''''The Warriors of Light must take to the sky on their quest to light the remaining crystal. With the help of the Lufenians, descendants of the legendary Sky People, the warriors will gain access to the Mirage Tower, a portal in the desert. From there, they can warp to the Sky Fortress and view the world from another perspective before facing off with Tiamat, the Fiend of Wind.''''' | |||
[[ | == {{s|Locations|Waterfall Cave}} == | ||
[[File:Final Fantasy 1 map cave Waterfall.png|frame|left|Waterfall Cave]] | |||
*<font color="red">'''A'''</font>: Wizard's Staff | |||
*<font color="red">'''B'''</font>: Ribbon | |||
*<font color="red">'''C'''</font>: 13,450 Gil | |||
*<font color="red">'''D'''</font>: 6400 Gil | |||
*<font color="red">'''E'''</font>: 5000 Gil | |||
*<font color="red">'''F'''</font>: NES - Defense, DoS - Defender | |||
Behind the cascade of falling mist lies a deep cavern with many winding passages. Here you must go to solve the mystery of the U.F.O. seen in Onrac. Enter the river near Onrac and travel north straight into the waterfall. As you approach the treasure room, be prepared to fight Cockatrices and Pyrolisks—the latter can knock out party members in a single turn. Some enemies like the Green (Gas) Dragon are extremely dangerous, while others like the Clay Golem (MudGol) are easy to run away from. | |||
'' | Talk to the robot inside the treasure room. It will mention something about a flying fortress and give you the key item called the {{s|Key items|Warp Cube}}, which you'll need later in the game. You'll also find two more usable pieces of equipment. The Wizard Staff will cast Confuse on all of your enemies when used in battle. The Defender (Defense) sword will cast Blink on the user for added protection. To avoid the frustration of all of the side paths, Exit or Teleport will instantly remove the problem. | ||
{{-}} | |||
== [[Final Fantasy | == {{s|Locations|Lufenia}} == | ||
[[File:Final Fantasy 1 map town Lefein.png|frame|right|Town of Lufenia]] | |||
Lufenia, the Wing of the Hawk, is located south of Gaia. There is only one small area on which to land your airship to reach Lufenia. It is located to the north, near a small lake. Set the airship down on a tiny square of unforested grassland, then battle your way south toward Lufenia. | |||
=== The {{s|Locations|Melmond}} graveyard === | |||
If you visit Lufenia before taking the Rosetta Stone to Dr. Unne, it could be a frustrating trip. The fact is that the people of Lufenia speak an ancient language which has been forgotten everywhere else in the world. Return to Melmond with the Rosetta Stone from the Sunken Shrine. Show the stone to Dr. Unne, who's wandering the graveyard in the northeast part of town. He will be able to decipher a Lufenian puzzle, and in return will teach your party to understand the cryptic language. | |||
Once you have learned the ancient language from Dr. Unne, travel to the town of Lufenia. Whereas before they spoke only gibberish, now you can understand every word. Here you will find the descendants of the brave souls who hid the Airship in the South. You will also learn that the people of Lufenia once controlled a fantastic realm that reached into the sky. | |||
= | Lufenia was once the home of the great civilization of the North. Their language is foreign, but with Dr. Unne's help, you can learn it. Once you do, you'll learn of an ancient race called the Sky People who once thrived on the power of wind. Tiamat, the Fiend of Wind, now inhabits their glorious castle in the sky. The Lufenians will also mention their ancestor, Cid, who built your airship (not in the NES version). Talk to them to hear their tales and receive the [[../Key items#Bell|Chime]], which will grant you access to the sky. | ||
{{-}} | |||
{| {{prettytable|style=font-size:0.8em}} | |||
|+ Lufenia Shops | |||
! L8 [[../White magic/]]: 60,000 (40,000) Gil || L8 [[../Black magic/]]: 60,000 (40,000) Gil | |||
|- | |||
| Full-life || Flare | |||
|} | |||
=== Lufenian history === | |||
Four hundred years ago Tiamat, the Fiend of the Wind, stole the power of the wind from the Lufenian Sky Warriors. Now she resides high above the Earth in the realm of stars. Perhaps the Lufenian robots still operate the complex machinery that suspends the castle in space. The Light Warriors must find the entrance to the Sky Castle somewhere in the Mirage Tower. | |||
The | The five bravest warriors of Lufenia went in search of the cause of the turmoil in the sky, knowing that some vast power was intent on the destruction of their civilization. They left their Airship and Levistone in the South, but never returned to Lufenia. | ||
=== | === Lufenian shopping === | ||
Lufenia is home to only two shops. They each contain a powerful level-8 spell and are easy to miss. In the northeastern corner of Lufenia you will discover a breach in the wall. Pass through the hole and walk east across the grassy area until you find them. There you will find the hidden magic shops. Each shop sells just one spell, Full-life (LIF2) and Flare (NUKE). They are arguably the best spells, so don't pass them up! Only a high level Black and White Wizard can learn the spells. | |||
The legend of the four warriors precedes them. A Lufenian in the southeast part of town will give you the [[../Key items#Bell|Chime]], a key item that enables you to enter Mirage Tower. Only the precise harmonic tones of the Chime will open the door to the Mirage Tower. Head to the desert west of Lufenia to use the Chime and enter the tower. | |||
== | == {{s|Locations|Tower of Mirage}} == | ||
Rising from the center of the Great Eastern Desert like a horn of stone, the Mirage Tower is your path to the final fiend, Tiamat, who lives somewhere above in the floating castle of the Lufenians. But the Tower itself holds many dangers. Many adventurers discover the Mirage tower long before they hear of the Chime. But if they hope to get inside, they must speak Lufenian and get the Chime from a man in Lufenia. | |||
East of the desert is a small plot of grass just wide enough for an Airship to make a landing. As you cross the sands, Tyrannosaur (T Rex), Allosaurus (Tyro), and Desert Baretta (Ankylo) attack. All three provide high amounts of experience points, but Tyranosaurs have a lot of HP, and the thick hide of the Desert Baretta makes it incredibly tough to damage. | |||
=== Floor 1 === | |||
[[File:Final Fantasy 1 map tower Mirage F1.png|frame|left|Mirage Tower F1]] | |||
{| | |||
| | |||
*<font color="red">'''A'''</font>: 800 Gil, PR - 1300 Gil | |||
*<font color="red">'''B'''</font>: NES - Cabin, GBA - Tent | |||
*<font color="red">'''C'''</font>: Aegis Shield | |||
*<font color="red">'''D'''</font>: 2750 Gil | |||
| | |||
*<font color="red">'''E'''</font>: 3400 Gil | |||
*<font color="red">'''F'''</font>: 18,010 Gil | |||
*<font color="red">'''G'''</font>: Vorpal Sword | |||
*<font color="red">'''H'''</font>: Healing Helmet | |||
|} | |||
The journey through Mirage Tower and the Flying Fortress is long. Go in prepared with plenty of Cottages (Houses). If you get low on HP and MP, use the Exit spell then a Cottage before taking another stab at the dungeons. Be sure to collect the powerful weapons and armor as you advance. You'll find a great deal of treasure lying about in the Mirage Tower. Some of the weapons and armor, such as the Aegis Shield, you'll want to keep. Other pieces merely take up space, which is in much shorter supply in the original NES version. If your subscreen is full, go back to Gaia and sell unwanted items, or simply drop them. | |||
== [[Final Fantasy | === Floor 2 === | ||
[[File:Final Fantasy 1 map tower Mirage F2.png|frame|right|Mirage Tower F2]] | |||
{| | |||
| | |||
*<font color="red">'''A'''</font>: 13,000 Gil | |||
*<font color="red">'''B'''</font>: NES - House, GBA - Cottage | |||
*<font color="red">'''C'''</font>: 12,350 Gil | |||
*<font color="red">'''D'''</font>: 7690 Gil, PR - 7600 Gil | |||
*<font color="red">'''E'''</font>: Thor's Hammer | |||
| | |||
*<font color="red">'''F'''</font>: NES - Sun Sword, GBA - Sun Blade | |||
*<font color="red">'''G'''</font>: 7900 Gil | |||
*<font color="red">'''H'''</font>: 10,000 Gil | |||
*<font color="red">'''I'''</font>: 8135 Gil | |||
*<font color="red">'''J'''</font>: NES - Dragon Armor, GBA - Dragon Mail | |||
|} | |||
Chimeras, if not quelled quickly, will attack your entire party with Blaze. Hit them with strong physical attacks, and cast Blizzaga (Ice3) to defeat them fast. | |||
Like the Robot in the Waterfall, you will find other robots occupying each floor. These robots have been programmed with messages for warriors who may not have ventured into the Waterfall yet to recover the Cube from the other robot. | |||
You will also obtain the powerful Dragon Mail. Your Knight will now be guarded against all elemental attacks with the same protection as Diamond Armor (NES: Opal Armor). | |||
With Aegis Shield protecting from Stoning, the Protect Ring protecting from Death and the Dragon Mail protecting from Elemental Attacks, your Knight will not need any of the 3 Ribbons in the game. | |||
You could also equip your Knight with the Healing Helm. You would only lose 2 Absorb points but gain the ability to heal your team during battles with weaker monsters. | |||
{{-}} | |||
=== Floor 3 === | |||
[[File:Final Fantasy 1 map tower Mirage F3.png|frame|left|Mirage Tower F3]] | |||
You'll be forced to fight a Blue Dragon before stepping onto the warp pad. The serpent has no particular weaknesses and his Thunder spell can wreak havoc, so Ribbons and NulShock will be helpful. Cast Saber using the Giant's Gloves, then cast Haste with a Black or Red Wizard to raise a party member's Attack and inflict strong physical damage on the Blue Dragon. | |||
[[File:FFI boss Blue Dragon.gif|thumb|right|Blue Dragon]] | |||
*'''HP''': 454 | |||
*'''Experience Points''': 3274 | |||
*'''Gil''': 2000 | |||
= | In the center of the top floor of the Tower you'll find the Transporter. The Warp Cube from the Waterfall Cavern will allow you to advance to the Flying Fortress, home of Tiamat. Stand on the pad at point <font color="blue">'''C'''</font> in the middle of the room to use the cube. | ||
== {{s|Locations|Flying Fortress}} == | |||
Mirage Tower was just the beginning. Once you're inside the Flying Fortress, be prepared to face some dangerous enemies, including Tiamat, the Fiend of Wind. While exploring the fortress, take advantage of your weapons and armor that have spellcasting abilities when accessed from your inventory. The Exit spell will transport you to the beginning of the Mirage Tower, so use it only as a last resort. | |||
The first thing that you'll notice is that the Flying Fortress is obviously a product of high technology, and not just because it's miles above Earth. Transporters and robots are everywhere. One of the guardians is high-tech as well—the awesome Death Machine. | |||
=== Floor 1 === | |||
[[File:Final Fantasy 1 map castle Sky F1.png|frame|right|Flying Fortress F1]] | |||
{| | |||
| | |||
*<font color="red">'''A'''</font>: 9900 Gil | |||
*<font color="red">'''B'''</font>: NES - Heal, GBA - Potion | |||
*<font color="red">'''C'''</font>: 4150 Gil | |||
*<font color="red">'''D'''</font>: 7900 Gil | |||
*<font color="red">'''E'''</font>: 5000 Gil | |||
| | |||
*<font color="red">'''F'''</font>: Protection Ring | |||
*<font color="red">'''G'''</font>: 6720 Gil | |||
*<font color="red">'''H'''</font>: Healing Helmet | |||
*<font color="red">'''I'''</font>: 180 Gil | |||
*<font color="red">'''J'''</font>: NES - Bane Sword, PS - Venom Blade, GBA - Razer | |||
|} | |||
Before equipping a newly found weapon or piece of armor, check to see if it has spellcasting ability. Even if an item would increase a party member's stats when equipped, you may benefit more from leaving it unequipped to use its spellcasting ability in battle. Thor's Hammer for instance, will most likely raise a White Wizard's Attack, but it is better used to cast Thundara. | |||
Any party member can use the Healing Staff and Healing Helm. The benefits aren't as great as those from Healara, but they come in handy nonetheless when you need to heal, but are low on MP. The Razer (Bane Sword/Venom Blade) has the ability to cast Scourge (Bane/Poison) if used in battle. Its chances for success are low, but it could make the difference in a tight situation. | |||
{{-}} | |||
=== Floor 2 === | |||
[[File:Final Fantasy 1 map castle Sky F2.png|frame|left|Flying Fortress F2]] | |||
{| | |||
| | |||
*<font color="red">'''A'''</font>: NES - Silver Helmet, GBA - Mythril Helm | |||
*<font color="red">'''B'''</font>: NES - House, GBA - Cottage | |||
*<font color="red">'''C'''</font>: NES - Opal Gauntlet, GBA - Diamond Gloves | |||
*<font color="red">'''D'''</font>: 880 Gil, PR - 1380 Gil | |||
*<font color="red">'''E'''</font>: 13,000 Gil | |||
| | |||
*<font color="red">'''F'''</font>: Ribbon | |||
*<font color="red">'''G'''</font>: NES - Opal Shield, GBA - Diamond Shield | |||
*<font color="red">'''H'''</font>: Adamantite | |||
*<font color="red">'''I'''</font>: White Robe | |||
*<font color="red">'''J'''</font>: Black Robe | |||
|} | |||
If you're playing the original NES version and you run out of space, remember that it's easy to use the Exit spell, then go to Gaia and sell off the excess treasure. Always be sure the equipment doesn't have some secret use before selling it off forever. If you don't want to spend the time going all the way back to Gaia, you can drop weapons or armor. Just don't drop a valuable item. After clearing the Sky Castle, you'll never want for Gold again. Spend it on expensive magic spells to fill out your casting options. | |||
Once you obtain the Adamantite, take it back to {{s|Locations|Mt. Duergar}}. There a blacksmith will use the raw material to forde a fantastic sword known as Excalibur, which is second in power only to the Masamune. | |||
The White and Black Robes found on this level are useful both as equipped armor and as spellcasting items during battle. The Robes are equally as protective as the Ruby Armlet (NES: Gold Bracelet) while only weighing 1 point more. | |||
The Black Robe is the only item which casts Blizzara (NES: Ice2). If you have the Mage Staff, the Light Axe and Thor's Hammer (or the Zeus Gauntlets), the addition of the Black Robe gives a full array of endless elemental attacks for the variety of enemies you'll encounter, allowing non-magic users new abilities and saving casters from having to cast. | |||
The | The White Robe casts Invisara (NES: INV2) which raises your entire party's ability to dodge. The strongest enemies in the game you will soon have to confront. They inflict multiple hits per attack making an 40 point increase in each Light Warrior's evade extremely useful. | ||
The drawback is this: only the Black Wizard can equip the Black Robe; only the White Wizard can equip the White Robe. If you do not have a White Wizard or Black Wizard in your party and you have the NES version which allows only 4 slots for armor, you may have to pass up these items. | |||
However, if you are using a White Wizard or Black Wizard equip them with their Robes. | |||
On the next level, you'll find a item called the Protect Cloak (NES: ProCape), which any of your Wizard class should equip as a hand guard. | |||
{{-}} | |||
[[ | === Floor 3 === | ||
[[File:Final Fantasy 1 map castle Sky F3.png|frame|right|Flying Fortress F3]] | |||
{| | |||
| | |||
*<font color="red">'''A'''</font>: 9000 Gil | |||
*<font color="red">'''B'''</font>: Protect Ring | |||
*<font color="red">'''C'''</font>: NES - Heal, GBA - Potion | |||
*<font color="red">'''D'''</font>: 5450 Gil | |||
*<font color="red">'''E'''</font>: NES - Soft, GBA - Gold Needle | |||
*<font color="red">'''F'''</font>: 4150 Gil | |||
*<font color="red">'''G'''</font>: 3400 Gil | |||
| | |||
*<font color="red">'''H'''</font>: NES - Katana, GBA - Sasuke's Blade | |||
*<font color="red">'''I'''</font>: 6400 Gil | |||
*<font color="red">'''J'''</font>: NES - Soft, GBA - Gold Needle | |||
*<font color="red">'''K'''</font>: Clothes | |||
*<font color="red">'''L'''</font>: 9500 Gil | |||
*<font color="red">'''M'''</font>: NES - ProCape, GBA - Protect Cloak | |||
*<font color="red">'''N'''</font>: 8135 Gil | |||
|} | |||
The robot near the center of the third floor will tell you to look into the window to see the world from the Flying Fortress. Do as it says to learn how the powers of the four elements converges at a single point on the world. This will clue you in to your next destination after completing the Flying Fortress and lighting the fourth crystal. Four forces are flowing together into the center of the Temple of Fiends. When it comes time to seek out the Master of those four elemental forces, the Light Warriors will return to the Temple of Fiends. | |||
{{-}} | {{-}} | ||
=== Floor 4 === | |||
[[File:Final Fantasy 1 map castle Sky F4.png|frame|left|Flying Fortress F4]] | |||
The fourth floor of the Flying Fortress goes on forever in any direction. Walking straight will get you nowhere in this maze. From the warp point marked <font color="blue">'''F'''</font> on the map, go up (or down) two squares and left (or right) two squares, to reach warp point <font color="blue">'''G'''</font> which leads to the final level. There are no other items or features of any interest on this level. | |||
{{-}} | |||
=== Floor 5 === | |||
[[File:Final Fantasy 1 map castle Sky F5.png|frame|right|Flying Fortress F5]] | |||
A combat robot called Death Machine (WarMech) patrols the bridge that leads to Tiamat's inner sanctum. But your chances of meeting it are slim—just one in 64. If you do have to fight, use NulBlaze and the Ice Armor. | |||
[[File:FFI boss Warmech.gif|thumb|left|The Death Machine]] | |||
* '''HP''': 2000 | |||
* '''Experience Points''': 32,000 (8006 on mobile) | |||
* '''Gil''': 32,000 | |||
You may or may not encounter the [[../Bosses#Warmech|Death Machine]] on the bridge. Prepare for the worst, however; the Death Machine is more difficult than even Tiamat! Its attacks are focused on single party members, and they do damage of hundreds of HP. The machine also heals itself 100 HP every turn. Attack incessantly—your foe will eventually cast a nasty spell called Nuke that deals heavy damage to your entire party. If you do manage to destroy the Death Machine, the reward will be well worth the effort. | |||
Tiamat awaits you on the opposite end of the bridge. | |||
[[File:FFI boss Tiamat.gif|thumb|left|Tiamat]] | |||
*'''HP''': NES - 1000, GBA - 2400 | |||
*'''Experience Points''': 5496 | |||
*'''Gil''': 6000 | |||
[[../Bosses#Tiamat 1|Tiamat]], the Fiend of Wind, will be waiting for you when you reach the crystal. Her specialized attacks can be brutal. Protective spells such as Protera will be helpful against her wide array of spells. Saber and Haste will be helpful for increasing the strength of your physical attacks. If you purchased the black spell Flare (Nuke) in Lufenia, cast it as often as possible. It will do more damage than any other spell. Tiamat's assaults are ferocious, so have your healer use Healaga and Curaja whenever needed. | |||
{{Footer Nav|game=Final Fantasy|prevpage= | {{Footer Nav|game=Final Fantasy|prevpage=The Crystal of Water|nextpage=The Temple of Chaos}} | ||
Latest revision as of 17:18, 3 August 2023
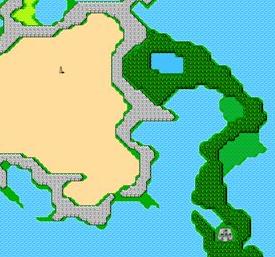
The Warriors of Light must take to the sky on their quest to light the remaining crystal. With the help of the Lufenians, descendants of the legendary Sky People, the warriors will gain access to the Mirage Tower, a portal in the desert. From there, they can warp to the Sky Fortress and view the world from another perspective before facing off with Tiamat, the Fiend of Wind.
Waterfall Cave[edit]

- A: Wizard's Staff
- B: Ribbon
- C: 13,450 Gil
- D: 6400 Gil
- E: 5000 Gil
- F: NES - Defense, DoS - Defender
Behind the cascade of falling mist lies a deep cavern with many winding passages. Here you must go to solve the mystery of the U.F.O. seen in Onrac. Enter the river near Onrac and travel north straight into the waterfall. As you approach the treasure room, be prepared to fight Cockatrices and Pyrolisks—the latter can knock out party members in a single turn. Some enemies like the Green (Gas) Dragon are extremely dangerous, while others like the Clay Golem (MudGol) are easy to run away from.
Talk to the robot inside the treasure room. It will mention something about a flying fortress and give you the key item called the Warp Cube, which you'll need later in the game. You'll also find two more usable pieces of equipment. The Wizard Staff will cast Confuse on all of your enemies when used in battle. The Defender (Defense) sword will cast Blink on the user for added protection. To avoid the frustration of all of the side paths, Exit or Teleport will instantly remove the problem.
Lufenia[edit]

Lufenia, the Wing of the Hawk, is located south of Gaia. There is only one small area on which to land your airship to reach Lufenia. It is located to the north, near a small lake. Set the airship down on a tiny square of unforested grassland, then battle your way south toward Lufenia.
The Melmond graveyard[edit]
If you visit Lufenia before taking the Rosetta Stone to Dr. Unne, it could be a frustrating trip. The fact is that the people of Lufenia speak an ancient language which has been forgotten everywhere else in the world. Return to Melmond with the Rosetta Stone from the Sunken Shrine. Show the stone to Dr. Unne, who's wandering the graveyard in the northeast part of town. He will be able to decipher a Lufenian puzzle, and in return will teach your party to understand the cryptic language.
Once you have learned the ancient language from Dr. Unne, travel to the town of Lufenia. Whereas before they spoke only gibberish, now you can understand every word. Here you will find the descendants of the brave souls who hid the Airship in the South. You will also learn that the people of Lufenia once controlled a fantastic realm that reached into the sky.
Lufenia was once the home of the great civilization of the North. Their language is foreign, but with Dr. Unne's help, you can learn it. Once you do, you'll learn of an ancient race called the Sky People who once thrived on the power of wind. Tiamat, the Fiend of Wind, now inhabits their glorious castle in the sky. The Lufenians will also mention their ancestor, Cid, who built your airship (not in the NES version). Talk to them to hear their tales and receive the Chime, which will grant you access to the sky.
| L8 White magic: 60,000 (40,000) Gil | L8 Black magic: 60,000 (40,000) Gil |
|---|---|
| Full-life | Flare |
Lufenian history[edit]
Four hundred years ago Tiamat, the Fiend of the Wind, stole the power of the wind from the Lufenian Sky Warriors. Now she resides high above the Earth in the realm of stars. Perhaps the Lufenian robots still operate the complex machinery that suspends the castle in space. The Light Warriors must find the entrance to the Sky Castle somewhere in the Mirage Tower.
The five bravest warriors of Lufenia went in search of the cause of the turmoil in the sky, knowing that some vast power was intent on the destruction of their civilization. They left their Airship and Levistone in the South, but never returned to Lufenia.
Lufenian shopping[edit]
Lufenia is home to only two shops. They each contain a powerful level-8 spell and are easy to miss. In the northeastern corner of Lufenia you will discover a breach in the wall. Pass through the hole and walk east across the grassy area until you find them. There you will find the hidden magic shops. Each shop sells just one spell, Full-life (LIF2) and Flare (NUKE). They are arguably the best spells, so don't pass them up! Only a high level Black and White Wizard can learn the spells.
The legend of the four warriors precedes them. A Lufenian in the southeast part of town will give you the Chime, a key item that enables you to enter Mirage Tower. Only the precise harmonic tones of the Chime will open the door to the Mirage Tower. Head to the desert west of Lufenia to use the Chime and enter the tower.
Tower of Mirage[edit]
Rising from the center of the Great Eastern Desert like a horn of stone, the Mirage Tower is your path to the final fiend, Tiamat, who lives somewhere above in the floating castle of the Lufenians. But the Tower itself holds many dangers. Many adventurers discover the Mirage tower long before they hear of the Chime. But if they hope to get inside, they must speak Lufenian and get the Chime from a man in Lufenia.
East of the desert is a small plot of grass just wide enough for an Airship to make a landing. As you cross the sands, Tyrannosaur (T Rex), Allosaurus (Tyro), and Desert Baretta (Ankylo) attack. All three provide high amounts of experience points, but Tyranosaurs have a lot of HP, and the thick hide of the Desert Baretta makes it incredibly tough to damage.
Floor 1[edit]
|
|
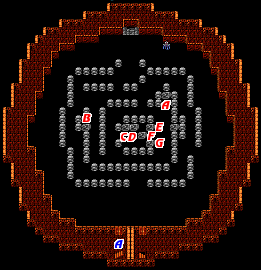
The journey through Mirage Tower and the Flying Fortress is long. Go in prepared with plenty of Cottages (Houses). If you get low on HP and MP, use the Exit spell then a Cottage before taking another stab at the dungeons. Be sure to collect the powerful weapons and armor as you advance. You'll find a great deal of treasure lying about in the Mirage Tower. Some of the weapons and armor, such as the Aegis Shield, you'll want to keep. Other pieces merely take up space, which is in much shorter supply in the original NES version. If your subscreen is full, go back to Gaia and sell unwanted items, or simply drop them.
Floor 2[edit]
|
|
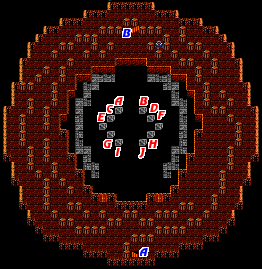
Chimeras, if not quelled quickly, will attack your entire party with Blaze. Hit them with strong physical attacks, and cast Blizzaga (Ice3) to defeat them fast.
Like the Robot in the Waterfall, you will find other robots occupying each floor. These robots have been programmed with messages for warriors who may not have ventured into the Waterfall yet to recover the Cube from the other robot.
You will also obtain the powerful Dragon Mail. Your Knight will now be guarded against all elemental attacks with the same protection as Diamond Armor (NES: Opal Armor). With Aegis Shield protecting from Stoning, the Protect Ring protecting from Death and the Dragon Mail protecting from Elemental Attacks, your Knight will not need any of the 3 Ribbons in the game. You could also equip your Knight with the Healing Helm. You would only lose 2 Absorb points but gain the ability to heal your team during battles with weaker monsters.
Floor 3[edit]

You'll be forced to fight a Blue Dragon before stepping onto the warp pad. The serpent has no particular weaknesses and his Thunder spell can wreak havoc, so Ribbons and NulShock will be helpful. Cast Saber using the Giant's Gloves, then cast Haste with a Black or Red Wizard to raise a party member's Attack and inflict strong physical damage on the Blue Dragon.

- HP: 454
- Experience Points: 3274
- Gil: 2000
In the center of the top floor of the Tower you'll find the Transporter. The Warp Cube from the Waterfall Cavern will allow you to advance to the Flying Fortress, home of Tiamat. Stand on the pad at point C in the middle of the room to use the cube.
Flying Fortress[edit]
Mirage Tower was just the beginning. Once you're inside the Flying Fortress, be prepared to face some dangerous enemies, including Tiamat, the Fiend of Wind. While exploring the fortress, take advantage of your weapons and armor that have spellcasting abilities when accessed from your inventory. The Exit spell will transport you to the beginning of the Mirage Tower, so use it only as a last resort.
The first thing that you'll notice is that the Flying Fortress is obviously a product of high technology, and not just because it's miles above Earth. Transporters and robots are everywhere. One of the guardians is high-tech as well—the awesome Death Machine.
Floor 1[edit]
|
|
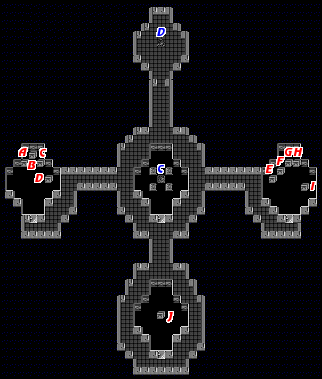
Before equipping a newly found weapon or piece of armor, check to see if it has spellcasting ability. Even if an item would increase a party member's stats when equipped, you may benefit more from leaving it unequipped to use its spellcasting ability in battle. Thor's Hammer for instance, will most likely raise a White Wizard's Attack, but it is better used to cast Thundara.
Any party member can use the Healing Staff and Healing Helm. The benefits aren't as great as those from Healara, but they come in handy nonetheless when you need to heal, but are low on MP. The Razer (Bane Sword/Venom Blade) has the ability to cast Scourge (Bane/Poison) if used in battle. Its chances for success are low, but it could make the difference in a tight situation.
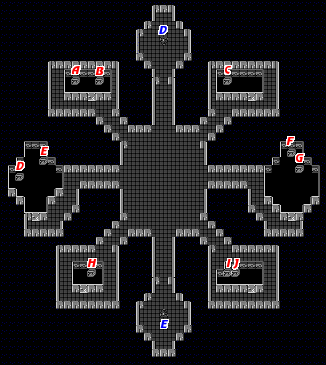
Floor 2[edit]
|
|
If you're playing the original NES version and you run out of space, remember that it's easy to use the Exit spell, then go to Gaia and sell off the excess treasure. Always be sure the equipment doesn't have some secret use before selling it off forever. If you don't want to spend the time going all the way back to Gaia, you can drop weapons or armor. Just don't drop a valuable item. After clearing the Sky Castle, you'll never want for Gold again. Spend it on expensive magic spells to fill out your casting options.
Once you obtain the Adamantite, take it back to Mt. Duergar. There a blacksmith will use the raw material to forde a fantastic sword known as Excalibur, which is second in power only to the Masamune.
The White and Black Robes found on this level are useful both as equipped armor and as spellcasting items during battle. The Robes are equally as protective as the Ruby Armlet (NES: Gold Bracelet) while only weighing 1 point more.
The Black Robe is the only item which casts Blizzara (NES: Ice2). If you have the Mage Staff, the Light Axe and Thor's Hammer (or the Zeus Gauntlets), the addition of the Black Robe gives a full array of endless elemental attacks for the variety of enemies you'll encounter, allowing non-magic users new abilities and saving casters from having to cast.
The White Robe casts Invisara (NES: INV2) which raises your entire party's ability to dodge. The strongest enemies in the game you will soon have to confront. They inflict multiple hits per attack making an 40 point increase in each Light Warrior's evade extremely useful.
The drawback is this: only the Black Wizard can equip the Black Robe; only the White Wizard can equip the White Robe. If you do not have a White Wizard or Black Wizard in your party and you have the NES version which allows only 4 slots for armor, you may have to pass up these items. However, if you are using a White Wizard or Black Wizard equip them with their Robes.
On the next level, you'll find a item called the Protect Cloak (NES: ProCape), which any of your Wizard class should equip as a hand guard.
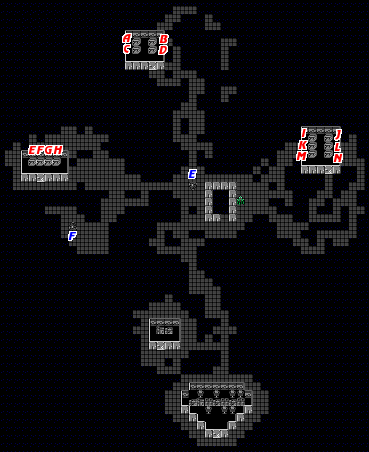
Floor 3[edit]
|
|
The robot near the center of the third floor will tell you to look into the window to see the world from the Flying Fortress. Do as it says to learn how the powers of the four elements converges at a single point on the world. This will clue you in to your next destination after completing the Flying Fortress and lighting the fourth crystal. Four forces are flowing together into the center of the Temple of Fiends. When it comes time to seek out the Master of those four elemental forces, the Light Warriors will return to the Temple of Fiends.
Floor 4[edit]
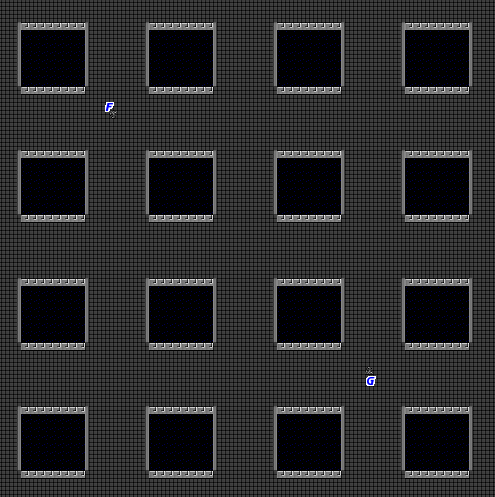
The fourth floor of the Flying Fortress goes on forever in any direction. Walking straight will get you nowhere in this maze. From the warp point marked F on the map, go up (or down) two squares and left (or right) two squares, to reach warp point G which leads to the final level. There are no other items or features of any interest on this level.
Floor 5[edit]

A combat robot called Death Machine (WarMech) patrols the bridge that leads to Tiamat's inner sanctum. But your chances of meeting it are slim—just one in 64. If you do have to fight, use NulBlaze and the Ice Armor.

- HP: 2000
- Experience Points: 32,000 (8006 on mobile)
- Gil: 32,000
You may or may not encounter the Death Machine on the bridge. Prepare for the worst, however; the Death Machine is more difficult than even Tiamat! Its attacks are focused on single party members, and they do damage of hundreds of HP. The machine also heals itself 100 HP every turn. Attack incessantly—your foe will eventually cast a nasty spell called Nuke that deals heavy damage to your entire party. If you do manage to destroy the Death Machine, the reward will be well worth the effort.
Tiamat awaits you on the opposite end of the bridge.

- HP: NES - 1000, GBA - 2400
- Experience Points: 5496
- Gil: 6000
Tiamat, the Fiend of Wind, will be waiting for you when you reach the crystal. Her specialized attacks can be brutal. Protective spells such as Protera will be helpful against her wide array of spells. Saber and Haste will be helpful for increasing the strength of your physical attacks. If you purchased the black spell Flare (Nuke) in Lufenia, cast it as often as possible. It will do more damage than any other spell. Tiamat's assaults are ferocious, so have your healer use Healaga and Curaja whenever needed.

