With the Crystal Rod in hand, it's time to head to the Mysidian Tower. It can be found on an island to the North of Mysidia that almost makes a circle, with an opening along the south. You'll have to hop on your ship and head over to it. But as you approach the opening, a whirlpool will suddenly appear, and suck your ship to the bottom of the ocean. (If you are concerned with keeping any of Leila's equipment, remove it before you approach the island.) When you awaken, you will discover that Leila's missing. You are now in the bowels of an aquatic beast known as the Leviathan.
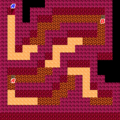
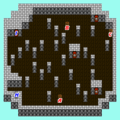
You begin in the intestinal track of this large beast. From your starting point, you must walk along a linear path until you find a way to get higher up into the creature. Along the way, portions of the floor will be lined with digestive fluids. These fluids are acidic and do slight damage to the members of your party as you walk through them. You are forced to walk through them, so minimize your route to avoid taking more damage than necessary. All the while, you will be attacked by the creatures who make the beast their home. Along the way, you will find two chests, the first containing the Twist Headband, and the second has a Power Vest. Be sure to equip these power items on whoever they benefit most.
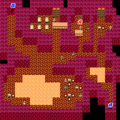
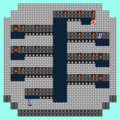
When you reach the next level, you may be surprised to find other people about. One of the first you will encounter is an armored warrior. He will ask who you are, at which time you may ask him about anything. If you happen to ask him about Dragoons, he will confess that he is one. But when you tell him the news about Dragoons and Wyverns, he won't believe you. Present the Crystal Rod to him, and he will understand that you were after the Ultima Tome as well. He proposes that you might be able to defeat the large monster guarding the exit if you team up. At that time, he will join you. His name is Ricard, and he specializes in spears.
After that, explore the rest of the area. All the other people present will explain that you're in the Leviathan's stomach, and there are apparently several Crystal Rods, as the Leviathan eats anyone who has one and tries to enter the tower. There is a chest near the top which contains a Power Armlet, another defensive item which also increases your attack power. Make your way to the upper left corner where you'll find a passage to another level.
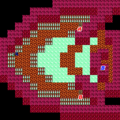
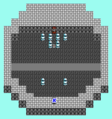
You are closer to the Leviathan's mouth. As a result, on this next level you'll find differently colored, but no less dangerous saliva. Walk through it carefully. There are two chests on this level, one on the top which contains the Gaia Blade, and one on the bottom which has a Diamond Shield, but leads to a forced fight with some Red Souls. Be sure to equip the Gaia Blade for anyone who is strong with swords. Then head left and approach the monster at the mouth of the Leviathan. Heal anyone if necessary, and then speak to the monster.
The monster is a Roundworm and it's blocking access to a boat which you can use to escape. Naturally, you must defeat the Roundworm to proceed. No special strategy is required, the Roundworm is simply very strong defensively and offensively. You'll need really powerful attacks to do damage, and his bite will do quite a bit of damage to you. Most of your party should be well trained and strong enough to withstand it, but Ricard may still be fairly under powered for this fight, and can die with one hit, so be sure to have a member who can cast Life handy, or some Phoenix Downs just in case. Blink and Protect will help as well.
After you complete the tower, many of the weaker enemies found around the overworld will disappear and be replaced by stronger enemies. If you are attempting to complete the Bestiary contained in many of the remakes of the game, this is your last chance to find some of the enemies before they are removed from the game.
Once the Roundworm is defeated, you can freely sail in and out of the inlet. Park your boat in front of the tower, (save your game,) and approach. When you do, the Crystal Rod will remove the barrier surrounding the tower, and allow you to enter. If you do not have a large supply of healing items, you may wish to consider heading back to Mysidia or Altair to stock up; the tower has many floors and is quite long. Many of the floors contain some kind of elemental theme. It also contains several floor where you must face a boss challenge in order to advance.
Floor 1
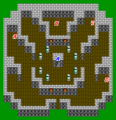
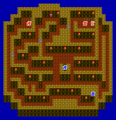
You will be introduced to some of the strange pairings of creatures found throughout the tower, including Hill Gigas and Bombs, Werewolves and Imps (which can cast Confusion), and Killer Mantises and Vampire Girls. There are four chests to discover, but three of them contain nearly worthless Staffs (the chest on the right contains an Ether in the remake). The best chest is behind a wall at the very top, and it contains a White Robe. Find a false wall along the right side to access it, and equip it on anyone who primarily casts White magic. Then head to the middle of the floor to find the stairs which lead up to the second floor.
Floor 2
More enemies join the mix, like magic resistant Red Souls and physical resistant Black Flan, and the powerful combo of Flying Rays and Big Horns. There are three chests to discover here, all located near the top, and all containing Flame equipment. Two are on the right, and one is on the left. Ignore the door at the top, as it only leads to an empty room populated with Basilisks which have the ability to petrify your party members. When you're done head to the lower left corner and take the bottom passage to the right to find the next set of stairs.
Floor 3
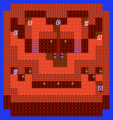
Throughout much of this floor, you are forced to walk on a painful lava surface which drains your party of a few hit points with each step. You are initially confined to the lower half of the floor until you find the door which leads to the upper half. This door is all the way to the far left, so ignore all of the other doors and head straight to the left. Once you pass through this door, the only way out of the tower is by completing it or using magic to escape. Once you reach the upper portion, head down and to the right to find a safe spot. If you wish to examine every chest on the floor, you'll have to pass the steps and continue to the right to find the Flame Sword. Climb up the stairs in the center, but before you pass through the door at the top, examine the alcoves on either side for two more pieces of Flame equipment. Equip any Flame armor you have before you proceed.
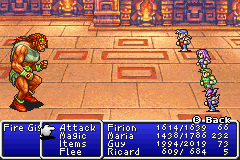
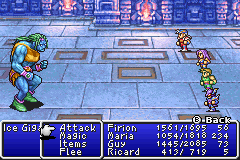
When you pass through the door, you will be challenged by a mage who will transform himself into a Fire Gigas and attack. He is weak to ice magic, so you can make pretty short work of him if you have anyone who can cast a fairly high level Blizzard spell. Additionally, equip anyone who is skillful with Axes with two Ogrekillers if you haven't done so already. The defensive Flame equipment will help protect you against his attacks. Once he's defeated, head upstairs.
Floor 4
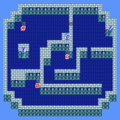
The theme of the floor will change from fire to ice, as will the equipment that you will find in chests. Most of the enemies you encounter on the next couple of floors will be weak against the Flame weapons you've found. After collecting the Ice Shield from the chest to the left of the entrance, climb up the stairs you see below you for a quick detour through Floor 5. This is the only way to explore the left side of the floor, and it dead-ends, but you will find the Ice Lance in the process. The spiky segments of ice on the floor cause damage to your party, but you can avoid them. Then return to the fourth floor and continue making your way around the floor in a counter-clockwise direction, collecting the remaining two pieces of Ice equipment, until you reach the stairs to the fifth floor.
Floor 5
The ice theme continues, and now you are forced to walk across the shards of ice that damage your party. Pay attention to your health in case anyone gets too low to survive a fight, and cure them. After the first long passage of ice, there is a shortcut you can take to avoid the rest. When you see a small hallway to your right that dead-ends, walk through it and you will discover a false wall that you can pass through and head right to the chest containing the Ice Brand. Equip any defensive ice equipment you have, along with any Flame weapons, and pass through the door at the top.
You will discover another mage who will challenge you before you can proceed to the sixth floor. This time, the mage will transform himself into a Frost Gigas. Everything from the previous Gigas fight applies to this one, except that his weakness is Fire and not Blizzard. Have any magic-specialized character cast Fire (if they can do more damage with the spell than the Flame weapon they are equipped with) and have the rest attack. Ice armor can lessen the impact of any ice spell he casts. Beat the Frost Gigas and proceed to the next floor.
Floor 6
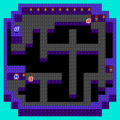
This floor contains a small maze of passages. There are two chests to find on this floor. The first is far to the right along the top wall and contains a Potion (Elixir in remakes). You must navigate across the passages to the middle, and then out to the right. Ignore both doors that you encounter on the right side of the floor, and stay on the passages to the bottom, and then to the left. Before you reach the door in the lower left corner, be sure to open the chest along an isolated path. It contains the Wizard's Staff, a powerful weapon which can cast Scourge in battle.
Floor 7
This floor has a fairly open floor plan, with many columns sprinkled throughout. There are three chests, all of which contain some status changing item that can be used in battle. There are also three doors along the right half of the floor which should be avoided. The only door you should investigate is the one in the upper left corner.
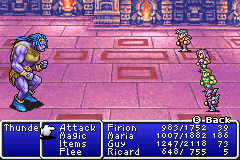
This door leads to a third mage who challenges you to a battle just before transforming into a Gigas. This time, he becomes a Thunder Gigas. As a Thunder Gigas, he has lightning powers, but is weak against poison attacks, so use them to your fullest. The Evil (Wizard's) Staff that you picked up earlier is a good start. Nothing else will be that effective against him, not even dual Ogrekillers. Cast Protect, Shell, and Blink to protect your party, and Cure as often as necessary to get through this battle alive. He has a chance to drop the powerful Confuse spell, making the rest of the tower much easier.
Floor 8
The eighth floor is composed of a series of small hallways split down the middle. Each hallway contains a door. The challenge is to find the one door which actually leads to the next floor. All the other doors are the usual empty rooms with high encounter rates. Whether you discover on your own, or by reading this walkthrough, the door you seek is near the upper right corner, but before you go through it, be sure to check the chest at the very top of the room. It contains a Flare Tome, but it also leads to a forced fight against a Devil's Bloom plant, and two of the Gottos enemy that you fought when you took back Fynn Castle. You may even be fortunate enough to obtain the powerful Ripper knife, dropped by Gottos on occasion.
Floor 9
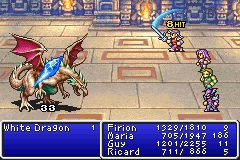
This floor contains three chests, one of which leads to a particularly interesting fight. From the entrance, head to the left to find a chest with a Cross. Then return to the right and investigate above the entrance to find an Hourglass. Now you must cross to the left, and up the left side of the room to reach the top. Near the top is a chest which contains the Black Robes, amazing armor for any player who specializes in Black magic. However, opening the chest will force you into a fight with a boss creature, the White Dragon. The White Dragon is about as powerful as the Thunder Gigas you recently faced, only the White Dragon is ice-based and weak to fire. Return to using all of your fire based attacks to reduce the White Dragon's hit points as quickly as possible.
When you win the fight, be sure to equip the Black Robe, and take note that the White Dragon may also drop a pair of Genji gloves, which will raise your defense to 100. Proceed to the set of doors down and to the right of the chest. Only one of the four doors leads to the tenth floor: the second from the left.
Floor 10
The tenth floor is wide open and contains no enemies. You will finally discover Minwu standing near the door at the top of the room. Once you arrive, Minwu will use every last ounce of his power to shatter the barrier protecting the door in the back. He will effectively sacrifice himself in order to give you access to the Ultima Tome, and pass away. Head through the door, and you will find four silver orbs and a golden orb in the center. Be sure to get the gold orb last, as the four silver orbs contain powerful elemental magic which will enhance the attributes of your party members; Fire will increase Strength, Earth will increase Spirit, Water will increase Intelligence, and Wind increases Agility. With each increase, every party member's particular stat increase by 10 points. This should dramatically improve your performance in battle. Then head for the gold orb and claim the Ultima Tome. Upon doing so, a warp tile will appear above that can instantly transport you outside the tower.
With the Ultima Tome in hand, you'll need to return to Fynn Castle to determine what your next steps will be.
Floor 1: A) Staff, B) White Robe, C) Staff, D) Staff (Ether)
Floor 2: A) Flame Shield, B) Flame Bow, C) Flame Lance
Floor 3: A) Flame Sword, B) Flame Helmet, C) Flame Armor
Floor 4: A) Ice Shield, B) Ice Armlet, C) Ice Armor
Floor 5: A) Ice Lance, B) Ice Brand
Floor 6: A) Potion (Elixir), B) Evil (Wizard's) Staff
Floor 7: A) Spider Silk, B) Unicorn Horn, C) Hermes Shoes