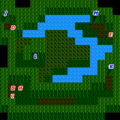
The time has come for you to visit the town of Mysidia. To reach it, you must travel south from Fynn, and then follow the stretch of land that travels west for a bit before continuing south. Travel all the way down until you cross a river. Mysidia is nestled into a mountain range that runs from southwest to northeast. Be careful, however, as the land around Mysidia is home to some of the strongest overworld enemies that the game has to offer. If you haven't been strengthening your team, travel to Mysidia will be quite difficult. You will want to have your ship nearby, so it's a good idea to sail as close to Mysidia as you can from any direction. As an added benefit, it will cut down on how many dangerous enemies you will have to face.
Mysidia
Mysidia is home to a clan of powerful mages who are very informed about the world and its secrets. You will learn a surprising amount from its citizens just by talking to them. For one, you will learn that Minwu was there, but recently departed for Mysidia Tower. You will also learn that in addition to the two masks, you need the Crystal Rod in order to enter the tower. Another mage informs you that you can find the Black Mask on a small island somewhere in the middle of the sea.
However, the most informative location of all happens to be a small house near the souther edge of town which contains a bookshelf. If you walk up to this bookshelf and interact with you, you will have the opportunity to inquire about any key term you have learned. For example, you can learn that mages feared the power of the Ultima spell, so they sealed it within a great tower. You will learn the way to utilize both the White and Black masks. You can even ask it about Dragoons and Wyverns, as well as the Goddess Bell and Sunfire. Learn as much as you can before leaving the building.
The shopping in Mysidia is some of the best that any town in the game has to offer. In addition to having very powerful armor and weapons, it boasts a spell shop with five counters, each offering four spells for purchase. One counter in particular offers four very powerful Template:~ spells that are found nowhere else.
| Template:~ | Template:~ | Template:~ shop 1 | Template:~ shop 2 |
|---|---|---|---|
| Knife: 150 Gil | Leather Cap: 80 Gil | Fire: 400 Gil | Cure: 200 Gil |
| Staff: 250 Gil | Shirt: 20 Gil | Thunder: 400 Gil | Blink: 400 Gil |
| Javelin: 300 Gil | Leather Gloves: 50 Gil | Blizzard: 400 Gil | Protect: 400 Gil |
| Broad Sword: 400 Gil | Buckler: 50 Gil | Cure: 200 Gil | Shell: 400 Gil |
| Template:~ shop 3 | Template:~ shop 4 | Template:~ shop 5 |
|---|---|---|
| Barrier: 8000 Gil | Raise: 1500 Gil | Fear: 800 Gil |
| Wall: 8000 Gil | Sap: 1500 Gil | Basuna: 800 Gil |
| Swap: 8000 Gil | Warp: 1500 Gil | Esuna: 800 Gil |
| Holy: 20,000 Gil | Teleport: 1500 Gil | Silence: 800 Gil |
| Left Template:~ | Center Template:~ | Right Template:~ |
| Cross: 1000 Gil | Potion: 50 Gil | Phoenix Down: 5000 Gil |
| Echo Screen: 2000 Gil | High Potion: 500 Gil | Ether: 2500 Gil |
| Maiden's Kiss: 2500 Gil | Eye Drops: 100 Gil | Cottage: 5000 Gil |
| Gold Needle: 2500 Gil | Antidote: 200 Gil | Elixir: 50,000 Gil |
Tropical island
Your next destination is the small island in the middle of the ocean that one of the mages in Mysidia mentioned. Finding it without viewing the World Map by pressing ![]() +
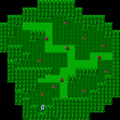
+![]() is considerably difficult. One easy method of finding it is determining the position of Salamand on the map, and then traveling due north from the coast of the snowfield above Salamand. Once you reach the island, there's nothing else to do but step into the cave. Compared to caves that you've visited in the past, this one contains far more branches and paths that weave between floors. It's easy to get lost if you don't keep track of how you got to each floor. There are many treasures in this cave, and although a majority of them are natural remedies made from the vegetation that grows throughout the island, you'll also find many important key-items if you look hard enough.
is considerably difficult. One easy method of finding it is determining the position of Salamand on the map, and then traveling due north from the coast of the snowfield above Salamand. Once you reach the island, there's nothing else to do but step into the cave. Compared to caves that you've visited in the past, this one contains far more branches and paths that weave between floors. It's easy to get lost if you don't keep track of how you got to each floor. There are many treasures in this cave, and although a majority of them are natural remedies made from the vegetation that grows throughout the island, you'll also find many important key-items if you look hard enough.
The enemies are not too fearsome, and primarily consist of certain sets. You'll encounter a number of Dual Heads and Dual Deads, as well as groups of Wererats and Stunners. Neither of these should present a big problem, but you will also encounter groups of Red Mousses and Yellow Jellies. These blobs are very resistant to physical attacks. Red Mousses are weak against Thunder magic while Yellow Jellies are weak against Fire. While it's easy to cast these spells to get rid of them, the frequency with which you run into them may cause you to use up your magic faster than you'd like, so consider running away from them if your agility is high enough. Deeper down in the cave, you'll encounter slightly stronger enemies such as Wild Horns and Poison Toads.
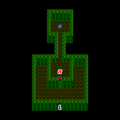
The first floor is contains a number of small rooms off the central area, many of which contain a treasure chest, but there is one single staircase down to the second floor. Once you reach the second floor, you have to walk up along the left side. In the upper left corner, you'll see a treasure chest above a staircase. If you take this staircase, and follow the path it leads to all the way to its conclusion, you will wind up in a closed off section in the middle of the island where a group of natives live. They all wear masks, and some comment on the fact that the Black Mask is their treasure, and they've hidden it below the island so you can't find it. There are also two tribe members who will actually sell you some items, though none of the equipment is as good as the equipment available in Mysidia.
| Shop 1 | Shop 2 |
|---|---|
| Demon Axe: 10,000 Gil | Potion: 50 Gil |
| Demon Lance: 10,000 Gil | High Potion: 500 Gil |
| Ruby Cuirass: 800 Gil | Antidote: 200 Gil |
| Earth Drum: 8000 Gil | Ether: 1000 Gil |
Once you're done in the hidden village, return to the second floor and wind your way around the rest of the floor, picking up the two Blind Tomes and Scourge Tomes from the treasure chests along the way, until you reach the other stair case to the third floor right near the center of the map. From where you arrive on the third floor, you'll have little choice but to walk up and around the path above to the next staircase. This staircase deposits you on the fourth floor, where you will have many more options to choose from.
- Take the staircase directly below the one you arrived from to climb back up to the third floor and find a treasure chest which contains a Phoenix Down along with a forced encounter with a group of undead enemies.
- Take the staircase in the upper left corner to be taken to a small dead-end room on the fifth floor which contains a Death Idol
- Take the staircase in the lower right corner to begin a long convoluted path that takes you back up to the third floor, then down to the fourth floor, and ultimately to the bottom portion of the fifth floor where you will find three treasure chests grouped together along the left. One of these chests contains an important item; the Earth Drum (or Gaia Drum), which is guarded by some monsters (Wild Horns and Poison Toads)
Finally, from the fourth floor, take the staircase closest to the upper right corner to be taken down to the large room that occupies most of the fifth floor. In this room, you'll find a chest containing a Sleep Tome, and a door which leads to a new room. In this room, a chest can be seen guarded by some kind of beast. That beast turns out to be four Big Horns, stronger versions of the Wild Horns that you've faced throughout the cave. They have no special attack, they are simply strong and powerful. Give yourself as much of an advantage as you can by casting Blink, Protect, and even Berserk, and heal any damage they cause with Cure. Focus on one Big Horn at a time until they are all removed. Then approach the chest to find the Black Mask. If you are satisfied, you can walk up the corridor to the warp tile which will instantly teleport you to the outside.
-
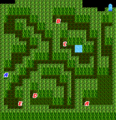
Floor 1: A) Eye Drops, B) High Potion, C) High Potion, D) Ether, E) Spider's Silk
-
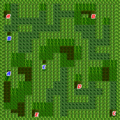
Floor 2: A) Sleepgrass, B) Scourge Tome, C) Blind Tome, D) Scourge Tome, E) Blind Tome
-
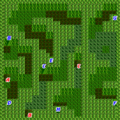
Floor 3: A) Spider's Silk, B) Garlic, C) Phoenix Down
-
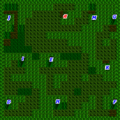
Floor 4: A) 1000 Gil
-
Floor 5: A) Sleep Grass, B) Earth Drum, C) Sleep Grass, D) Death Idol, E) Sleep Tome
-
Floor 6: A) Black Mask
-
Hidden Village


Mysidian cave
Item checklist:
- B1: gold hairpin, black garb; use the Black Mask on the Doppelganger;
- B2: flame lance, power staff;
- B3: ogrekiller axe, Ice Bow (walk through the wall to get it);
- B4: potion, bell of silence, phoenix down, gold needle;
- B5: potion, 2 hi-potions, ether, Mini tome (walk through the wall to get them), 2 Drain tomes, Osmose tome, Crystal Rod;