m (→New Pokémon: info) |
(Cleanup, bold items in guide and removed item sections) Tags: Mobile edit Mobile web edit |
||
| (23 intermediate revisions by 8 users not shown) | |||
| Line 1: | Line 1: | ||
{{Header Nav|game=Pokémon FireRed and LeafGreen}} | {{Header Nav|game=Pokémon FireRed and LeafGreen}} | ||
There are three different levels in '''Mt. Moon''', populated by four types of Pokémon and multiple trainers. Also along the way, you'll notice that the criminal gang Team Rocket is carrying out an operation in Mt. Moon, and it's up to you to blow their operation wide open! | There are three different levels in '''Mt. Moon''', populated by four types of Pokémon and multiple trainers. Also along the way, you'll notice that the criminal gang Team Rocket is carrying out an operation in Mt. Moon, and it's up to you to blow their operation wide open! | ||
There's a Rare Candy within Mt. Moon, but save it for now. Your Pokemon level up too fast right now to justify using a Rare Candy. In addition, Mt. Moon is where you will find your first Evolutionary Stones. The '''Moon Stones''' you find here can be used to evolve {{bp|Nidorino}}, {{bp|Nidorina}}, {{bp|Jigglypuff}}, or {{bp|Clefairy}}. If you wish to use it on Nidorino/a, you should wait to do so at Level 22, and only at 22, to gain access to great moves for both. | There's a '''Rare Candy''' within Mt. Moon, but save it for now. Your Pokemon level up too fast right now to justify using a Rare Candy. In addition, Mt. Moon is where you will find your first Evolutionary Stones. The '''Moon Stones''' you find here can be used to evolve {{bp|Nidorino}}, {{bp|Nidorina}}, {{bp|Jigglypuff}}, or {{bp|Clefairy}}. If you wish to use it on Nidorino/a, you should wait to do so at Level 22, and only at 22, to gain access to great moves for both. | ||
{{ | If you dont want to fight all the trainers and just reach the end of Mt. Moon then follow the path all the way to the end and go down the very last ladder and follow the path from there. Each floor section will have a detailed guide to get to each trainer/item. | ||
== | |||
{{floatingtoc}} | |||
==1F== | |||
[[File:Pokemon FRLG Mt. Moon 1F.png|thumb|Mt. Moon 1F]] | |||
From the entrance you should go left grab '''TM09''' then continue left to face Bug Catcher Kent. To the left of Bug Catcher Kent is a '''Parlyz Heal'''. | |||
Head back east and face Lass Iris. Continue east and follow the path until reach the first ladder. Dont go down it yet and head south. You will then find Super Nerd Jovan. Just northwest if Jovan is a '''Potion'''. Go to the south wall and follow it to find a '''Rare Candy'''. To the northwest of the rare candy is Bug Catcher Robby. Go back to the south wall until you hit the corner and go north to find an '''Escape Rope'''. Keep going north until the wall to your left ends then turn left to get to the ladder that we skipped before and go down it to get to [[#First ladder B1F|B1F]]. | |||
Now that your first adventure is done, its time to return to the first floor. Follow the path northeast where you will bump into Lass Miriam. Follow the path until you hit the next ladder and go down it to go back to another section of [[#Second ladder B1F|B1F]]. | |||
Now you are on the final stretch of Mt. Moon but there are still more surprises for you! Follow the path south and you'll run into Youngster Josh. Head northwest and you'll find Hiker Marcos. Above Marcos is a rare '''Moon stone'''! Go down the last ladder on this floor to go to the final section of [[#Third ladder B1F|B1F]]. | |||
===Pokémon found=== | ===Pokémon found=== | ||
{{ContentBoxContainer}} | |||
{{Pokemon/Wild|FRLG}} | |||
{{Pokemon/Wild row|FRLG||035|8|1|bp=1}} | |||
{{Pokemon/Wild row|FRLG||041|7-10|69|bp=1}} | |||
{{Pokemon/Wild row|FRLG||046|8|5|bp=1}} | |||
{{Pokemon/Wild row|FRLG||074|7-9|25|bp=1}} | |||
| | |||
| | |||
| | |||
| | |||
| | |||
| | |||
| | |||
| | |||
|} | |} | ||
</div> | |||
===Trainers=== | ===Trainers=== | ||
{ | {{ContentBoxContainer}} | ||
{{Pokemon/Trainer|FRLG}} | |||
{{Pokemon/Trainer row|FRLG|Bug Catcher|Kent|132}} | |||
{{Pokemon/Trainer mon|FRLG|013|11}} | |||
{{Pokemon/Trainer mon|FRLG|014|11}} | |||
{{Pokemon/Trainer row|FRLG|Lass|Iris|224}} | |||
| | {{Pokemon/Trainer mon|FRLG|035|14}} | ||
{{Pokemon/Trainer row|FRLG|Super Nerd|Jovan|264}} | |||
{{Pokemon/Trainer mon|FRLG|081|11}} | |||
{{Pokemon/Trainer mon|FRLG|100|11}} | |||
{{Pokemon/Trainer row|FRLG|Bug Catcher|Robby|120}} | |||
{{Pokemon/Trainer mon|FRLG|010|10}} | |||
{{Pokemon/Trainer mon|FRLG|011|10}} | |||
{{Pokemon/Trainer mon|FRLG|010|10}} | |||
{{Pokemon/Trainer row|FRLG|Lass|Miriam|176}} | |||
| | {{Pokemon/Trainer mon|FRLG|043|11}} | ||
| | {{Pokemon/Trainer mon|FRLG|069|10}} | ||
| | {{Pokemon/Trainer row|FRLG|Youngster|Josh|160}} | ||
{{Pokemon/Trainer mon|FRLG|019|10}} | |||
{{Pokemon/Trainer mon|FRLG|019|10}} | |||
{{Pokemon/Trainer mon|FRLG|041|10}} | |||
{{Pokemon/Trainer row|FRLG|Hiker|Marcos|360}} | |||
{{Pokemon/Trainer mon|FRLG|074|10}} | |||
{{Pokemon/Trainer mon|FRLG|074|10}} | |||
{{Pokemon/Trainer mon|FRLG|095|10}} | |||
| | |||
| | |||
|} | |} | ||
</div> | |||
==B1F== | |||
[[File:Pokemon FRLG Mt Moon B1F.png|thumb|Mt. Moon B1F]] | |||
===First ladder B1F=== | |||
There isn't really anything here but if you want to test your luck search the rocks and you might get some mushrooms. Also this floor is great to get a Paras as its the only pokémon you'll find here. | |||
Follow the path to the next ladder to get to [[#First ladder B2F|B2F]]. | |||
====Items==== | |||
* TinyMushroom ×3 (hidden in the rocks in the tunnels, but only later on in the game and subject to an uncertain bug where they might not be encountered; respawn occasionally) | |||
* Big Mushroom ×3 (hidden in the rocks in the tunnels, but only later on in the game and subject to an uncertain bug where they might not be encountered; respawn occasionally) | |||
=== | ===Second ladder B1F=== | ||
This is a pretty small section but again test your luck and check the rocks for mushrooms. Only Paras are found here again. Go down the ladder to reach the second section of [[#Second ladder B2F|B2F]]. | |||
== | ====Third ladder B1F==== | ||
If you have noticed B1F is pretty boring. Just follow the path to get to the final section of [[#Third ladder B2F|B2F]]. | |||
===Pokémon found=== | ===Pokémon found=== | ||
{ | {{ContentBoxContainer}} | ||
{{Pokemon/Wild|FRLG}} | |||
{{Pokemon/Wild row|FRLG||046|5-10|100|bp=1}} | |||
| | |||
| | |||
|} | |} | ||
</div> | |||
==B2F== | |||
[[File:Pokemon FRLG Mt Moon B2F.png|thumb|Mt. Moon B2F]]. | |||
=== | ===First ladder B2F=== | ||
Here you'll face a Team Rocket Grunt. To the right on a plateau you'll find a '''Star Piece'''. Head back the way you came and go to the [[#1F|first floor]]. | |||
== | ====Trainer==== | ||
{{ContentBoxContainer}} | |||
{{Pokemon/Trainer|FRLG}} | |||
{{Pokemon/Trainer row|FRLG|Team Rocket Grunt||352|gender=M}} | |||
{{Pokemon/Trainer mon|FRLG|027|11}} | |||
{{Pokemon/Trainer mon|FRLG|019|11}} | |||
{{Pokemon/Trainer mon|FRLG|041|11}} | |||
|} | |||
</div> | |||
=== | ===Second ladder B2F=== | ||
Here you will face another Team Rocket Grunt. You will also find a hidden '''Ether''' in the rock to the right and '''TM46''' on the plateau. When done here, go back the way you came and return to the [[#1F|first floor]]. | |||
====Trainer==== | |||
{{ContentBoxContainer}} | |||
{{Pokemon/Trainer|FRLG}} | |||
{{Pokemon/Trainer row|FRLG|Team Rocket Grunt||352|gender=M}} | |||
{{Pokemon/Trainer mon|FRLG|041|11}} | |||
{{Pokemon/Trainer mon|FRLG|023|11}} | |||
| | |||
| | |||
| | |||
| | |||
|} | |} | ||
</div> | |||
===Third ladder B2F=== | |||
A long and windy path that will lead you through more trainers and items. The rare Clefairy is also easier to find here so catch it before leaving. Catch the opposite gender if you want to breed them to get cleffa to complete the National Dex. | |||
Head north to get a '''Revive''' then head back south to the stairs to face another Team Rocket Grunt. Follow the path and you will run another the last Team Rocket Grunt here. Head north and right before the stairs head east to the rock to find another rare '''Moon Stone'''! Head back to the stairs and face Super Nerd Miguel. Once you beat and chat with Miguel you'll be able to choose a '''Helix Fossil''' or a '''Dome Fossil'''. Follow the path north and find an '''Antidote''' before the ladder then go up the ladders to see the light out of Mt. Moon! | |||
===Trainers=== | ====Trainers==== | ||
{ | {{ContentBoxContainer}} | ||
{{Pokemon/Trainer|FRLG}} | |||
{{Pokemon/Trainer row|FRLG|Team Rocket Grunt||416|gender=M}} | |||
{{Pokemon/Trainer mon|FRLG|019|13}} | |||
{{Pokemon/Trainer mon|FRLG|027|13}} | |||
{{Pokemon/Trainer row|FRLG|Team Rocket Grunt||416|gender=M}} | |||
{{Pokemon/Trainer mon|FRLG|019|13}} | |||
{{Pokemon/Trainer mon|FRLG|041|13}} | |||
{{Pokemon/Trainer row|FRLG|Super Nerd|Miguel|288}} | |||
{{Pokemon/Trainer mon|FRLG|088|12}} | |||
{{Pokemon/Trainer mon|FRLG|100|12}} | |||
{{Pokemon/Trainer mon|FRLG|109|12}} | |||
| | |||
|} | |} | ||
</div> | |||
=== | ===Pokémon found=== | ||
{{ContentBoxContainer}} | |||
{{Pokemon/Wild|FRLG}} | |||
{{Pokemon/Wild row|FRLG||035|10-12|6|bp=1}} | |||
{{Pokemon/Wild row|FRLG||041|8-11|49|bp=1}} | |||
{{Pokemon/Wild row|FRLG||046|10-12|15|bp=1}} | |||
{{Pokemon/Wild row|FRLG||074|9-10|30|bp=1}} | |||
|} | |||
</div> | |||
==New Pokémon== | ==New Pokémon== | ||
{ | {{ContentBoxContainer}} | ||
{{Pokemon/New|title=#41 Zubat|contents={{PokePic|Zubat|left}} | |||
The most common Pokémon among caves in all the Pokémon Core games. At this part of the game you can only evolve it into {{bp|Golbat}}. In order to evolve it further into {{bp|Crobat}}, you will need to beat the Elite Four and to raise Golbat's happiness to the maximum. Crobat, however, is an excellent Pokémon which has decent Attack and magnificent Speed. You can catch Zubat later because Golbat doesn't do very well on the Elite Four.}} | |||
| | {{Pokemon/New|title=#74 Geodude|contents={{PokePic|Geodude|right}} | ||
The first Rock-type Pokémon in this game. It has powerful attacks early on and is easy to train. However, it can't stand Water- nor Grass-type attacks so be cautious when using it. It evolves into {{bp|Graveler}} by leveling up and then into {{bp|Golem}} by trading. Golem, however, is inferior to {{bp|Rhydon}} (which is also a Rock/Ground-type Pokémon) statwise and Rhydon can be obtained easier since Rhyhorn doesn't need to be traded to evolve.}} | |||
| | {{Pokemon/New|title=#46 Paras|contents={{PokePic|Paras|left}} | ||
| | A weak Bug/Grass-type Pokémon which can be easily found in Basement Floor 1. It evolves into {{bp|Parasect}}. It has numerous weaknesses and its stats are quite poor (especially Speed), so using it isn't recommendable. | ||
| | |||
A caught Paras has a chance of holding a '''Tiny Mushroom''' or a '''Big Mushroom'''. These items, worthless now, have a purpose much later in the game, serving as a currency for an unique Move Tutor that can reteach a Pokemon its early moves. | A caught Paras has a chance of holding a '''Tiny Mushroom''' or a '''Big Mushroom'''. These items, worthless now, have a purpose much later in the game, serving as a currency for an unique Move Tutor that can reteach a Pokemon its early moves.}} | ||
| | {{Pokemon/New|title=#35 Clefairy|contents={{PokePic|Clefairy|right}} Clefairy the Moon Pokémon. It has some decent attacks and some very useful egg moves, though its Attack isn't that high. It is a bit difficult to find, but it can be bought at Celadon City afterwards. | ||
It evolves into {{bp|Clefable}} by using the Moon Stone. Clefable may be worth a second look | It evolves into {{bp|Clefable}} by using the Moon Stone. Clefable may be worth a second look as it is capable of learning the wonderful move {{bpm|Soft-Boiled}} from a Move Tutor, a feat otherwise only available to {{bp|Chansey}}.}} | ||
</div> | |||
{{Footer Nav|game=Pokémon FireRed and LeafGreen|prevpage=Route 3|nextpage=Route 4}} | {{Footer Nav|game=Pokémon FireRed and LeafGreen|prevpage=Route 3|nextpage=Route 4}} | ||
Latest revision as of 15:48, 2 April 2024
There are three different levels in Mt. Moon, populated by four types of Pokémon and multiple trainers. Also along the way, you'll notice that the criminal gang Team Rocket is carrying out an operation in Mt. Moon, and it's up to you to blow their operation wide open!
There's a Rare Candy within Mt. Moon, but save it for now. Your Pokemon level up too fast right now to justify using a Rare Candy. In addition, Mt. Moon is where you will find your first Evolutionary Stones. The Moon Stones you find here can be used to evolve Nidorino, Nidorina, Jigglypuff, or Clefairy. If you wish to use it on Nidorino/a, you should wait to do so at Level 22, and only at 22, to gain access to great moves for both.
If you dont want to fight all the trainers and just reach the end of Mt. Moon then follow the path all the way to the end and go down the very last ladder and follow the path from there. Each floor section will have a detailed guide to get to each trainer/item.
1F[edit]
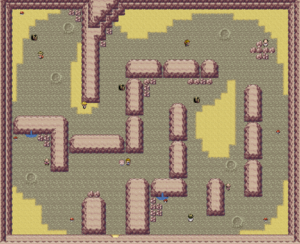
From the entrance you should go left grab TM09 then continue left to face Bug Catcher Kent. To the left of Bug Catcher Kent is a Parlyz Heal.
Head back east and face Lass Iris. Continue east and follow the path until reach the first ladder. Dont go down it yet and head south. You will then find Super Nerd Jovan. Just northwest if Jovan is a Potion. Go to the south wall and follow it to find a Rare Candy. To the northwest of the rare candy is Bug Catcher Robby. Go back to the south wall until you hit the corner and go north to find an Escape Rope. Keep going north until the wall to your left ends then turn left to get to the ladder that we skipped before and go down it to get to B1F.
Now that your first adventure is done, its time to return to the first floor. Follow the path northeast where you will bump into Lass Miriam. Follow the path until you hit the next ladder and go down it to go back to another section of B1F.
Now you are on the final stretch of Mt. Moon but there are still more surprises for you! Follow the path south and you'll run into Youngster Josh. Head northwest and you'll find Hiker Marcos. Above Marcos is a rare Moon stone! Go down the last ladder on this floor to go to the final section of B1F.
Pokémon found[edit]
Trainers[edit]
B1F[edit]
First ladder B1F[edit]
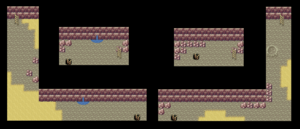
There isn't really anything here but if you want to test your luck search the rocks and you might get some mushrooms. Also this floor is great to get a Paras as its the only pokémon you'll find here.
Follow the path to the next ladder to get to B2F.
Items[edit]
- TinyMushroom ×3 (hidden in the rocks in the tunnels, but only later on in the game and subject to an uncertain bug where they might not be encountered; respawn occasionally)
- Big Mushroom ×3 (hidden in the rocks in the tunnels, but only later on in the game and subject to an uncertain bug where they might not be encountered; respawn occasionally)
Second ladder B1F[edit]
This is a pretty small section but again test your luck and check the rocks for mushrooms. Only Paras are found here again. Go down the ladder to reach the second section of B2F.
Third ladder B1F[edit]
If you have noticed B1F is pretty boring. Just follow the path to get to the final section of B2F.
Pokémon found[edit]
| FireRed and LeafGreen | |||
|---|---|---|---|
| Pokémon | Level | Rate | |
| Paras | 5-10 | 100% | |
B2F[edit]
.
First ladder B2F[edit]
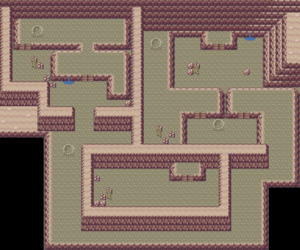
Here you'll face a Team Rocket Grunt. To the right on a plateau you'll find a Star Piece. Head back the way you came and go to the first floor.
Trainer[edit]
Second ladder B2F[edit]
Here you will face another Team Rocket Grunt. You will also find a hidden Ether in the rock to the right and TM46 on the plateau. When done here, go back the way you came and return to the first floor.
Trainer[edit]
Third ladder B2F[edit]
A long and windy path that will lead you through more trainers and items. The rare Clefairy is also easier to find here so catch it before leaving. Catch the opposite gender if you want to breed them to get cleffa to complete the National Dex.
Head north to get a Revive then head back south to the stairs to face another Team Rocket Grunt. Follow the path and you will run another the last Team Rocket Grunt here. Head north and right before the stairs head east to the rock to find another rare Moon Stone! Head back to the stairs and face Super Nerd Miguel. Once you beat and chat with Miguel you'll be able to choose a Helix Fossil or a Dome Fossil. Follow the path north and find an Antidote before the ladder then go up the ladders to see the light out of Mt. Moon!
Trainers[edit]
| FireRed and LeafGreen | |
|---|---|
| Trainer | Pokemon |
 Team Rocket Grunt Reward: |
|
 Team Rocket Grunt Reward: |
|
 Super Nerd Miguel Reward: |
|
Pokémon found[edit]
| FireRed and LeafGreen | |||
|---|---|---|---|
| Pokémon | Level | Rate | |
| Clefairy | 10-12 | 6% | |
| Zubat | 8-11 | 49% | |
| Paras | 10-12 | 15% | |
| Geodude | 9-10 | 30% | |
New Pokémon[edit]
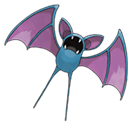
The most common Pokémon among caves in all the Pokémon Core games. At this part of the game you can only evolve it into Golbat. In order to evolve it further into Crobat, you will need to beat the Elite Four and to raise Golbat's happiness to the maximum. Crobat, however, is an excellent Pokémon which has decent Attack and magnificent Speed. You can catch Zubat later because Golbat doesn't do very well on the Elite Four.

The first Rock-type Pokémon in this game. It has powerful attacks early on and is easy to train. However, it can't stand Water- nor Grass-type attacks so be cautious when using it. It evolves into Graveler by leveling up and then into Golem by trading. Golem, however, is inferior to Rhydon (which is also a Rock/Ground-type Pokémon) statwise and Rhydon can be obtained easier since Rhyhorn doesn't need to be traded to evolve.
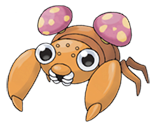
A weak Bug/Grass-type Pokémon which can be easily found in Basement Floor 1. It evolves into Parasect. It has numerous weaknesses and its stats are quite poor (especially Speed), so using it isn't recommendable.
A caught Paras has a chance of holding a Tiny Mushroom or a Big Mushroom. These items, worthless now, have a purpose much later in the game, serving as a currency for an unique Move Tutor that can reteach a Pokemon its early moves.

It evolves into Clefable by using the Moon Stone. Clefable may be worth a second look as it is capable of learning the wonderful move Soft-Boiled from a Move Tutor, a feat otherwise only available to Chansey.
