m (Moving 6th floor info to 6th floor section) |
Trig Jegman (talk | contribs) mNo edit summary |
||
| (5 intermediate revisions by 5 users not shown) | |||
| Line 1: | Line 1: | ||
{{Header Nav|game=Pokémon Gold and Silver}} | {{Header Nav|game=Pokémon Gold and Silver}} | ||
'''The Lighthouse is used as a training area, most of the Trainers inside use Water- or Flying-type Pokémon. | '''The Lighthouse is used as a training area, most of the Trainers inside use Water- or Flying-type Pokémon. An Eletric-type will keep your opponent at bay.''' | ||
{{floatingtoc}} | {{floatingtoc}} | ||
There are no Pokémon in this dark tower, only a series of relatively easy trainers. | There are no Pokémon in this dark tower, only a series of relatively easy trainers. Some of them can be avoided, but don't miss the Gentlemen, since they carry a ton of cash. The only trick here is to fall through the pit above one of the staircases on Floor 4; that's the way to get to the central staircase that will take you to the top floor. But make sure to head up to the dead end on Floor 5 anyway to get the '''Rare Candy''' and '''TM 34 (Swagger)'''. | ||
==1st Floor== | ==1st Floor== | ||
| Line 11: | Line 11: | ||
==2nd Floor== | ==2nd Floor== | ||
[[File:Pokemon GSC map Lighthouse F2.png|frame|right|Floor 2]] | [[File:Pokemon GSC map Lighthouse F2.png|frame|right|Floor 2]] | ||
{| | |||
|- | |||
!colspan="2" style="background:#407040; color:#ffffff;" | Trainers | |||
|- | |||
|valign="top" | [[File:Pokemon_GSC_Gentleman.png|left]] | |||
|valign="top" | '''Gentleman Alfred''': [[File:Pokebuck.png]]1440 | |||
*{{bp|Noctowl|20|693}} | |||
|- | |||
|valign="top" | [[File:Pokemon_GSC_Sailor.png|left]] | |||
|valign="top" | '''Sailor Huey''': [[File:Pokebuck.png]]720 ([[File:Pokemon phone.png]]) | |||
*{{bp|Poliwag|18|297}} | |||
*{{bp|Poliwhirl|18|504}} | |||
|} | |||
*No items | *No items | ||
{{-}} | {{-}} | ||
==3rd Floor== | ==3rd Floor== | ||
[[File:Pokemon GSC map Lighthouse F3.png|frame|right|Floor 3]] | [[File:Pokemon GSC map Lighthouse F3.png|frame|right|Floor 3]] | ||
There is a man and an item here, you need to fall down the hole to the left of the girl in the next level | There is a man and an item here, you need to fall down the hole to the left of the girl in the next level | ||
{| | |||
|- | |||
!colspan="2" style="background:#407040; color:#ffffff;" | Trainers | |||
|- | |||
|valign="top" | [[File:Pokemon_GSC_BirdKeeper.png|left]] | |||
|valign="top" | '''Bird Keeper Theo''': [[File:Pokebuck.png]]360 | |||
*{{bp|Pidgey|17|199}} | |||
*{{bp|Pidgey|15|175}} | |||
*{{bp|Pidgey|19|223}} | |||
*{{bp|Pidgey|15|175}} | |||
*{{bp|Pidgey|15|175}} | |||
|- | |||
* | |valign="top" | [[File:Pokemon_GSC_Gentleman.png|left]] | ||
|valign="top" | '''Gentleman Preston''': [[File:Pokebuck.png]]1296 | |||
*{{bp|Growlithe|18|351}} | |||
*{{bp|Growlithe|18|351}} | |||
|- | |||
|valign="top" | [[File:Pokemon_GSC_Sailor.png|left]] | |||
|valign="top" | '''Sailor Terrell''': [[File:Pokebuck.png]]800 | |||
*{{bp|Poliwhirl|20|561}} | |||
|- | |||
! colspan="2" style="background:#407040; color:#ffffff;" | Items | |||
|- | |||
| colspan="2" | | |||
* Ether | |||
|} | |||
{{-}} | {{-}} | ||
==4th Floor== | ==4th Floor== | ||
[[File:Pokemon GSC map Lighthouse F4.png|frame|right|Floor 4]] | [[File:Pokemon GSC map Lighthouse F4.png|frame|right|Floor 4]] | ||
{| | |||
|- | |||
!colspan="2" style="background:#407040; color:#ffffff;" | Trainers | |||
|- | |||
|valign="top" | [[File:Pokemon_GSC_Lass.png|left]] | |||
|valign="top" | '''Lass Connie''': [[File:Pokebuck.png]]504 | |||
*{{bp|Marill|21|261}} | |||
|- | |||
|valign="top" | [[File:Pokemon_GSC_Sailor.png|left]] | |||
|valign="top" | '''Sailor Kent''': [[File:Pokebuck.png]]800 | |||
*{{bp|Krabby|18|442}} | |||
*{{bp|Krabby|20|492}} | |||
|} | |||
*No items | |||
{{-}} | {{-}} | ||
==5th Floor== | ==5th Floor== | ||
[[File:Pokemon GSC map Lighthouse F5.png|frame|right|Floor 5]] | [[File:Pokemon GSC map Lighthouse F5.png|frame|right|Floor 5]] | ||
{| | |||
|- | |||
!colspan="2" style="background:#407040; color:#ffffff;" | Trainers | |||
|- | |||
|valign="top" | [[File:Pokemon_GSC_BirdKeeper.png|left]] | |||
|valign="top" | '''Bird Keeper Denis''': [[File:Pokebuck.png]]420 | |||
*{{bp|Spearow|18|223}} | |||
*{{bp|Fearow|20|693}} | |||
*{{bp|Spearow|18|223}} | |||
|- | |||
|valign="top" | [[File:Pokemon_GSC_Sailor.png|left]] | |||
|valign="top" | '''Sailor Ernest''': [[File:Pokebuck.png]]720 | |||
*{{bp|Machop|18|339}} | |||
*{{bp|Machop|18|339}} | |||
*{{bp|Poliwhirl|18|504}} | |||
|- | |||
!colspan="2" style="background:#407040; color:#ffffff;" | Items | |||
|- | |||
|colspan="2" | | |||
*TM34 (Swagger) | *TM34 (Swagger) | ||
*Hyper Potion (beside TM34, non-visible) | *Hyper Potion (beside TM34, non-visible) | ||
*Rare Candy | *Rare Candy | ||
*Great Ball (G/S Alcove) | |||
*Super Repel (Crystal Alcove) | |||
|} | |||
*Great Ball (G/S) | |||
*Super Repel (Crystal) | |||
{{-}} | {{-}} | ||
==6th Floor== | ==6th Floor== | ||
[[File:Pokemon GSC map Lighthouse F6.png|frame|right|Floor 6]] | [[File:Pokemon GSC map Lighthouse F6.png|frame|right|Floor 6]] | ||
Make sure that you've healed your Pokémon before you try to reach the top of the Lighthouse. | Make sure that you've healed your Pokémon before you try to reach the top of the Lighthouse. At the top, you'll find Jasmine, who is nursing a sick {{bp|Ampharos}}, Amphy, that usually powers the Lighthouse. Jasmine won't leave the sick animal to battle or get medicine, so she won't be willing to accept any challenges. It's up to you to head over the water to [[../Cianwood City/]] to get the medicine it needs at a drugstore. If you don't pick up the medicine, you won't get to battle in the Gym. | ||
* | {| | ||
|- | |||
!style="background:#407040; color:#ffffff;" | Items | |||
|- | |||
| | |||
* Super Potion | |||
|} | |||
{{Footer Nav|game=Pokémon Gold and Silver|prevpage=Olivine City|nextpage=Route 40-41|nextname=Routes 40 & 41}} | {{Footer Nav|game=Pokémon Gold and Silver|prevpage=Olivine City|nextpage=Route 40-41|nextname=Routes 40 & 41}} | ||
Latest revision as of 20:10, 12 January 2022
The Lighthouse is used as a training area, most of the Trainers inside use Water- or Flying-type Pokémon. An Eletric-type will keep your opponent at bay.
There are no Pokémon in this dark tower, only a series of relatively easy trainers. Some of them can be avoided, but don't miss the Gentlemen, since they carry a ton of cash. The only trick here is to fall through the pit above one of the staircases on Floor 4; that's the way to get to the central staircase that will take you to the top floor. But make sure to head up to the dead end on Floor 5 anyway to get the Rare Candy and TM 34 (Swagger).
1st Floor[edit]
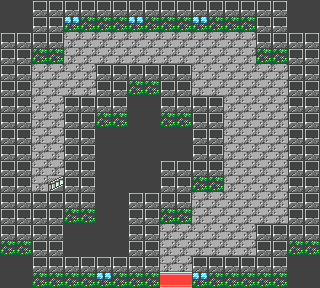
- No trainers
- No items
2nd Floor[edit]
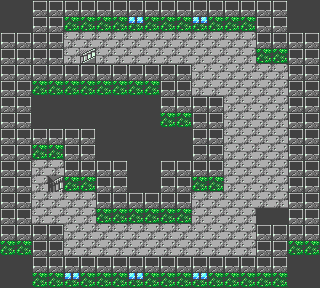
| Trainers | |
|---|---|
 |
Gentleman Alfred:
|
 |
Sailor Huey: |
- No items
3rd Floor[edit]
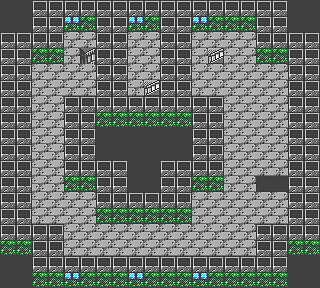
There is a man and an item here, you need to fall down the hole to the left of the girl in the next level
| Trainers | |
|---|---|
 |
Bird Keeper Theo: |
 |
Gentleman Preston: |
 |
Sailor Terrell:
|
| Items | |
| |
4th Floor[edit]

| Trainers | |
|---|---|
 |
Lass Connie:
|
 |
Sailor Kent: |
- No items
5th Floor[edit]
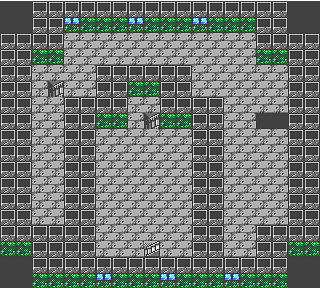
| Trainers | |
|---|---|
 |
Bird Keeper Denis: |
 |
Sailor Ernest: |
| Items | |
| |
6th Floor[edit]
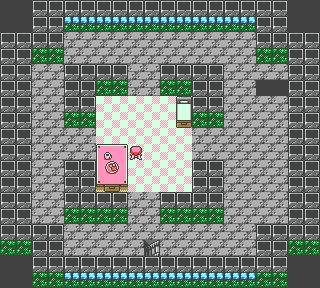
Make sure that you've healed your Pokémon before you try to reach the top of the Lighthouse. At the top, you'll find Jasmine, who is nursing a sick Ampharos, Amphy, that usually powers the Lighthouse. Jasmine won't leave the sick animal to battle or get medicine, so she won't be willing to accept any challenges. It's up to you to head over the water to Cianwood City to get the medicine it needs at a drugstore. If you don't pick up the medicine, you won't get to battle in the Gym.
| Items |
|---|
|
