From StrategyWiki, the video game walkthrough and strategy guide wiki
Jump to navigation Jump to search
(fixed up a bit)
m (rm {{~}})
 
(14 intermediate revisions by 9 users not shown)
Line 1: Line 1:
{{All Game Nav|game=Pokémon Gold, Silver and Crystal|custom=[[Pokémon/Pokédex|Pokédex]]}}
{{Header Nav|game=Pokémon Gold and Silver}}
{| {{prettytable|notwide=1}} align="right" style="text-align:center"
{| {{prettytable|float=right|style=text-align:center}}
|+ New Pokémon Available
|+ New Pokémon
! style="background-color:#ff0000" | Red
! style="background-color:#f08000; color:#ffffff" | Gold
! style="background-color:#4080ff" | Blue
! style="background-color:#808080; color:#ffffff" | Silver
! style="background-color:#ffd700" | Yellow
! style="background-color:#8080f0; color:#ffffff" | Crystal
|- valign="center"
|- valign="center"
| colspan=2 |[[Image:Pokemon_039Jigglypuff.png|40px]][[BP:Jigglypuff (Pokémon)|Jigglypuff]]<br />
| colspan=2 |
Purchase in<br>Pokémon Center:<br />
none
[[BP:Magikarp (Pokémon)|Magikarp]][[Image:Pokemon_129Magikarp.png|35px]]
|
|[[Image:Pokemon_027Sandshrew.png|40px]][[BP:Sandshrew (Pokémon)|Sandshrew]]<br />
[[File:Pokemon_035Clefairy.png|40px]]{{bp|Clefairy}}
Purchase in<br>Pokémon Center:<br />
[[BP:Magikarp (Pokémon)|Magikarp]][[Image:Pokemon_129Magikarp.png|35px]]
|}
|}
'''''After you receive the Boulder Badge, other Pokémon trainers will see you as a worthy opponent.  No fewer than eight trainers wait to challenge you along Route #3. You'll have a tough struggle getting through them all, but you'll emerge from Route #3 a more powerful (and richer) trainer than ever.  Stock up on Poké Balls to capture some more Pokémon in the wild too.'''''
'''''Route 3 leads to Mt. Moon, where your Rival is waiting, ready to battle. You'll run into a handful of Trainers with Flying-, Poison- or Fire-type Pokémon, so you might want to backtrack to Pewter City before continuing on to Mt. Moon.'''''
__NOTOC__
[[File:Pokemon GSC map Route 3.png|thumb|600px|left|Route 3]]
{{-}}
{{-}}
[[Image:Pokemon_RBY_Route03.png|left|thumb|600px|Route #3]]
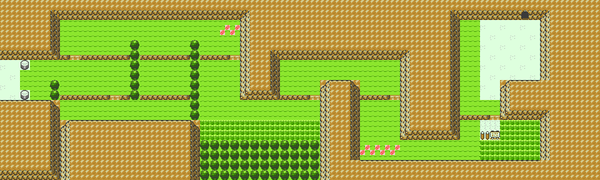
There's nothing to do here except catch a {{bp|Clefairy}} in Crystal and battle a few easy Junior Trainers. You'll note that the Pokémon Center near the entrance to [[../Mt. Moon/]] has closed, but it's such an easy area now that you won't miss it.
{{-}}
 
{|{{prettytable|notwide=1}} align="left" style="font-size:smaller"
==Trainers==
|-
* Youngster Warren
|bgcolor="#c080ff"|'''1'''||Lass||[[Image:Pokébuck.png]]135
** {{bp|Fearow|35|1215}} and [[File:Pokebuck.png]]560
|-
* Youngster Jimmy
|bgcolor="#c080ff"| ||Pidgey||LV9
** {{bp|Raticate|33|819}}
|- style="border-bottom:2px solid grey;"
** {{bp|Arbok|33|1039}} [[File:Pokebuck.png]]528
|bgcolor="#c080ff"| ||Pidgey||LV9
* Firebreather Otis
|-
** {{bp|Magmar|29|1036}}
|bgcolor="#c080ff"|'''2'''||Bug Catcher||[[Image:Pokébuck.png]]100
** {{bp|Weezing|32|1185}}
|-
** {{bp|Magmar|29|1036}} and [[File:Pokebuck.png]]1392
|bgcolor="#c080ff"| ||Caetrpie||LV10
* Firebreather Burt
|-
** {{bp|Koffing|32|781}}
|bgcolor="#c080ff"| ||Weedle||LV10
** {{bp|Slugma|32|534}} and [[File:Pokebuck.png]]1536
|-style="border-bottom:2px solid grey;"
 
|bgcolor="#c080ff"| ||Caterpie||LV10
==Pokémon Found==
|-
{{PokemonGSC Header|Route 3}}
|bgcolor="#c080ff"|'''3'''||Youngster||[[Image:Pokébuck.png]]165
{{PokemonGSC Encounter|Rattata|019|35|35|60|30|30|35|30|30|65}}
|-
{{PokemonGSC Encounter|Raticate|020|||||||10|10|20}}
|bgcolor="#c080ff"| ||Rattata||LV11
{{PokemonGSC Encounter|Spearow|021|55|55||35|35||30|30|}}
|-style="border-bottom:2px solid grey;"
{{PokemonGSC Encounter|Ekans|023||||20|20|20|20|20|}}
|bgcolor="#c080ff"| ||Ekans||LV11
{{PokemonGSC Encounter|Arbok|024||||5|5|5|5|5|}}
|-
{{PokemonGSC Encounter|Sandshrew|027|||||||5|5|}}
|bgcolor="#c080ff"|'''4'''||Bug Catcher||[[Image:Pokébuck.png]]90
{{PokemonGSC Encounter|Clefairy|035|||||||||5}}
|-
{{PokemonGSC Encounter|Jigglypuff|039|10|10|10|10|10|10|||}}
|bgcolor="#c080ff"| ||Weedle||LV9
{{PokemonGSC Encounter|Zubat|041|||30|||30|||10}}
|-
|bgcolor="#c080ff"| ||Kakuna||LV9
|-
|bgcolor="#c080ff"| ||Caterpie||LV9
|- style="border-bottom:2px solid grey;"
|bgcolor="#c080ff"| ||Metapod||LV9
|}
{|{{prettytable|notwide=1}} align="left" style="font-size:smaller"
|-
|bgcolor="#c080ff"|'''5'''||Lass||[[Image:Pokébuck.png]]150
|-
|bgcolor="#c080ff"| ||Rattata||LV10
|- style="border-bottom:2px solid grey;"
|bgcolor="#c080ff"| ||Nidoran♂||LV10
|-
|bgcolor="#c080ff"|'''6'''||Youngster||[[Image:Pokébuck.png]]210
|-style="border-bottom:2px solid grey;"
|bgcolor="#c080ff"| ||Spearow||LV14
|-
|bgcolor="#c080ff"|'''7'''||Bug Catcher||[[Image:Pokébuck.png]]110
|-
|bgcolor="#c080ff"| ||Caterpie||LV11
|- style="border-bottom:2px solid grey;"
|bgcolor="#c080ff"| ||Metapod||LV11
|-
|bgcolor="#c080ff"|'''8'''||Lass||[[Image:Pokébuck.png]]210
|- style="border-bottom:2px solid grey;"
|bgcolor="#c080ff"| ||Jigglypuff||LV14
|}
{| {{prettytable}} align="right" style="font-size:larger"
|+ Route 3 encounters
| style="background:red;color:white" |'''Pidgey'''[[Image:Pokemon_016Pidgey.png|40px]]
| style="border:1px solid red" | '''48%'''
| style="border:1px solid blue" | '''48%'''
| style="border:1px solid #ffd700" | N/A
|-
| style="background:red;color:white" |[[Image:Pokemon_021Spearow.png|40px]]'''Spearow'''
| style="border:1px solid red" | '''48%'''
| style="border:1px solid blue" | '''48%'''
| style="border:1px solid #ffd700" | '''40%'''
|-
| style="background:red;color:white" |'''Jigglypuff'''[[Image:Pokemon_039Jigglypuff.png|40px]]
| style="border:1px solid red" | '''4%'''
| style="border:1px solid blue" | '''4%'''
| style="border:1px solid #ffd700" | N/A
|-
| style="background:red;color:white" |[[Image:Pokemon_019Rattata.png|40px]]'''Rattata'''
| style="border:1px solid red" | N/A
| style="border:1px solid blue" | N/A
| style="border:1px solid #ffd700" | '''20%'''
|-
| style="background:red;color:white" |'''Sandshrew'''[[Image:Pokemon_027Sandshrew.png|40px]]
| style="border:1px solid red" | N/A
| style="border:1px solid blue" | N/A
| style="border:1px solid #ffd700" | '''20%'''
|-
| style="background:red;color:white" |[[Image:Pokemon 056Mankey.png|40px]]'''Mankey'''
| style="border:1px solid red" | N/A
| style="border:1px solid blue" | N/A
| style="border:1px solid #ffd700" | '''20%'''
|}
|}
{{-}}
{| {{prettytable|float=right}}
== On the way to Mt. Moon ==
! style="background-color:#000;color:#fff;" | #35 Clefairy
<big>There are eight disgruntled Pokémon trainers between [[Pokémon Red and Blue/Pewter City|Pewter City]] and the entrance to [[Pokémon Red and Blue/Mt. Moon|Mt. Moon]], but they're pretty easy to avoid (by staying out of their direct line of sight).  Still you may need the EXP: Mt. Moon is tough.
 
At the Mt. Moon Pokémon Center, you can pick up a black market [[BP:Magikarp (Pokémon)|Magikarp]] for [[Image:Pokébuck.png]]500.  As for wild Pokémon, [[BP:Jigglypuff (Pokémon)|Jigglypuffs]] are only decent in Red or Blue, but Yellow players shouldn't move on without a [[BP:Sandshrew (Pokémon)|Sandshrew]] in tow.</big>
{{-}}
{| {{prettytable|notwide=1}}
! style="background-color:#c080ff;color:#ffffff;" width="50%"| #39 Jigglypuff
! style="background-color:#ffff00;" width="50%"| #27 Sandshrew
|-
|[[Image:Pokemon_039Jigglypuff.png|left]]Jigglypuffs, even ''more'' ridiculously cute in Yellow, have a ton of HP, but very few good techniques.  They can use a wide variety of powerful TM's, however, so if you put some time into it, these Puffs can kick some tail.
| [[Image:Pokemon_027Sandshrew.png|right]]This Ground-type Pokémon doesn't learn anything particularly exciting but he's tough on defense and makes a good all-around fighter that's virtually impervious to Rock-type attacks.  And you'll be facing a lot of those in the very near future.
|-
! style="background-color:#c080ff;color:#ffffff;" colspan="2"| #129 Magikarp
|-
|-
|colspan="2"|[[Image:Pokemon_129Magikarp.png|left]][[Image:Pokemon_130Gyarados.png|right]]The thing about Magikarps is that they're totally, completely horrible.  They come with only one technique, Splash, and it does absolutely nothing.  Magikarps can't learn any TMs or HMs and they don't even learn an attack until Level 15!
| [[File:Pokemon 035Clefairy.png|right]] {{bp|Clefairy}} has a couple of new moves, including level 4's Encore (which repeats your opponent's last move) and Moonlight, a healing move that is stronger at night. And now they can lay an egg containing a new Pokémon, {{bp|Cleffa}}.
 
''BUT'' if you can get one to Level 20, it will evolve into [[BP:Gyarados (Pokémon)|Gyarados]], an incredible Flying-type, Water-type dragon with a ton of HP that learns the strong Dragon Rage technique at level 25!  So either stick your 'Karp at the top of your roster to level him up, or drop him in the Day Care Center when you get to [[Pokémon Red and Blue/Route 5-6|Route #5]]. If you can't afford him now, don't worry about it: You can fish for one anywhere once you get a Rod.
|}
|}


{{Footer Nav|game=Pokémon Gold, Silver and Crystal|backpage=Pewter City|here=Route #3|nextpage=Mt. Moon}}
{{Footer Nav|game=Pokémon Gold and Silver|prevpage=Pewter City|nextpage=Mt. Moon}}

Latest revision as of 05:04, 13 January 2022

New Pokémon
Gold Silver Crystal

none

Pokemon 035Clefairy.pngClefairy

Route 3 leads to Mt. Moon, where your Rival is waiting, ready to battle. You'll run into a handful of Trainers with Flying-, Poison- or Fire-type Pokémon, so you might want to backtrack to Pewter City before continuing on to Mt. Moon.

Route 3

There's nothing to do here except catch a Clefairy in Crystal and battle a few easy Junior Trainers. You'll note that the Pokémon Center near the entrance to Mt. Moon has closed, but it's such an easy area now that you won't miss it.

Trainers[edit]

  • Youngster Warren
    • Fearow (lvl. 35, 1215 EXP) and Pokebuck.png560
  • Youngster Jimmy
  • Firebreather Otis
  • Firebreather Burt

Pokémon Found[edit]

Route 3 encounters
Gold Silver Crystal
Morn Day Night Morn Day Night Morn Day Night
Pokemon 019Rattata.pngRattata 35% 35% 60% 30% 30% 35% 30% 30% 65%
Pokemon 020Raticate.pngRaticate N/A N/A N/A N/A N/A N/A 10% 10% 20%
Pokemon 021Spearow.pngSpearow 55% 55% N/A 35% 35% N/A 30% 30% N/A
Pokemon 023Ekans.pngEkans N/A N/A N/A 20% 20% 20% 20% 20% N/A
Pokemon 024Arbok.pngArbok N/A N/A N/A 5% 5% 5% 5% 5% N/A
Pokemon 027Sandshrew.pngSandshrew N/A N/A N/A N/A N/A N/A 5% 5% N/A
Pokemon 035Clefairy.pngClefairy N/A N/A N/A N/A N/A N/A N/A N/A 5%
Pokemon 039Jigglypuff.pngJigglypuff 10% 10% 10% 10% 10% 10% N/A N/A N/A
Pokemon 041Zubat.pngZubat N/A N/A 30% N/A N/A 30% N/A N/A 10%
#35 Clefairy
Pokemon 035Clefairy.png
Clefairy has a couple of new moves, including level 4's Encore (which repeats your opponent's last move) and Moonlight, a healing move that is stronger at night. And now they can lay an egg containing a new Pokémon, Cleffa.