(Added map, cleaned up text) |
Trig Jegman (talk | contribs) mNo edit summary |
||
| (33 intermediate revisions by 21 users not shown) | |||
| Line 1: | Line 1: | ||
{{Header Nav|game=Pokémon Gold and Silver| | {{Header Nav|game=Pokémon Gold and Silver}} | ||
__NOTOC__ | |||
''' | {| {{prettytable|float=left|style=text-align:center}} | ||
|+ New Pokémon | |||
! style="background-color:#f08000; color:#ffffff" | Gold | |||
! style="background-color:#808080; color:#ffffff" | Silver | |||
! style="background-color:#8080f0; color:#ffffff" | Crystal | |||
|- valign="center" | |||
| colspan=2 | | |||
[[File:Pokemon_092Gastly.png|40px]]{{bp|Gastly}} | |||
| | |||
none | |||
|} | |||
'''''The magical Sprout Tower is rumored to have a giant Bellsprout stalk as its center column. Many monks devoted to Grass-types train in Sprout Tower, but you should be able to handle them. You may want to use the Escape Rope to leave the tower, or you can climb down. Sprout Tower is an optional side mission only required for obtaining Flash.''' | |||
==Level 1== | ==Level 1== | ||
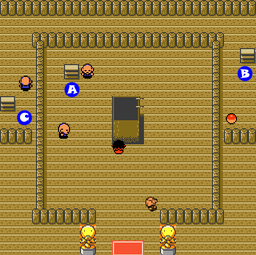
[[ | [[File:Pokemon-GSC-Johto-SproutTower1.png|thumb|256px|left|Sprout Tower Level 1]] | ||
{| align="left" cellpadding="4" | |||
{ | ! align="center" colspan="2" style="background:#407040; color:#ffffff;" | Trainers | ||
== | |||
|- | |- | ||
|[[ | |[[File:Pokemon GSC Sage.png|left]] | ||
|Sage Nico: | |'''Sage Nico''': [[File:Pokebuck.png]]96 | ||
* {{bp|Bellsprout|3|54}} | *{{bp|Bellsprout|3|54}} | ||
* {{bp|Bellsprout|3|54}} | *{{bp|Bellsprout|3|54}} | ||
* {{bp|Bellsprout|3|54}} | *{{bp|Bellsprout|3|54}} | ||
|} | |} | ||
The tower is fairly easy if you arrive during the morning or day, since the only random encounters you'll have to deal with are {{bp|Rattatas}}. At night, {{bp|Gastly}} join in the fun, and their immunity to Normal-type attacks can be a problem if you don't have a Pokémon with a different type of attack, like Bellsprout's Vine Whip or Onix's Rock Throw. On the plus side for Crystal players, this is a great opportunity to catch one, since they appear more frequently here than they did on [[Pokémon Gold and Silver/Route 30-31|Route #31]]. | |||
Virtually all of the trainers are packing Bellsprouts. If you chose Cyndaquil as your starter, you'll have no problem burning through them. Other players will want to use a good Flyer. Crystal players can pick up a Spearow from [[../Route 45-46|Route #46]], which starts with Flying-type Peck, and Hoothoot can learn it at level 11. Pidgey's Gust, which it learns at level 9, is equally effective. | |||
{{-}} | {{-}} | ||
==Level | |||
[[ | ==Level 2== | ||
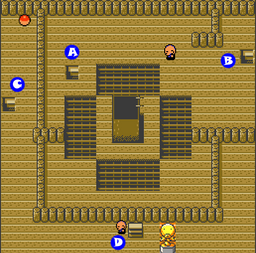
{| | [[File:Pokemon-GSC-Johto-SproutTower2.png|thumb|256px|left|Sprout Tower Level 2]] | ||
{| align="left" cellpadding="4" | |||
! align="center" colspan="2" style="background:#407040; color:#ffffff;" | Trainers | |||
|- | |- | ||
| [[File:Pokemon GSC Sage.png|left]] | |||
| | | '''Sage Chow''': [[File:Pokebuck.png]]96 | ||
* {{bp|Bellsprout|3|54}} | *{{bp|Bellsprout|3|54}} | ||
* {{bp|Bellsprout|3|54}} | *{{bp|Bellsprout|3|54}} | ||
* {{bp|Bellsprout|3|54}} | *{{bp|Bellsprout|3|54}} | ||
|- | |- | ||
| [[File:Pokemon GSC Sage.png|left]] | |||
| | | '''Sage Edmond''': [[File:Pokebuck.png]]96 | ||
* {{bp|Bellsprout|3|54}} | *{{bp|Bellsprout|3|54}} | ||
* {{bp|Bellsprout|3|54}} | *{{bp|Bellsprout|3|54}} | ||
* {{bp|Bellsprout|3|54}} | *{{bp|Bellsprout|3|54}} | ||
|} | |} | ||
For Gold and Silver players, this will be your first chance to catch a Gastly. The usefulness of a lot of the new Ghost abilities is debatable, but Gastly is still a great Pokémon. Its Ghost-type nature makes it immune to Normal and Fighting-type attacks, but its real strength lies in its utility on the field. While its resistances keep it healthy, it can put wild Pokémon to sleep with Hypnosis, keep them from escaping with Mean Look, and whittle down their health with Nightshade (which doesn't get critical hits, and won't accidentally K.O. your quarry). | |||
Getting one isn't easy. You have to come to the tower at night, and can only damage it with Type attacks like Rock Throw and Vine Whip. But it's well worth the trouble. | |||
{{-}} | {{-}} | ||
==Level | |||
[[ | ==Level 3== | ||
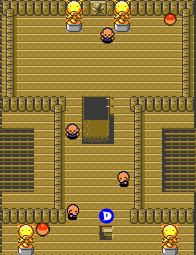
{| | [[File:Pokemon-GSC-Johto-SproutTower3.png|thumb|196px|left|Sprout Tower Level 3]] | ||
{| align="left" cellpadding="4" | |||
! align="center" colspan="2" style="background:#407040; color:#ffffff;" | Trainers | |||
|- | |- | ||
| [[File:Pokemon GSC Sage.png|left]] | |||
| | | '''Sage Jin''': [[File:Pokebuck.png]]192 | ||
* {{bp|Bellsprout|6|108}} | *{{bp|Bellsprout|6|108}} | ||
|- | |- | ||
|[[ | | [[File:Pokemon GSC Sage.png|left]] | ||
|Sage Neal: | | '''Sage Neal''': [[File:Pokebuck.png]]192 | ||
* {{bp|Bellsprout|6|108}} | *{{bp|Bellsprout|6|108}} | ||
|- | |- | ||
|[[ | | [[File:Pokemon GSC Sage.png|left]] | ||
|Sage Troy: | | '''Sage Troy''': [[File:Pokebuck.png]]224 | ||
* {{bp|Bellsprout|7|126}} | *{{bp|Bellsprout|7|126}} | ||
* {{bp|Hoothoot|7|87}} | * {{bp|Hoothoot|7|87}} | ||
|- | |- | ||
| [[File:Pokemon GSC Sage.png|left]] | |||
| '''Sage Li''': [[File:Pokebuck.png]]320 + '''HM 05''' | |||
| | *{{bp|Bellsprout|7|126}} | ||
* {{bp|Bellsprout|7|126}} | *{{bp|Bellsprout|7|126}} | ||
* {{bp|Bellsprout|7|126}} | *{{bp|Hoothoot|10|123}} | ||
* {{bp|Hoothoot|10|123}} | |||
|} | |} | ||
The third floor has several monks and their leader, the Elder. You will see your Rival briefly, but he leaves quickly. He thinks the Elder is weak. Defeating the final Sage will get you '''HM 05''' (Flash, which is much more useful than it was in Red/Blue/Yellow), which will help you see inside dark caves. You need the Zephyr Badge to use Flash outside of battle. But the Sage is tough—while your Flying or Fire-type Pokémon can shred his Bellsprouts, and the Bellsprouts of all his underlings—you'll need an Onix or Geodude to deal with his vicious level 10 Hoothoot. There is an '''Escape Rope''' at the top right corner of the room, which can be used as a quick escape from dungeons, including the Sprout Tower. | |||
{{-}} | {{-}} | ||
==Next stop: Azalea Town== | |||
Now your quest has truly begun! There are seven more badges in Johto alone, and the next will take us to secluded Azalea Town, in Johto's southern tip. The journey will be long, but does offer a variety of cool new Pokémon and interesting detours. Head south from Violet City to get started. | |||
==Pokémon Found== | ==Pokémon Found== | ||
{ | {{PokemonGSC Header|Sprout Tower}} | ||
{{PokemonGSC Encounter|Rattata|019|100|100|15|100|100|15|100|100|15}} | |||
{{PokemonGSC Encounter|Gastly|092|||85|||85|||85}} | |||
| | |||
| | |||
| | |||
| | |||
| | |||
| | |||
|| | |||
|} | |} | ||
{{-}} | {{-}} | ||
==Items== | ==Items== | ||
* | *Parlyze Heal - the right side of the first floor. | ||
*X Accuracy | *X Accuracy (Crystal only) - 2nd floor | ||
*Escape Rope | *X Defend (G/S only) - 2nd floor | ||
*HM 05 | *Potion - 3rd floor | ||
*Escape Rope - 3rd floor | |||
*HM 05 - receive from Sage Li | |||
{{Footer Nav|game=Pokémon Gold and Silver|prevpage=Violet City|nextpage= | {{Footer Nav|game=Pokémon Gold and Silver|prevpage=Violet City|nextpage=Route 32}} | ||
Latest revision as of 20:19, 12 January 2022
| Gold | Silver | Crystal |
|---|---|---|
|
none | ||
The magical Sprout Tower is rumored to have a giant Bellsprout stalk as its center column. Many monks devoted to Grass-types train in Sprout Tower, but you should be able to handle them. You may want to use the Escape Rope to leave the tower, or you can climb down. Sprout Tower is an optional side mission only required for obtaining Flash.
Level 1[edit]

| Trainers | |
|---|---|
Sage Nico:
| |
The tower is fairly easy if you arrive during the morning or day, since the only random encounters you'll have to deal with are Rattatas. At night, Gastly join in the fun, and their immunity to Normal-type attacks can be a problem if you don't have a Pokémon with a different type of attack, like Bellsprout's Vine Whip or Onix's Rock Throw. On the plus side for Crystal players, this is a great opportunity to catch one, since they appear more frequently here than they did on Route #31.
Virtually all of the trainers are packing Bellsprouts. If you chose Cyndaquil as your starter, you'll have no problem burning through them. Other players will want to use a good Flyer. Crystal players can pick up a Spearow from Route #46, which starts with Flying-type Peck, and Hoothoot can learn it at level 11. Pidgey's Gust, which it learns at level 9, is equally effective.
Level 2[edit]

| Trainers | |
|---|---|
Sage Chow:
| |
Sage Edmond:
| |
For Gold and Silver players, this will be your first chance to catch a Gastly. The usefulness of a lot of the new Ghost abilities is debatable, but Gastly is still a great Pokémon. Its Ghost-type nature makes it immune to Normal and Fighting-type attacks, but its real strength lies in its utility on the field. While its resistances keep it healthy, it can put wild Pokémon to sleep with Hypnosis, keep them from escaping with Mean Look, and whittle down their health with Nightshade (which doesn't get critical hits, and won't accidentally K.O. your quarry).
Getting one isn't easy. You have to come to the tower at night, and can only damage it with Type attacks like Rock Throw and Vine Whip. But it's well worth the trouble.
Level 3[edit]

| Trainers | |
|---|---|
Sage Jin:
| |
Sage Neal:
| |
Sage Troy:
| |
Sage Li:
| |
The third floor has several monks and their leader, the Elder. You will see your Rival briefly, but he leaves quickly. He thinks the Elder is weak. Defeating the final Sage will get you HM 05 (Flash, which is much more useful than it was in Red/Blue/Yellow), which will help you see inside dark caves. You need the Zephyr Badge to use Flash outside of battle. But the Sage is tough—while your Flying or Fire-type Pokémon can shred his Bellsprouts, and the Bellsprouts of all his underlings—you'll need an Onix or Geodude to deal with his vicious level 10 Hoothoot. There is an Escape Rope at the top right corner of the room, which can be used as a quick escape from dungeons, including the Sprout Tower.
Next stop: Azalea Town[edit]
Now your quest has truly begun! There are seven more badges in Johto alone, and the next will take us to secluded Azalea Town, in Johto's southern tip. The journey will be long, but does offer a variety of cool new Pokémon and interesting detours. Head south from Violet City to get started.
Pokémon Found[edit]
| Gold | Silver | Crystal | |||||||
|---|---|---|---|---|---|---|---|---|---|
| Morn | Day | Night | Morn | Day | Night | Morn | Day | Night | |
| 100% | 100% | 15% | 100% | 100% | 15% | 100% | 100% | 15% | |
| N/A | N/A | 85% | N/A | N/A | 85% | N/A | N/A | 85% | |
Items[edit]
- Parlyze Heal - the right side of the first floor.
- X Accuracy (Crystal only) - 2nd floor
- X Defend (G/S only) - 2nd floor
- Potion - 3rd floor
- Escape Rope - 3rd floor
- HM 05 - receive from Sage Li

