Jump to navigation
Jump to search
m (footer nav) |
(revamp) |
||
| Line 1: | Line 1: | ||
{{Header Nav|game=Super Mario World}} | {{Header Nav|game=Super Mario World}} | ||
{{Infobox_SMW_Level | |||
|level name = Chocolate Island 1 | |||
|level type = | |||
|entrance = [[Super Mario World/Roy's Castle|Roy's Castle]] | |||
|exit = [[Super Mario World/Choco-Ghost House|Choco-Ghost House]] | |||
|secret exit = ''none'' | |||
|time at start = 300 | |||
}} | |||
==Walkthrough== | |||
{{Scrolling map|SMW-CI1-1.png}} | |||
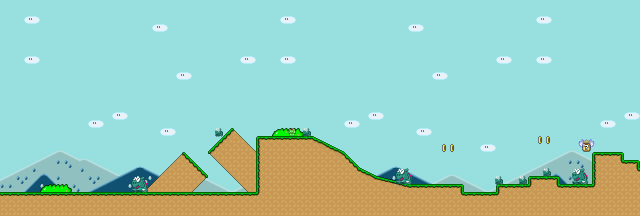
* You'll encounter two new enemies right at the beginning: the large Dino-Rhino and the small Dino-Torch. The Dino-Rhino are harmless and turn into Dino-Torch once stomped on. The Dino-Torch, on the other hand, are more dangerous since they can breathe fire. | |||
* Shortly past the beginning a flying ? block will provide you with a flower should you need it. | |||
{{Scrolling map|SMW-CI1-2.png}} | |||
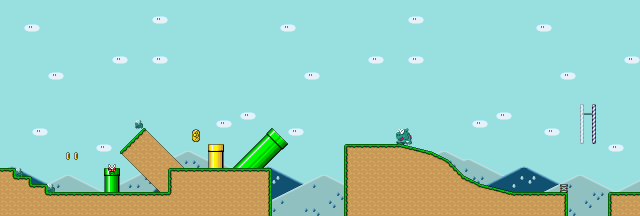
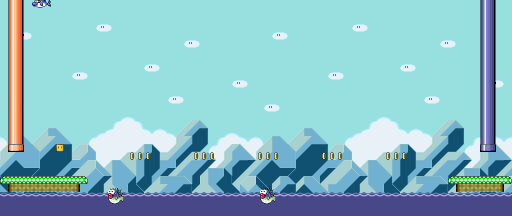
* Enter the yellow pipe to shoot yourself to the other side of the pit. | |||
* If you were to just jump (or fly) over the pit without using the pipe, you'll quickly notice that the midway tape and the Dragon Coins are all gone. | |||
* As for the midway tape, a conveniently placed springboard allows you to reach it up in the air. | |||
{{sidebar|float=right|width=250px|title=3-up moon|contents=Once you pass the Muncher pit, take off and fly straight up to discover a 3-up moon on a platform up in the sky. This bonus too will not appear if you just fly from the beginning of the level.}} | |||
{{Scrolling map|SMW-CI1-3.png}} | |||
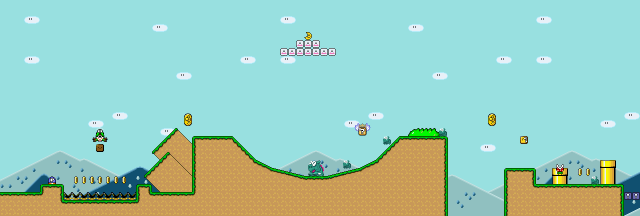
* You'll need to step on the P-Switch to cross the pit with the Munchers. The Clappin' Chuck falls down as well and must be carefully leaped over. If you wish, you can carry the springboard over here and use that. | |||
* Another flying ? block will provide you with a flower should you need one. On the other side of the pit, you can get Yoshi from the ? block. | |||
{{Scrolling map|SMW-CI1-4.png}} | |||
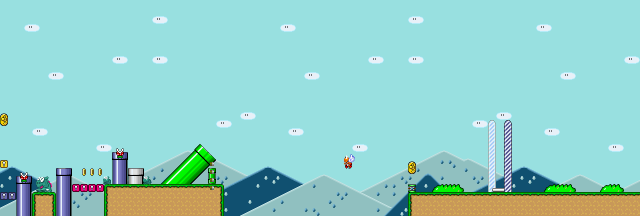
* The single switch block in the air serves as an indicator if you did everything right. If so, it will be yellow, if you did something wrong, it will be green. | |||
* The blue pipe with no Piranha Plant in it leads to a bonus area (see below). | |||
* To cross the large pit, enter the silver pipe. Once you shoot out of the large diagonal pipe, you will need to hold right to bounce off a Paratroopa and end up on a springboard. If you don't do this, you will fall down the void. | |||
* You can use the springboard you land on to touch the goal tape at its highest point. | |||
{{Scrolling map|SMW-CI1-bonus.png}} | |||
* Here, you will need to use the dolphins to make it to the other side of the area. If you fall into the water, the Porcu-Puffers are going to eat you. | |||
* You can get a 1-up mushroom from the turn block at the beginning. Otherwise, there's not much to do here. | |||
* The pipe at the end will launch you to the goal tape, just as if you had entered the silver pipe in the main area. | |||
==Dragon Coin locations== | |||
The five Dragon Coins in this level are located as follows: | |||
* Just before the yellow pipe before the first large pit. | |||
* Past the Muncher pit. | |||
* In the air before the pipe area. | |||
* In the air between the pipes (need to jump from the switch block to reach it). | |||
* Over the springboard in front of the goal tape. | |||
{{Footer Nav|game=Super Mario World|prevpage=Roy's Castle|nextpage=Choco-Ghost House}} | {{Footer Nav|game=Super Mario World|prevpage=Roy's Castle|nextpage=Choco-Ghost House}} | ||
Revision as of 12:00, 10 August 2013
Walkthrough

- You'll encounter two new enemies right at the beginning: the large Dino-Rhino and the small Dino-Torch. The Dino-Rhino are harmless and turn into Dino-Torch once stomped on. The Dino-Torch, on the other hand, are more dangerous since they can breathe fire.
- Shortly past the beginning a flying ? block will provide you with a flower should you need it.

- Enter the yellow pipe to shoot yourself to the other side of the pit.
- If you were to just jump (or fly) over the pit without using the pipe, you'll quickly notice that the midway tape and the Dragon Coins are all gone.
- As for the midway tape, a conveniently placed springboard allows you to reach it up in the air.

- You'll need to step on the P-Switch to cross the pit with the Munchers. The Clappin' Chuck falls down as well and must be carefully leaped over. If you wish, you can carry the springboard over here and use that.
- Another flying ? block will provide you with a flower should you need one. On the other side of the pit, you can get Yoshi from the ? block.

- The single switch block in the air serves as an indicator if you did everything right. If so, it will be yellow, if you did something wrong, it will be green.
- The blue pipe with no Piranha Plant in it leads to a bonus area (see below).
- To cross the large pit, enter the silver pipe. Once you shoot out of the large diagonal pipe, you will need to hold right to bounce off a Paratroopa and end up on a springboard. If you don't do this, you will fall down the void.
- You can use the springboard you land on to touch the goal tape at its highest point.

- Here, you will need to use the dolphins to make it to the other side of the area. If you fall into the water, the Porcu-Puffers are going to eat you.
- You can get a 1-up mushroom from the turn block at the beginning. Otherwise, there's not much to do here.
- The pipe at the end will launch you to the goal tape, just as if you had entered the silver pipe in the main area.
Dragon Coin locations
The five Dragon Coins in this level are located as follows:
- Just before the yellow pipe before the first large pit.
- Past the Muncher pit.
- In the air before the pipe area.
- In the air between the pipes (need to jump from the switch block to reach it).
- Over the springboard in front of the goal tape.