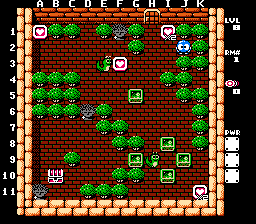
This one is a little trickier than the previous rooms.
Move the G5 EF to F6. Move the J9 EF to G11. You'll get the K11 heart.
Quickly move the H9 Snakey all the way up, get the heart and shoot the egg again. Move the G9 EF to D7 while the Snakey's gone and head out.
Move the I8 EF to D5. Move the H9 Snakey to A8. Move the E3 Snakey to F2. Move the I10 EF to D1. Get the last heart and the chest.
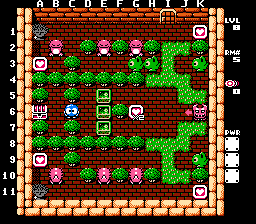
8-2
Description.
Move the E4 EF left one. Move the F5 EF to C6. Move the C3 EF right one. Move the D4 EF to E2. Get the heart.
Move the H9 Snakey into the water on C9, get on the egg and move right one space. Move the B10 EF left one and get the heart.
Move the E9 EF to A4. Move the H9 Snakey to cross D8 up and move that EF to B2. Get the 3 hearts.
When the Snakey returns, move it to K9. Get the heart. Move the K7 Snakey up two, getting the heart, and cross up.
Get the 2 K-column hearts. wait on the grass for Alma to come beside you and shoot it. Get the third heart and cross down on H4. Shoot the Snakey and move it down to H11. Get the last heart and the chest.
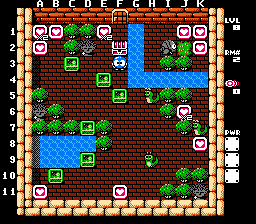
8-3
This one's not too tough.
Move the C10 EF to D7. You'll get the heart. Move the E10 EF to E6. Move the C8 EF to C6. Move the A7 EF left one, circle around, and move it all the way up.
Move the B9 EF right one. Move the B8 EF to B3. Move the C9 EF to D5. Get the C1 heart.
Move the E3 Snakey into the water and walk right, gettin gthe H3 heart. Wait on K8 for the egg to come by and cross down.
Use the Snakey again, only this time ride the egg. Get the last heart and ride around and cross up to J8. Shoot the Gol. Move the K2 Snakey up out of the way and get the chest.
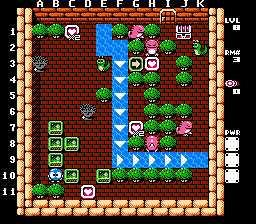
8-4
The difficulty suddenly increased. This one is a lot harder than any room yet.
Move the I10 EF to E10. Move the I6 EF up two. Move the G6 EF to K6. Get the K8 heart.
Quickly move the H3 Snakey up one, move the EF right, move the egg to D6. Move the E10 EF to C10. Maneuver the E8 EF to K2. Get the K1 heart.
Move the E2 Snakey down and get the heart.
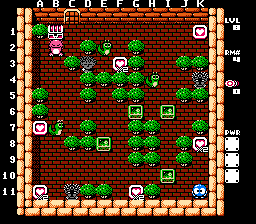
Quickly move the B7 Snakey up one and then back down to B11. Get the A11 heart and shoot the egg again. Wait on B6.
When the Snakey returns, move it to F11. Get the heart and shoot the egg again.
When the Snakey returns, move it all the way up, getting the A7 heart. Move the Gol aside and get the chest.
8-5
The last level will need you to use Leepers as shields.