Arumana no Kiseki/Stage 1
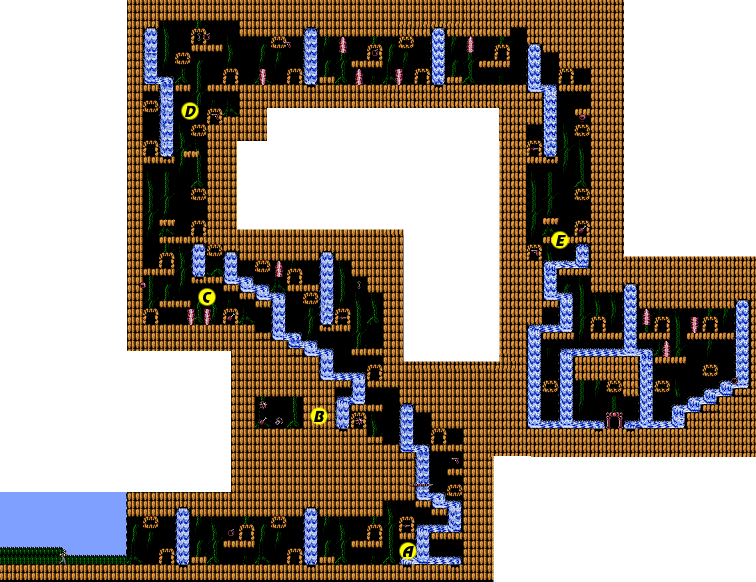
The first stage is an opportunity for you to get a feel for how the grappling hook works. Plenty of enemies will pour out of the entrances, so you'll have to stay on guard while they appear, but you should be able to move through the stage without too much difficulty. If you die on this stage, you will have considerable difficulty making it through the remaining five stages, so practice this stage until you have it mastered.
- Point A
- This is the first entrance where a red enemy will appear from. This particular enemy leaves knives behind. If you are not satisfied with your current allocation of knives, and would like to collect more, stand here an attack each enemy until a red one appears. Then kill it and retrieve the knives before a new enemy follows. When you proceed, watch out for the spear trap coming out of the left wall. You are safe as long as you are ducking.
- Point B
- Red enemies will appear from the entrance to the right of this wall. They provide you with Mines. These Mines are especially useful here because they can be used to break down this wall. Two Mines will create a path for you to access a small closed off chamber which contains a life extending Pendant, life filling Meat, and more Mines.
- Point C
- Two jets of flame rise out unexpectedly from the floor at this point. If you get hit by them, don't despair. The entrance to the right will reveal some red enemies which can be defeated for Meat. Stand around and wait for them to appear so that you can restore your health. Don't proceed until your meter is full.
- Point D
- After riding up the floating platform and connecting your grappling hook to the underside of the platform on the left, climb up and attack any red enemies that pour out of the entrance on the right. They will provide you with gun ammunition. And entrance immediately above that contains red enemies that drop Bolas, which are difficult to come by and quite handy at the end of this level.
- Point E
- When you drop down to this point, red enemies may appear from either entrance. The red enemies that you defeat from the right entrance will leave Meat behind, while enemies that appear from the left drop guns. This is a safe place to replenish both your health and your supply of bullets before you drop down and locate the entrance to the boss' lair.
Boss: Dragon[edit]

After riding the raft to the right, you will arrive at the location of the Dragon which attempts to prevent you from advancing to the next stage. He will lift his head out of the water and three flames will appear to float around his head. You are generally safe from these flames as long as you stay on the far left side of the screen.
There are two strategies that you can use to attack the dragon. One is slower and safer, while the other is faster but a bit more dangerous. The slow and safe method is to use the Pistol. You can kill the dragon by hitting it in the head with 8 bullets. Since the dragon has a tendency to line up with your raft, you won't have to move up or down very much. In addition, the dragon's aim is less reliable when it is farther away from you, so you might be able to kill it before the flames it breaths get too close to you.
The faster method is to use the Bolas. It only takes six Bolas to put the dragon down. To succeed, you need to remain on the bottom of the screen. However, since the Bolas fly at a fixed angle, you may have to move to the right in order to hit the dragon's head, and that may expose you to getting hit by the three flames. Remember that all of your damage will be healed when you start the next stage, so it may be worth the exposure to danger if you can defeat the dragon quickly enough.
