m (Correction to an error I made before about how many Seeds of Life were needed for Milly) |
m (→Cave of Amor: Took out some bad advice) |
||
| (5 intermediate revisions by the same user not shown) | |||
| Line 1: | Line 1: | ||
{{Header Nav|game=Dragon Quest VI: Realms of Revelation}} | {{Header Nav|game=Dragon Quest VI: Realms of Revelation}} | ||
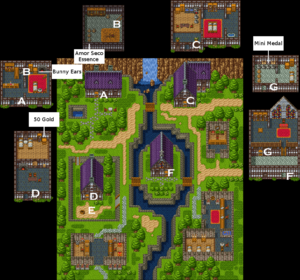
[[File:DQ6 Amor (Real World).png|thumb|left|Map for Amor in the Real World]] | [[File:DQ6 Amor (Real World).png|thumb|left|Map for Amor in the Real World]] | ||
| Line 7: | Line 5: | ||
[[File:DQ6 Amor (Dream World).png|thumb|right|Map for Amor in the Dream World]] | [[File:DQ6 Amor (Dream World).png|thumb|right|Map for Amor in the Dream World]] | ||
After getting the [[File:Dragon Warrior 3 SNES Small Medal.png]] <span style="color:green">6th Mini Medal</span>, you will have to talk to four specific NPC's to progress with the plot. You have to talk with the man who runs the Inn, the man inside the southwest house, the scholar inside the northeast house, and the blue NPC at the weapons shop (the one who looks like a warrior). Only then can you go inside the Church. When you do, talk to the pastor, go inside the bedroom, and talk to Evgenya so you can finally sleep inside the Church's bed. | |||
When you do, you will suddenly find yourself in the Dream World version of Amor, with entirely new items | When you do, you will suddenly find yourself in the Dream World version of Amor, with the [[File:Dragon Warrior 3 SNES Small Medal.png]] <span style="color:green">7th Mini Medal</span> and other entirely new items. If you are playing the SNES version (and ''do not'' sell the Bronze Shield to do the following), you will want to buy a Steel Broadsword for Carver. Then, if you can afford it, two Iron Shields for both Rex and Carver. It is not vital that you purchase the two now however; you can wait until after the next dungeon to do so if needed. And if you are playing the remakes, you should already have two Dragon Shields. | ||
Be sure to find the Bunny Ears as well; they will be Milly's strongest piece of headgear for a very long time. Once you have gotten that and the rest of the items, move on to the cave of Amor; it's in the exact same spot as it was in the Real World. Before you do, your party should look like the following... | Be sure to find the Bunny Ears as well; they will be Milly's strongest piece of headgear for a very long time. Once you have gotten that and the rest of the items, move on to the cave of Amor; it's in the exact same spot as it was in the Real World. Before you do, your party should look like the following... | ||
| Line 25: | Line 23: | ||
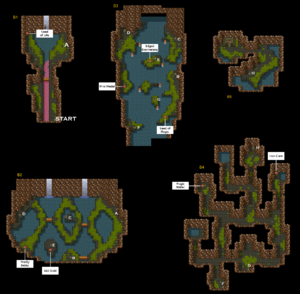
[[File:DQ6 Cave North of Amor.png|thumb]] | [[File:DQ6 Cave North of Amor.png|thumb]] | ||
First things first, you should use the Lucida Shard on any group with more than 1 Babygoyle; You don't want their Sizzes draining your HP & MP. | |||
Additionally, it is recommended that you grind Milly to Level 7 while you are on the second floor. It has Metal Slimes that give out 1350 EXP, and are much easier to kill with three party members than they are with two. When you kill one, Milly will skyrocket all the way up to Level 8 and become much stronger than before. Additionally, this specific floor has a 12% of catching the enemy by surprise, instead of the standard 3%. | |||
This is not mandatory however, not even in the SNES version. Skipping this opportunity just means that you may have to fight more enemies before being able to take on that one Chapter 3 boss. | |||
Whatever you decide to do, get the Mini Medal first, then the Edged Boomerang, then the 410G. Do not get | Whatever you decide to do, get the [[File:Dragon Warrior 3 SNES Small Medal.png]] <span style="color:green">8th Mini Medal</span> first, then the Edged Boomerang, then the 410G. Do not get any of the other treasures until you have slain the boss; all enemies in this dungeon will disappear upon the Grrrgoyle's defeat. Speaking of which... | ||
== VS. Grrrgoyle == | == VS. Grrrgoyle == | ||
| Line 97: | Line 68: | ||
|- | |- | ||
!A.I. Pecularities: | !A.I. Pecularities: | ||
| | |None | ||
|- | |- | ||
!Resistances: | !Resistances: | ||
| Line 103: | Line 74: | ||
|} | |} | ||
The Grrrgoyle is relatively easy. It has no resistance to Sap, and Milly's Buff spell will utterly negate it's physical attacks if she casts them enough times on someone. This guide only mentions all of this for later on, when the bosses are not so simple. | |||
== Aftermath == | |||
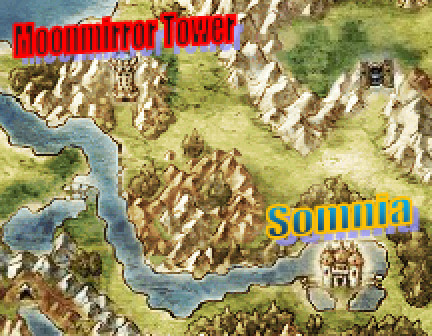
Talk to Ilya and raid any chests that you skipped on the way to the boss. After that, go back to Amor, rest up at the Church, and you will find yourself back in the Real World. By the end of it all, you should have both the Agility Ring (30+ Agility) and the Moonmirror Key in your possession. So return to Somnia, and head on out to Moonmirror Tower! | |||
[[File:DQ6 Path to Moonmirror Tower.jpg]] | |||
{{sidebar|title=The Metal Slimes|float=left|width=880px|contents=A speed-runner name Kuneo simulated 200 battles to test how often Metal Slimes appeared. From that test, he saw them appear about 50 times, suggesting an appearance rate of around 25%. | |||
Of those 50 encounters, he managed to defeat them around 16 times. This suggests a success rate of around 32%. Data-miners have also concluded that Metal Slimes have a 33% of running away per round. | |||
Single targeting weapons have a 50/50 chance of doing either 0 Damage, or 1 Damage, along with a ~1.5% chance of scoring a critical hit (more than enough to OHKO any Metal monster). Boomerangs & Whips will never hurt Metal Slimes, unless it's in the leftmost spot of the group attacked. Even then, Boomerangs & Whips are hard-coded to never crit... So single-targeting attacks are always used for Metal Slime hunting. | |||
Based on the above information, and the fact that Metal Slimes can spawn anywhere from 4-6 HP (4-5, if playing the Remakes), Kuneo made a simulator to calculate the odds of killing a Metal Slime. | |||
After 1 Battle: 7.4%<br/> | |||
After 5 Battles: 32%<br/> | |||
After 10 Battles: 53.7%<br/> | |||
After 15 Battles: 68.5%<br/> | |||
After 20 Battles: 78.6%<br/> | |||
After 30 Battles: 90.1%<br/> | |||
After 40 Battles: 95.4%<br/> | |||
Note that there are diminishing returns for every battle you fight, due to how percentages work. Also note that Kuneo did this on the SNES version, and failed to account for the 12% chance of pre-emptive attacks. For that reason, your success rate will probably be slightly higher.}} | |||
{{Footer Nav|game=Dragon Quest VI: Realms of Revelation|prevpage=Somnia (Real World)|nextpage=Moonmirror Tower}} | {{Footer Nav|game=Dragon Quest VI: Realms of Revelation|prevpage=Somnia (Real World)|nextpage=Moonmirror Tower}} | ||
Latest revision as of 13:51, 8 May 2020


After getting the ![]() 6th Mini Medal, you will have to talk to four specific NPC's to progress with the plot. You have to talk with the man who runs the Inn, the man inside the southwest house, the scholar inside the northeast house, and the blue NPC at the weapons shop (the one who looks like a warrior). Only then can you go inside the Church. When you do, talk to the pastor, go inside the bedroom, and talk to Evgenya so you can finally sleep inside the Church's bed.
6th Mini Medal, you will have to talk to four specific NPC's to progress with the plot. You have to talk with the man who runs the Inn, the man inside the southwest house, the scholar inside the northeast house, and the blue NPC at the weapons shop (the one who looks like a warrior). Only then can you go inside the Church. When you do, talk to the pastor, go inside the bedroom, and talk to Evgenya so you can finally sleep inside the Church's bed.
When you do, you will suddenly find yourself in the Dream World version of Amor, with the ![]() 7th Mini Medal and other entirely new items. If you are playing the SNES version (and do not sell the Bronze Shield to do the following), you will want to buy a Steel Broadsword for Carver. Then, if you can afford it, two Iron Shields for both Rex and Carver. It is not vital that you purchase the two now however; you can wait until after the next dungeon to do so if needed. And if you are playing the remakes, you should already have two Dragon Shields.
7th Mini Medal and other entirely new items. If you are playing the SNES version (and do not sell the Bronze Shield to do the following), you will want to buy a Steel Broadsword for Carver. Then, if you can afford it, two Iron Shields for both Rex and Carver. It is not vital that you purchase the two now however; you can wait until after the next dungeon to do so if needed. And if you are playing the remakes, you should already have two Dragon Shields.
Be sure to find the Bunny Ears as well; they will be Milly's strongest piece of headgear for a very long time. Once you have gotten that and the rest of the items, move on to the cave of Amor; it's in the exact same spot as it was in the Real World. Before you do, your party should look like the following...
| Carver (Level 8-9): Steel Broadsword, Fur Cape/Platinum Mail, Iron/Dragon Shield, Hardwood Headware, Gold Bracer |
| Rex (Level 8-9): Boomerang, Royal Clothes/Platinum Mail, Iron/Dragon Shield, Hardwood Headware, Gold Bracer |
| Milly (Level 5): Thorn Whip, Silk Robe, Bunny Ears, Gold Bracer |
Cave of Amor[edit]

First things first, you should use the Lucida Shard on any group with more than 1 Babygoyle; You don't want their Sizzes draining your HP & MP.
Additionally, it is recommended that you grind Milly to Level 7 while you are on the second floor. It has Metal Slimes that give out 1350 EXP, and are much easier to kill with three party members than they are with two. When you kill one, Milly will skyrocket all the way up to Level 8 and become much stronger than before. Additionally, this specific floor has a 12% of catching the enemy by surprise, instead of the standard 3%.
This is not mandatory however, not even in the SNES version. Skipping this opportunity just means that you may have to fight more enemies before being able to take on that one Chapter 3 boss.
Whatever you decide to do, get the ![]() 8th Mini Medal first, then the Edged Boomerang, then the 410G. Do not get any of the other treasures until you have slain the boss; all enemies in this dungeon will disappear upon the Grrrgoyle's defeat. Speaking of which...
8th Mini Medal first, then the Edged Boomerang, then the 410G. Do not get any of the other treasures until you have slain the boss; all enemies in this dungeon will disappear upon the Grrrgoyle's defeat. Speaking of which...
VS. Grrrgoyle[edit]
| Recommended Level: | Rex Lvl 9-10, Carver Lvl 9-10, Milly Lvl 7-8 |
|---|---|
| Recommended A.I. Settings for Party (Remakes Only; SNES A.I. is bad): | Everyone (Focus on Healing) |
| HP: | 380 |
| MP: | 0 |
| Item: | Iron Claw (1/64 of dropping) |
| Attack: | 69 |
| Defense: | 72 |
| Agility: | 65 |
| EXP: | 330 |
| Gold: | 250 |
| Attack Patterns: | Slash [1.25x damage]/Fuddle Dance -> Dazzleflash/Fuddle Dance -> Slash [1.25x damage]/Attack -> Repeat the Cycle |
| A.I. Pecularities: | None |
| Resistances: | No resistance to Sap, 15% resistance to Dazzle, 30% damage reduction of Crack spells, 100% resistance to Lucida Shard and Poison Moth Knife |
The Grrrgoyle is relatively easy. It has no resistance to Sap, and Milly's Buff spell will utterly negate it's physical attacks if she casts them enough times on someone. This guide only mentions all of this for later on, when the bosses are not so simple.
Aftermath[edit]
Talk to Ilya and raid any chests that you skipped on the way to the boss. After that, go back to Amor, rest up at the Church, and you will find yourself back in the Real World. By the end of it all, you should have both the Agility Ring (30+ Agility) and the Moonmirror Key in your possession. So return to Somnia, and head on out to Moonmirror Tower!

