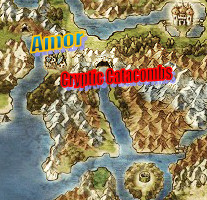
Path to Cryptic Catacombs[edit]

This is your last stop for gathering all the legendary equipment. It's another place you could have gone much earlier in the game, but it's monsters are terrifyingly strong. They are far above the ones you've fought at any other point in this guide; so it behooves you to come in prepared. So be sure your party looks something like this:
| Carver (Level 24): Miracle Sword, Sacred Armour, Platinum/Dragon Shield, Metal King Helmet, Raging Ruby |
| Rex (Level 23): Staff of Antimagic, Dream Blade, Armour of Orgo, Power/Dragon Shield, Helm of Sebath, Meteorite Bracer |
| Milly (Level 22): Fire Claw, Flowing Dress, Silver Platter, Hat of Hermes, Gold Bracer |
| Nevan (Level 22): Morning Star, Flowing Dress, Magic Shield, Thinking Cap, Agility Ring |
Cryptic Catacombs[edit]


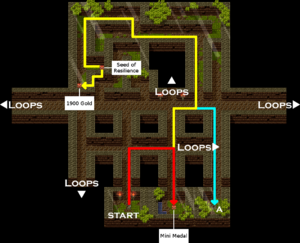
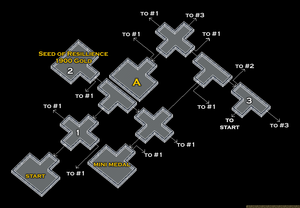
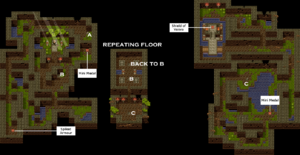
To start with, this dungeon is hexed. There are many, many passages on the first floor that loops the same way the Road to Rhone did in Dragon Quest II. You NEED to follow the colored arrows if you want to navigate this dungeon without getting lost in it. In addition, there are hidden stairs at point B that need to be unearthed; the Golden Pickaxe isn't required, just check the ground at the relevant spot. Finally, the 3rd floor is another looping puzzle. You must take the stairs down three times, then take the stairs up twice; this will open up a secret passage in the southern wall. Go down there and get the Shield of Valora.
Beware though; the monsters are just as deadly as the dungeon. The Trolls have a 33.3% chance of launching Desperate Attacks; not actual critical hits, just physical attacks that do 2.5x normal damage. Carver can take the punishment though; so he can spam Forebearance while the rest of your party sweeps the Trolls away. They can also use the Shove move, which removes a person from battle. It does not whisk them away to Patty's Party Planning Place, however; the unfortunate PC simply reappears at the end of the battle.
The Boarkers are even worse. They DO launch true critical hits! But fortunately, they're also weak to Fuddle. If you've followed the guide up to this point, you should have Fuddle Dance for Rex. It costs 0 MP to use; so spam that to neutralize the threat.
Then there are the Tyrantosaurus, the last enemies to use Desperate Attacks in this dungeon. In fact, they use both kinds; they use both the Troll type (which is a simple 2.5x Damage multiplier) and the Boarker type (an actual critical hit). To make matters worse, they also use Flame Breath to do 30-40 Fire Damage to your party. The only sure-fire way to neutralize them is to use Leg Sweep, Burning Breath, and Sultry Dance; but that only works on one of them at a time. Against a group of three of them, you'll have no choice but to use Fuddle and Fuddle Dance, hoping that you can make it past their 50% resistance. You'll still beat them of course; it's just a matter of how many PC's they take down with them.
The Haunted Mirrors and Gryphons also make a return; in fact, they're the main reason it's possible to go through the dungeon without running out of MP. Drain them both of their MP just like you did in the Seabed Shrine; and make sure Rex Fizzles the Gryphons before they can use Bazoom!
The Cureslimes also make their introduction here. They have no offense to speak of, but they can heal their fellow enemies and spam Drain Magic. You'll need to kill the monsters around them, and then drain them of their MP before they can steal too much of yours.
Finally, there are the Freezing Fogs, who have a 33% chance of using Chilly Breath on you. For those who've forgotten the horror of Murdaw, this does 50-60 Ice Damage to everyone in your party. The only way to safely shut them down is to cast Kasnooze; this spell is always at least 75% effective against every enemy that isn't outright immune. Against many monsters, it's outright guaranteed to land; so let that be your secret weapon!
The rest of the monsters are simple enough; no need to worry about them. And the Tyrantosaurus, Cureslimes, and Freezing Fogs don't appear until the last floor; they won't bother you till then. Just be sure to get the ![]() 79th-81st Mini Medals!
79th-81st Mini Medals!
