(Finishing up the page!) |
(Trimming unneeded words for easier reading) |
||
| Line 11: | Line 11: | ||
#'''You travel all the way back through the cave, to the other side of the mountains. This will make daylight come automatically.''' | #'''You travel all the way back through the cave, to the other side of the mountains. This will make daylight come automatically.''' | ||
This is why you were told to get the Warrior vocations on Rex, Carver, and Amos. If you do not have Buff/Kabuff on any of those PC's, then keep Rex the way he is and turn Milly into a Warrior instead. Either way, it's too hard to keep up on the healing with four party members, so | This is why you were told to get the Warrior vocations on Rex, Carver, and Amos. If you do not have Buff/Kabuff on any of those PC's, then keep Rex the way he is and turn Milly into a Warrior instead. Either way, it's too hard to keep up on the healing with four party members, so make sure your party looks something like this | ||
{| {{prettytable|notwide=1}} | {| {{prettytable|notwide=1}} | ||
| Line 25: | Line 25: | ||
[[File:DQ6 Floating Island.png]] | [[File:DQ6 Floating Island.png]] | ||
The three treasures that are clumped together are unavailable for now; they're locked behind a door that you will not be able to get through for a long time. You might be able to get the Mini Medal in the first room if you're playing the remakes, but otherwise, you'll have to wait until you beat the boss | The three treasures that are clumped together are unavailable for now; they're locked behind a door that you will not be able to get through for a long time. You might be able to get the Mini Medal in the first room if you're playing the remakes, but otherwise, you'll have to wait until you beat the boss. | ||
Talk to the man at the wheel to be let in, then talk to the bartender serving drinks. Say '''Yes''' multiple times, and you will be engaged in the next boss fight! | Talk to the man at the wheel to be let in, then talk to the bartender serving drinks. Say '''Yes''' multiple times, and you will be engaged in the next boss fight! | ||
| Line 72: | Line 72: | ||
|} | |} | ||
As stated before, this boss is more annoying than he is hard. For example, he could technically kill Milly in one round by hitting her with two "grab PC's" in a row | As stated before, this boss is more annoying than he is hard. For example, he could technically kill Milly in one round by hitting her with two "grab PC's" in a row. However, offense is all he has; he does not know any status ailments like Murdaw did, and he's not as hard to damage as he was. Amos and Carver could solo him all by themselves so long as they have Buff and the Ghent Staff. They would still be sent for a loop by a series of fire and Frizz attacks, but Jamirus generally wouldn't use them often enough to actually kill them. | ||
The only reason Rex is in the party as all is because the Enchanted Armour chops 10 Damage off of Jamirus's Fire Claw; coupled with his HP being almost as high as Carver and Amos's, he's actually ''more'' durable than either of them so long as he has enough Buffs to reduce Jamirus's physicals | The only reason Rex is in the party as all is because the Enchanted Armour chops 10 Damage off of Jamirus's Fire Claw; coupled with his HP being almost as high as Carver and Amos's, he's actually ''more'' durable than either of them so long as he has enough Buffs to reduce Jamirus's physicals to the single digits. | ||
Until then, have everyone on Back Me Up while Rex uses the Ghent Staff; if no one is damaged, then have him use it on himself anyway. The idea is that by doing this, the PC's will be able to cast Buff/Kabuff while ''immediately'' healing any damage done to them | Until then, have everyone on Back Me Up while Rex uses the Ghent Staff; if no one is damaged, then have him use it on himself anyway. The idea is that by doing this, the PC's will be able to cast Buff/Kabuff while ''immediately'' healing any damage done to them. After that (it should take 2-3 full Buffs to max everyone's resilience), all you need to do is keep Carver and Amos above 124 HP while keeping Rex above 104. Keep slamming Jamirus with Wind Sickles while Rex heals, and he should go down easily. There should be no chance of him ever killing anyone if you are diligent in following this strategy. | ||
'''If you do not have Buff on anyone but Milly:''' If this is you, and you have only just come to look at this guide, you can still execute a similar strategy by having Milly fill in for Rex while Carver uses the Ghent Staff. Milly needs to be free for casting Buff, and her HP is low enough that Jamirus could kill her immediately if the game really feels like trolling you. Therefore, Carver will want to use the 1st round to pre-emptively use the Ghent Staff on her while she gets Buff on herself. Just one of those will remove Jamirus's ability to kill her in one round, and three of those will make her almost as resilient as Rex would have been | '''If you do not have Buff on anyone but Milly:''' If this is you, and you have only just come to look at this guide, you can still execute a similar strategy by having Milly fill in for Rex while Carver uses the Ghent Staff. Milly needs to be free for casting Buff, and her HP is low enough that Jamirus could kill her immediately if the game really feels like trolling you. Therefore, Carver will want to use the 1st round to pre-emptively use the Ghent Staff on her while she gets Buff on herself. Just one of those will remove Jamirus's ability to kill her in one round, and three of those will make her almost as resilient as Rex would have been. | ||
This strategy is slower and more luck reliant than the previous strategy was; | This strategy is slower and more luck reliant than the previous strategy was; that's the problem with having just one Buff user. Milly is on the low end as far as HP is concerned, and there simply isn't anything to be done about that. | ||
== Path to the Next Real World Continent == | == Path to the Next Real World Continent == | ||
Snag the Mini Medal from your floating island if you have not already done so | Snag the Mini Medal from your floating island if you have not already done so. Change your vocations and equipment set-ups back to normal after doing that, then warp to the Underkeep. Then it's as simple as going southwest to the island with the next staircase. | ||
[[File:DQ6 Path to the Next Real World Continent.jpg]] | [[File:DQ6 Path to the Next Real World Continent.jpg]] | ||
Revision as of 02:45, 1 April 2017
Note: You need to turn Rex, Carver, and Amos into Warriors immediately, before you do anything else in Aridea. The upcoming boss can do a lot of damage in a single round if you are unlucky, so you will desperately want the extra HP if you want everyone to survive. Otherwise, you should do fine with your current vocations if you don't mind one or two PC's dying; the next boss isn't hard so much as he is frustratingly unpredictable.
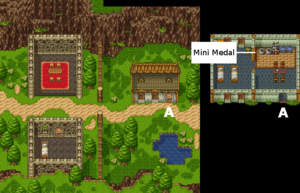
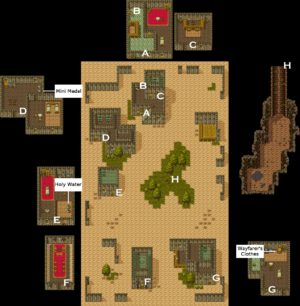
Your goal in this town is simple; go to the well, talk to the man inside it, then go into every building and talk to everyone inside of them (aside from the Innkeeper). Night will fall, and you will be unable to Zoom anywhere unless three of the following events happen:
- You kill the next boss
- You get killed yourself
- You travel all the way back through the cave, to the other side of the mountains. This will make daylight come automatically.
This is why you were told to get the Warrior vocations on Rex, Carver, and Amos. If you do not have Buff/Kabuff on any of those PC's, then keep Rex the way he is and turn Milly into a Warrior instead. Either way, it's too hard to keep up on the healing with four party members, so make sure your party looks something like this
| Amos (Level 17): Fire Claw, Full Plate Armour/Platinum Mail, Iron Shield/Dragon Shield, Iron Mask |
| Carver (Level 18): Battle Axe, Full Plate Armour/Platinum Mail, Iron Shield/Dragon Shield, Iron Mask, Gold Bracer |
| Rex (Level 18): Ghent Staff, Enchanted Armour, Iron Shield, Iron Helmet, Gold Bracer |
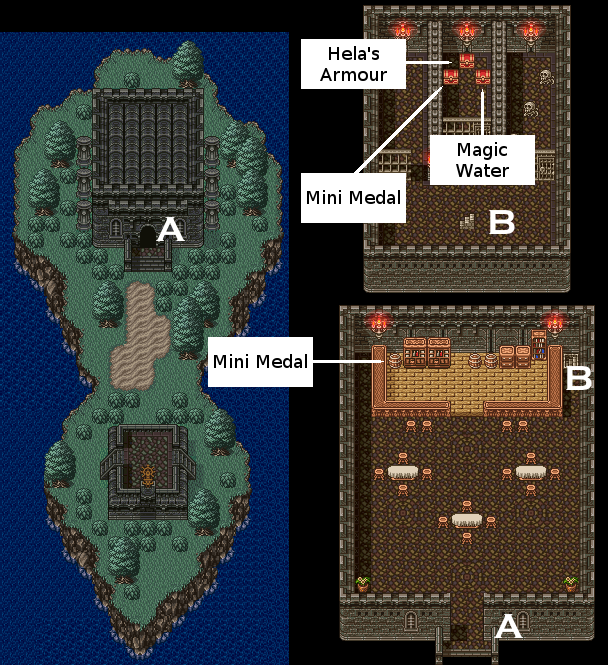
Go due west of Aridea once night falls; you will find the floating island:
The three treasures that are clumped together are unavailable for now; they're locked behind a door that you will not be able to get through for a long time. You might be able to get the Mini Medal in the first room if you're playing the remakes, but otherwise, you'll have to wait until you beat the boss.
Talk to the man at the wheel to be let in, then talk to the bartender serving drinks. Say Yes multiple times, and you will be engaged in the next boss fight!
VS. Jamirus
| Recommended Level: | Amos Lvl 17, Carver Lvl 18, Rex Lvl 18 |
|---|---|
| Recommended A.I. Settings (Including the SNES version!): | Everyone: (Switch between Back Me Up and Follow Orders until everyone's Resilience is matched. Then stay on Follow Orders) |
| HP: | 1500 |
| MP: | 0 |
| Item: | Fire Claw (1/8 of dropping) |
| Attack: | 178 |
| Defense: | 125 |
| Agility: | 65 |
| EXP: | 1050 |
| Gold: | 430 |
| Attack Patterns (Has a 50% chance of attacking twice in a single round!): | Attack (16.66%), Grab PC [1.25x Damage] (33.33%), Flame Breath [30-40 Fire Damage], Fire Claw [52-62 Frizz Damage] (16.66%) |
| A.I. Pecularities: | None |
| Resistances: | No resistance to Crack, Woosh, Zap, or Ice, 30% reduction of Bang, 15% resistance to Knuckle Sandwich and Sap, 60% reduction of Frizz, Sizz, and Fire, 100% resistance to everything else |
As stated before, this boss is more annoying than he is hard. For example, he could technically kill Milly in one round by hitting her with two "grab PC's" in a row. However, offense is all he has; he does not know any status ailments like Murdaw did, and he's not as hard to damage as he was. Amos and Carver could solo him all by themselves so long as they have Buff and the Ghent Staff. They would still be sent for a loop by a series of fire and Frizz attacks, but Jamirus generally wouldn't use them often enough to actually kill them.
The only reason Rex is in the party as all is because the Enchanted Armour chops 10 Damage off of Jamirus's Fire Claw; coupled with his HP being almost as high as Carver and Amos's, he's actually more durable than either of them so long as he has enough Buffs to reduce Jamirus's physicals to the single digits.
Until then, have everyone on Back Me Up while Rex uses the Ghent Staff; if no one is damaged, then have him use it on himself anyway. The idea is that by doing this, the PC's will be able to cast Buff/Kabuff while immediately healing any damage done to them. After that (it should take 2-3 full Buffs to max everyone's resilience), all you need to do is keep Carver and Amos above 124 HP while keeping Rex above 104. Keep slamming Jamirus with Wind Sickles while Rex heals, and he should go down easily. There should be no chance of him ever killing anyone if you are diligent in following this strategy.
If you do not have Buff on anyone but Milly: If this is you, and you have only just come to look at this guide, you can still execute a similar strategy by having Milly fill in for Rex while Carver uses the Ghent Staff. Milly needs to be free for casting Buff, and her HP is low enough that Jamirus could kill her immediately if the game really feels like trolling you. Therefore, Carver will want to use the 1st round to pre-emptively use the Ghent Staff on her while she gets Buff on herself. Just one of those will remove Jamirus's ability to kill her in one round, and three of those will make her almost as resilient as Rex would have been.
This strategy is slower and more luck reliant than the previous strategy was; that's the problem with having just one Buff user. Milly is on the low end as far as HP is concerned, and there simply isn't anything to be done about that.
Path to the Next Real World Continent
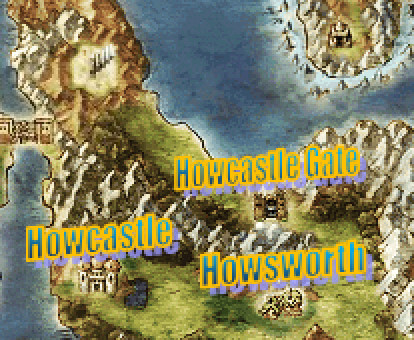
Snag the Mini Medal from your floating island if you have not already done so. Change your vocations and equipment set-ups back to normal after doing that, then warp to the Underkeep. Then it's as simple as going southwest to the island with the next staircase.
Path to Howcastle
You're still fighting low tier monsters at this point, so you still have nothing to worry about; just head straight to Howcastle!
