(AGN -> HN, back -> prev :Community Issues, Replaced: All Game Nav → Header Nav AWB) |
m (fix) |
||
| (7 intermediate revisions by 5 users not shown) | |||
| Line 1: | Line 1: | ||
{{Header Nav|game=F-Zero GX}} | {{Header Nav|game=F-Zero GX}} | ||
__TOC__ | |||
{{-}} | |||
== | ==Mute City - Twist Road== | ||
{{F-Zero GX/ChampReplay | |||
|video=jktspeed_tstr | |||
|course=Twist Road | |||
|time=00'39"619 | |||
|description=Watch California's JKTSPEED in their run in the Fat Shark. | |||
}} | |||
[[File:F-Zero GX Twist Road.jpg|right|thumb|Twist Road course map with callouts.]] | |||
*'''Difficulty''': {{*}} | |||
*'''Course Length''': 7910m | |||
*'''Prominent Features''': 180° loop, 180° corkscrew | |||
*'''Staff Ghost''': 00'59"964 | |||
*'''Music''': For the Glory/Mute City | |||
As the opening course of the Ruby Cup this is, perhaps, the easiest course in the game (even on Master difficulty). From the start is a small right-hand turn followed by a brief straight. This leads into a lazy hairpin that can be taken at full throttle, even with the dash plate present. Exiting the turn you find yourself on another brief straight with a dash plate leading to a short hop to a lazy left-turn flanked with long, wide pit areas. | |||
As you head out of pit row, there is a 90° right turn. Though it's the sharpest turn on the Twist Road circuit, it's fairly wide and can often be taken at top speed. This turn leads directly into a 180° loop that quickly becomes a 180° corkscrew featuring two dash plates. Despite the fact that this section of the track is in a corkscrew shape, it is still a straight and a great place to make heavy use of boosters. | |||
{{-}} | |||
==Lightning | ==Casino Palace - Split Oval== | ||
==Aeropolis | {{F-Zero GX/ChampReplay | ||
|video=mitani_splitovl | |||
|course=Split Oval | |||
|time=00'39"016 | |||
|description=Watch Shizuoka's MITANI in their run in the Tornado Condor-V2. | |||
}} | |||
[[File:F-Zero GX Split Oval.jpg|right|thumb|Split Oval course map with callouts.]] | |||
*'''Difficulty''': {{*}} | |||
*'''Course Length''': 8490m | |||
*'''Prominent Features''': Backstretch fork, 90° corkscrew | |||
*'''Staff Ghost''': 00'56"691 | |||
*'''Music''': Shotgun Kiss | |||
There's nothing fancy about this course. The Split Oval was designed for pure speed, and you'll be spending most of your time here with the throttle open all the way. A machine with high boost capabilities can easily leave its competition in the dust. | |||
From the start, you enter into a very wide and lazy 180° left turn. This turn is littered with dash plates. The dash plates appear in this order: [M]iddle, [L]eft, [R]ight, [L], [R], [L], [M]. If you can't weave back-and-forth to maximize the number of dash plates you hit, sticking to the left (inside) will not only reduce the distance you have to travel, but also offer three dash plates instead of the two along the right side. | |||
On the backstretch straightaway, the road forks. The left side contains a pit area while the right side contains four dash plates ([R], [L], [R], [R]). The two forks converge just before the final 180° left turn which features two more dash plates ([R], [L]). As this section also corkscrews 90° to the right, you will need to watch your speed through the turn to avoid flying off the track. At speeds of 2700 km/h or more, however, it is possible to launch off of the track and control your flight to shave time off you your run. This technique is is very difficult, and may only be possible through the use of snaking. After the turn, there is only a short straight leading back to the goal line. | |||
{{-}} | |||
==Sand Ocean - Surface Slide== | |||
{{F-Zero GX/ChampReplay | |||
|video=mitani_surfes | |||
|course=Surface Slide | |||
|time=01'12"425 | |||
|description=Watch Shizuoka's MITANI in their run in the Tornado Condor-V2. | |||
}} | |||
[[File:F-Zero GX Surface Slide.jpg|right|thumb|Surface Slide course map with callouts.]] | |||
*'''Difficulty''': {{*}}{{*}} | |||
*'''Course Length''': 13160m | |||
*'''Prominent Features''': Numerous hairpin turns, narrow straights | |||
*'''Staff Ghost''': 01'56"743 | |||
*'''Music''': 8 Guitars | |||
{{-}} | |||
==Lightning - Loop Cross== | |||
{{F-Zero GX/ChampReplay | |||
|video=eekami_loopc | |||
|course=Loop Cross | |||
|time=01'26"020 | |||
|description=Watch Fukuoka's E.EKAMI in their run in the Holy Cannon-RX . | |||
}} | |||
[[File:F-Zero GX Loop Cross.jpg|right|thumb|Loop Cross course map with callouts.]] | |||
*'''Difficulty''': {{*}}{{*}}{{*}} | |||
*'''Course Length''': 13270m | |||
*'''Prominent Features''': 360° loop, hairpin/spiral turns | |||
*'''Staff Ghost''': | |||
*'''Music''': Osc-Sync Carnival | |||
{{-}} | |||
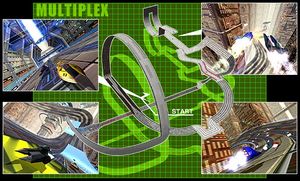
==Aeropolis - Multiplex== | |||
{{F-Zero GX/ChampReplay | |||
|video=eekami_multp | |||
|course=Multiplex | |||
|time=01'33"421 | |||
|description=Watch Fukuoka's E.EKAMI in their run in the Holy Cannon-RX . | |||
}} | |||
[[File:F-Zero GX Multiplex.jpg|right|thumb|Multiplex course map with callouts.]] | |||
*'''Difficulty''': {{*}}{{*}}{{*}}{{*}} | |||
*'''Course Length''': 16500m | |||
*'''Prominent Features''': Square turns, chicanes, land mines, slip zone | |||
*'''Staff Ghost''': | |||
*'''Music''': ZEN | |||
{{Footer Nav|game=F-Zero GX|prevpage=Grand Prix|nextpage=Sapphire Cup}} | |||
Latest revision as of 07:05, 29 April 2023
Mute City - Twist Road[edit]
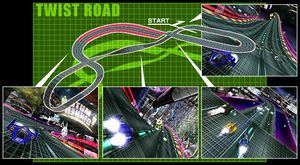
- Difficulty:

- Course Length: 7910m
- Prominent Features: 180° loop, 180° corkscrew
- Staff Ghost: 00'59"964
- Music: For the Glory/Mute City
As the opening course of the Ruby Cup this is, perhaps, the easiest course in the game (even on Master difficulty). From the start is a small right-hand turn followed by a brief straight. This leads into a lazy hairpin that can be taken at full throttle, even with the dash plate present. Exiting the turn you find yourself on another brief straight with a dash plate leading to a short hop to a lazy left-turn flanked with long, wide pit areas.
As you head out of pit row, there is a 90° right turn. Though it's the sharpest turn on the Twist Road circuit, it's fairly wide and can often be taken at top speed. This turn leads directly into a 180° loop that quickly becomes a 180° corkscrew featuring two dash plates. Despite the fact that this section of the track is in a corkscrew shape, it is still a straight and a great place to make heavy use of boosters.
Casino Palace - Split Oval[edit]
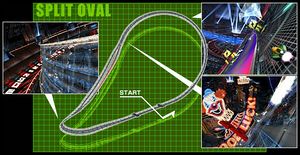
- Difficulty:

- Course Length: 8490m
- Prominent Features: Backstretch fork, 90° corkscrew
- Staff Ghost: 00'56"691
- Music: Shotgun Kiss
There's nothing fancy about this course. The Split Oval was designed for pure speed, and you'll be spending most of your time here with the throttle open all the way. A machine with high boost capabilities can easily leave its competition in the dust.
From the start, you enter into a very wide and lazy 180° left turn. This turn is littered with dash plates. The dash plates appear in this order: [M]iddle, [L]eft, [R]ight, [L], [R], [L], [M]. If you can't weave back-and-forth to maximize the number of dash plates you hit, sticking to the left (inside) will not only reduce the distance you have to travel, but also offer three dash plates instead of the two along the right side.
On the backstretch straightaway, the road forks. The left side contains a pit area while the right side contains four dash plates ([R], [L], [R], [R]). The two forks converge just before the final 180° left turn which features two more dash plates ([R], [L]). As this section also corkscrews 90° to the right, you will need to watch your speed through the turn to avoid flying off the track. At speeds of 2700 km/h or more, however, it is possible to launch off of the track and control your flight to shave time off you your run. This technique is is very difficult, and may only be possible through the use of snaking. After the turn, there is only a short straight leading back to the goal line.
Sand Ocean - Surface Slide[edit]
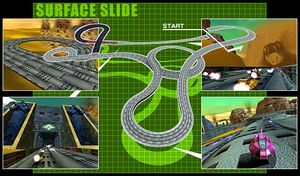
- Difficulty:


- Course Length: 13160m
- Prominent Features: Numerous hairpin turns, narrow straights
- Staff Ghost: 01'56"743
- Music: 8 Guitars
Lightning - Loop Cross[edit]
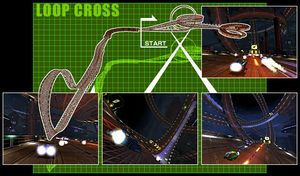
- Difficulty:


- Course Length: 13270m
- Prominent Features: 360° loop, hairpin/spiral turns
- Staff Ghost:
- Music: Osc-Sync Carnival
Aeropolis - Multiplex[edit]
