Namcorules (talk | contribs) (Created page with '{{Header Nav|game=Rolling Thunder}} Once Albatross has reappeared, start walking to the right and shoot the Yellow and Blue Type 2 Maskers, along with the Pink and Green Type 1 M…') |
(Rewritten with images) |
||
| Line 1: | Line 1: | ||
{{Header Nav|game=Rolling Thunder}} | {{Header Nav|game=Rolling Thunder}} | ||
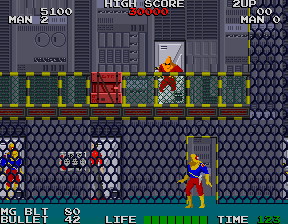
Stage 5 expands upon a concept introduced earlier in the game by the panther cage. This is the concept of foreground and background. The floor below the upper level of platforms will be fenced off, with doorways that allow you and the enemies to pass between the space in front of the fence and the space behind. Note that enemies in the background can’t attack you in the foreground unless they pass through the doorways, and vice versa. | |||
[[Image:Rolling Thunder Stage5 screen1.png|frame|right|Be sure to collect machine gun ammo from here.]] | |||
However, both sides of the fence have access to the platforms above. Be very careful when walking above the fenced in areas; enemies from behind the fence can jump up to attack you just as easily as enemies in front of the fence. Naturally, you can also jump up to the top from behind the fence. | |||
The fenced off areas often offer larger caches of ammunition than the more exposed doors, giving you incentive to cross through the entrances and examine the doors you find. Large collections of enemies will occupy both the foreground and the background, so clear out as many enemies as you can before trying to explore any doors. | |||
Below the second upper platform, you’ll find a machine gun ammo door near the end. Clear away any enemies, and enter inside to collect 80 rounds. Then step outside, and approach the crates to the right. Watch out for the particularly dangerous enemies on the other side, and time your drop down to the right between gun shots. You may wish to walk back to the machine gun door repeatedly to collect more bullets. | |||
[[Image:Rolling Thunder Stage5 screen2.png|frame|left|Navigate around the crates and through this passage carefully.]] | |||
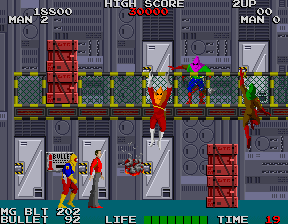
Beyond the crates is a fairly straightforward section with only a few small platforms above the floor. Watch out for any enemies who drop down to the floor from above, and stop in front of the doors to allow enemies to escape before shooting them and moving on. | |||
Eventually you will reach a stack of crates which will force you to jump up to the platform above. Another stack of crates will force you to drop down, but watch out for the particularly dangerous enemies on the ground below, including anyone toting guns or lobbing grenades. You will be forced to alternate levels because of the crates found throughout this section. Be very cautious when switching levels and make sure the coast is clear before proceeding. | |||
[[Image:Rolling Thunder Stage5 screen3.png|frame|right|Take out the last of the enemies in front of the computer.]] | |||
Once you’re through, approach each crate on the floor and stop to allow an enemy to escape through the door before moving on. When you have to jump up to another platform, watch out for Ninjas that will materialize around the area. Try luring them toward you. If they walk up to the crates, they will likely turn around and leave the area. | |||
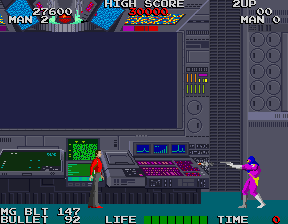
A short distance away, you will reach the giant console that you have seen the enemies manipulating during the cutscenes. A few enemies will be present to attack you, but with no other levels to occupy, you should be able to mow them all down. However, you will not encounter Mabu at the end of this level. Instead, you will see a screen of him laughing, and you will be sent back to the first stage of the second story, which will be a harder version of the original. | |||
{{Footer Nav|game=Rolling Thunder|prevpage=Stage 4|nextpage=Stage 6}} | {{Footer Nav|game=Rolling Thunder|prevpage=Stage 4|nextpage=Stage 6}} | ||
Revision as of 22:48, 17 April 2012
Stage 5 expands upon a concept introduced earlier in the game by the panther cage. This is the concept of foreground and background. The floor below the upper level of platforms will be fenced off, with doorways that allow you and the enemies to pass between the space in front of the fence and the space behind. Note that enemies in the background can’t attack you in the foreground unless they pass through the doorways, and vice versa.

However, both sides of the fence have access to the platforms above. Be very careful when walking above the fenced in areas; enemies from behind the fence can jump up to attack you just as easily as enemies in front of the fence. Naturally, you can also jump up to the top from behind the fence.
The fenced off areas often offer larger caches of ammunition than the more exposed doors, giving you incentive to cross through the entrances and examine the doors you find. Large collections of enemies will occupy both the foreground and the background, so clear out as many enemies as you can before trying to explore any doors.
Below the second upper platform, you’ll find a machine gun ammo door near the end. Clear away any enemies, and enter inside to collect 80 rounds. Then step outside, and approach the crates to the right. Watch out for the particularly dangerous enemies on the other side, and time your drop down to the right between gun shots. You may wish to walk back to the machine gun door repeatedly to collect more bullets.

Beyond the crates is a fairly straightforward section with only a few small platforms above the floor. Watch out for any enemies who drop down to the floor from above, and stop in front of the doors to allow enemies to escape before shooting them and moving on.
Eventually you will reach a stack of crates which will force you to jump up to the platform above. Another stack of crates will force you to drop down, but watch out for the particularly dangerous enemies on the ground below, including anyone toting guns or lobbing grenades. You will be forced to alternate levels because of the crates found throughout this section. Be very cautious when switching levels and make sure the coast is clear before proceeding.

Once you’re through, approach each crate on the floor and stop to allow an enemy to escape through the door before moving on. When you have to jump up to another platform, watch out for Ninjas that will materialize around the area. Try luring them toward you. If they walk up to the crates, they will likely turn around and leave the area.
A short distance away, you will reach the giant console that you have seen the enemies manipulating during the cutscenes. A few enemies will be present to attack you, but with no other levels to occupy, you should be able to mow them all down. However, you will not encounter Mabu at the end of this level. Instead, you will see a screen of him laughing, and you will be sent back to the first stage of the second story, which will be a harder version of the original.