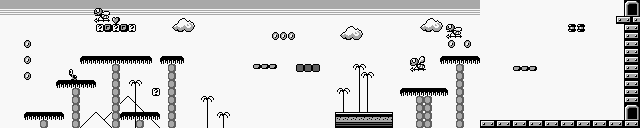
Here's your introduction to Sarasaland. You won't find many surprises in the first level if you've played a Mario game before. The play control is similar to the origin [[Super Mario Bros.]] game.
=== Part 1 ===
=== Part 1 ===
[[File:Sml-1-1-heart.png|thumb|Hidden Heart]]
{{Scrolling map|SML Map 1-1 p1.png}}
{{Scrolling map|SML Map 1-1 p1.png}}
* Starting the game there is a ? block, conveniently placed overhead of you containing your first coin.
{{-}}
* Here comes your first enemy, Chibibo, just jump on on it.
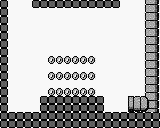
* [[File:SML Map Coin A.png|right]] The third pipe from the start of the level leads to the coin room shown to the right. It is reminiscent of the [[Super_Mario_Bros./Coin_Rooms#Coin_Room_A|first coin room]] that you can discover in ''Super Mario Bros.''. Note that you always exit from the same pipes that you enter.
* The third pipe, next to the hard blocks, leads to a coin room with 18 coins.
* A 1-Up Heart is hidden in the blocks towards the end of the first third of this stage. Use the question mark block below to help reveal the heart. Don't miss this or any of the other 1-Up Heart, especially early in the game when they're easy to get. You won't find many later on.
* There is a line of 6 bricks, jump and drop down to collect the 7 floating coins.
* Use the block below to smash the fourth brick from the left and a hidden 1-Up heart will appear.
=== Part 2 ===
=== Part 2 ===
{{sect-stub}}
{{-}}
{{Scrolling map|SML Map 1-1 p2.png}}
{{Scrolling map|SML Map 1-1 p2.png}}
* Use the block below to smash the fourth brick from the left and a hidden 1-Up heart will appear.
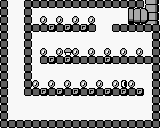
* [[File:SML Map Coin B.png|right]] Drop down the pipe after the tallest pyramid in the stage to discover the coin room shown to the right. Twenty one coins are you reward. You have to run through the maze to escape, but if you have the Superball power, you can throw one ahead of you to collect the coins first.
* next question block is a flower(unless you get hit and then its a muhroom)
* Don't miss the Invincibility Star in one of the question mark block. Grab the star and dash to the right while you're invincible. You can go as fast as you like, because you won't miss any hidden items in this stretch.
* a nokobon is near the next question box so kill it but be careful because they explode after you jump on it( but they dont explode if you throw a powerballs)
*the next question box is a coin
*the next question boxs are in a pyramid the middle question boxes are all coins, the top row are both coins too(by now you should have 42 coins)
*go down the next pipe to get 21 coins(by now you should have 63)
*the question box next to the pipe is a coin
* then go to meet a fly jump on it or throw 2 superballs at it
*then go to see a hibibothen and kill him then hit the question box for a star and kill that oter hibibothen
* then hit the question boxes (all of them give you coins)
=== Part 3 ===
=== Part 3 ===
{{sect-stub}}
{{-}}
{{Scrolling map|SML Map 1-1 p3.png}}
{{Scrolling map|SML Map 1-1 p3.png}}
* The end of the map contains a tight squeeze. If you're not small Mario, the only way to collect the coins in the narrow passages within the staircase is to fire a Superball into the gaps.
* Every first and second stage of each world ends with two doors. The bottom door takes you directly to the next level, but if you manage to reach the top door instead, you will be treated to the bonus room where you get the chance to earn extra lives or a power up.
{{-}}
== World 1-2 ==
Be careful on the moving lifts in this World. Mario's jumping control is similar to the original Super Mario Bros. game. He falls fast and it's to control his trajectory in mid-air.
=== Part 1 ===
{{Scrolling map|SML Map 1-2 p1.png}}
* Watch out for the bee-like BunBun when you run along the long treetops. When Bunbun gets close, fire a Superball to knock him out. If you don't have Superball power, get close and run under after he drops a spear.
* Find a hidden heart near the end of this section. Sometimes invisible blocks hide items. Jump under the spot where the Invisible Block is located and it will reveal a 1-Up Heart! Collect it and continue.
=== Part 2 ===
{{Scrolling map|SML Map 1-2 p2.png}}
* Learn the lifts. When the lift you're riding reaches it's highest point, jump to the next one. Be patient and perfect your timing on all lifts.
=== Part 3 ===
{{Scrolling map|SML Map 1-2 p3.png}}
* Master the possibilities. Use the ricocheting properties of the Superball to take out hard-to-reach enemies. To hit a Bunbun high in the sky, bounce your shot off the sides of a platform.
* To access the upper door, dash across the dropping lifts. If you hesitate, the lift will fall and you'll have to exit through the bottom door instead.
{{-}}
== World 1-3 ==
The fortress level of World One features pseudo-Egyptian graphics and a great soundtrack. You can use Lift Blocks to bypass some danger, but watch for falling blocks in this deteriorating tomb.
=== Part 1 ===
{{Scrolling map|SML Map 1-3 p1.png}}
* [[File:SML Map Coin C.png|right]] Hidden immediately at the start of the stage is an invisible block. Hit it to make a Lift Block appear. Ride the lift to the upper part of the stage. It's an easier path than the one below, and it offers you the chance to collect a bunch of coins in the process.
* The pipe at the end of this section leads to a coin room. In it, you can find 25 coins. But there are other secrets hidden in the blocks, including a 10-Coin block and a power-up.
=== Part 2 ===
{{-}}
{{Scrolling map|SML Map 1-3 p2.png}}
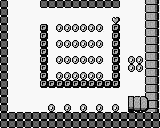
* [[File:SML Map Coin D.png|right]] A second secret lift is hidden in the second set of blocks that you encounter in this section, but you'll need to be at least Super Mario in order to find it. First remove the Gao to the right so he's not a threat. Then punch through the right breakable block and jump again to reveal the secret lift. Ride the lift up to the ceiling, and then after a short walk, you'll come to a pipe. The pipe leads to the coin room shown to the right. There are 33 coins in here, but the real treasure is the secret 1-Up Heart hidden in the top right block.
* Three paths lead to the next section. Normally, it doesn't pay to be small Mario, but only small Mario can take the lowest route that leads to a treasure room of coins. In addition, it also leads to a power up so you can grow again and escape. Just watch out for the blocks that fall from the ceiling.
=== Part 3 ===
{{Scrolling map|SML Map 1-3 p3.png}}
* Defeat Totomesu. You'll reach a bridge over lava, but that's not Bowser blocking your way. Totomesu is a large sphinx-like lion who leaps up and down, breath fire at the top and bottom of his jumps. Because he moves with regular timing, they are easy to predict and avoid. If you have Superball power, it takes five shots to remove him from the bridge. Otherwise, get a good running start and leap over him as he's landing back down on the bridge. Hit the switch behind him, and the bridge separating him from the lava will disappear.
{{Footer Nav|game=Super Mario Land|prevpage=Walkthrough|nextpage=World 2}}
{{Footer Nav|game=Super Mario Land|prevpage=Walkthrough|nextpage=World 2}}
Here's your introduction to Sarasaland. You won't find many surprises in the first level if you've played a Mario game before. The play control is similar to the origin Super Mario Bros. game.
The third pipe from the start of the level leads to the coin room shown to the right. It is reminiscent of the first coin room that you can discover in Super Mario Bros.. Note that you always exit from the same pipes that you enter.
A 1-Up Heart is hidden in the blocks towards the end of the first third of this stage. Use the question mark block below to help reveal the heart. Don't miss this or any of the other 1-Up Heart, especially early in the game when they're easy to get. You won't find many later on.
Drop down the pipe after the tallest pyramid in the stage to discover the coin room shown to the right. Twenty one coins are you reward. You have to run through the maze to escape, but if you have the Superball power, you can throw one ahead of you to collect the coins first.
Don't miss the Invincibility Star in one of the question mark block. Grab the star and dash to the right while you're invincible. You can go as fast as you like, because you won't miss any hidden items in this stretch.
The end of the map contains a tight squeeze. If you're not small Mario, the only way to collect the coins in the narrow passages within the staircase is to fire a Superball into the gaps.
Every first and second stage of each world ends with two doors. The bottom door takes you directly to the next level, but if you manage to reach the top door instead, you will be treated to the bonus room where you get the chance to earn extra lives or a power up.
Be careful on the moving lifts in this World. Mario's jumping control is similar to the original Super Mario Bros. game. He falls fast and it's to control his trajectory in mid-air.
Watch out for the bee-like BunBun when you run along the long treetops. When Bunbun gets close, fire a Superball to knock him out. If you don't have Superball power, get close and run under after he drops a spear.
Find a hidden heart near the end of this section. Sometimes invisible blocks hide items. Jump under the spot where the Invisible Block is located and it will reveal a 1-Up Heart! Collect it and continue.
Master the possibilities. Use the ricocheting properties of the Superball to take out hard-to-reach enemies. To hit a Bunbun high in the sky, bounce your shot off the sides of a platform.
To access the upper door, dash across the dropping lifts. If you hesitate, the lift will fall and you'll have to exit through the bottom door instead.
The fortress level of World One features pseudo-Egyptian graphics and a great soundtrack. You can use Lift Blocks to bypass some danger, but watch for falling blocks in this deteriorating tomb.
Hidden immediately at the start of the stage is an invisible block. Hit it to make a Lift Block appear. Ride the lift to the upper part of the stage. It's an easier path than the one below, and it offers you the chance to collect a bunch of coins in the process.
The pipe at the end of this section leads to a coin room. In it, you can find 25 coins. But there are other secrets hidden in the blocks, including a 10-Coin block and a power-up.
A second secret lift is hidden in the second set of blocks that you encounter in this section, but you'll need to be at least Super Mario in order to find it. First remove the Gao to the right so he's not a threat. Then punch through the right breakable block and jump again to reveal the secret lift. Ride the lift up to the ceiling, and then after a short walk, you'll come to a pipe. The pipe leads to the coin room shown to the right. There are 33 coins in here, but the real treasure is the secret 1-Up Heart hidden in the top right block.
Three paths lead to the next section. Normally, it doesn't pay to be small Mario, but only small Mario can take the lowest route that leads to a treasure room of coins. In addition, it also leads to a power up so you can grow again and escape. Just watch out for the blocks that fall from the ceiling.
Defeat Totomesu. You'll reach a bridge over lava, but that's not Bowser blocking your way. Totomesu is a large sphinx-like lion who leaps up and down, breath fire at the top and bottom of his jumps. Because he moves with regular timing, they are easy to predict and avoid. If you have Superball power, it takes five shots to remove him from the bridge. Otherwise, get a good running start and leap over him as he's landing back down on the bridge. Hit the switch behind him, and the bridge separating him from the lava will disappear.