(continuation of Norfair part, up to speed booster) |
(images) |
||
| Line 24: | Line 24: | ||
<br> | <br> | ||
<br> | <br> | ||
[[File:SMetroidNorfairBubbles.png |thumb|left|The "green bubble" section of Norfair]] | |||
You now should be in a room comprised of what appears to be green bubbles. Head right, looking out for the red waver. You should see a metallic looking area that stands apart from the bubbles. Here, bomb each of the tube-like areas to fall down to a pit with a red ripper II and a '''Missile Tank'''. | You now should be in a room comprised of what appears to be green bubbles. Head right, looking out for the red waver. You should see a metallic looking area that stands apart from the bubbles. Here, bomb each of the tube-like areas to fall down to a pit with a red ripper II and a '''Missile Tank'''. | ||
<br> | <br> | ||
| Line 41: | Line 42: | ||
<br> | <br> | ||
<br> | <br> | ||
[[File:SMetroidTripper.png |thumb|right|No need to fear the Trippers, jump on them]] | |||
Once you enter this room, it may seem like a dead-end, but a green tripper soon greets you from the left side. This creature is actually beneficial as you can jump on top of it and ride it across the lava. As soon as you're on it, turn into a ball to avoid the spikes from the ceiling. Then, jump to the left. Beware of the spikes from below on the next set of thin platforms, and wait until the pipe from the ceiling moves up out of your way before continuing onto the next tripper and morph like before. The pipe cycles up and down constantly so you may need to be patient. Notice that the next tripper will have trouble supporting your weight, so you must quickly unmorph and jump left and head to the next room before being dunked into the lava. | Once you enter this room, it may seem like a dead-end, but a green tripper soon greets you from the left side. This creature is actually beneficial as you can jump on top of it and ride it across the lava. As soon as you're on it, turn into a ball to avoid the spikes from the ceiling. Then, jump to the left. Beware of the spikes from below on the next set of thin platforms, and wait until the pipe from the ceiling moves up out of your way before continuing onto the next tripper and morph like before. The pipe cycles up and down constantly so you may need to be patient. Notice that the next tripper will have trouble supporting your weight, so you must quickly unmorph and jump left and head to the next room before being dunked into the lava. | ||
<br> | <br> | ||
| Line 49: | Line 51: | ||
Jump across the yellow platforms. On the third one, you may want to wait until the it goes down so that you have enough space to get to the final one. Then, you'll reach a shutter you can open which when heading through leads to a '''Missile Tank'''. | Jump across the yellow platforms. On the third one, you may want to wait until the it goes down so that you have enough space to get to the final one. Then, you'll reach a shutter you can open which when heading through leads to a '''Missile Tank'''. | ||
===Wave Beam, Now or Later=== | ===Wave Beam, Now or Later=== | ||
[[File:SMetroidWave.png |thumb|left|Door to the Wave Beam]] | |||
Now then, it's very dangerous, but you can get a beam upgrade slightly early if you want to risk it. It may be better to get to it with the Speed Booster, which you'll get soon, but you can try for it now. With the Speed Booster method, run on the right spikes then jump and you should have enough momentum from the boost to make it up. The safest way is to use the grapple beam on the grapple points above the spikes, but that won't be available until later. To get the Wave Beam now, move left to get a running start, then jump across the spike pit here, making sure to avoid the central spikes since you'll fall through, aiming instead for the rightmost spikes. You now must walljump to the right, to the red door. | Now then, it's very dangerous, but you can get a beam upgrade slightly early if you want to risk it. It may be better to get to it with the Speed Booster, which you'll get soon, but you can try for it now. With the Speed Booster method, run on the right spikes then jump and you should have enough momentum from the boost to make it up. The safest way is to use the grapple beam on the grapple points above the spikes, but that won't be available until later. To get the Wave Beam now, move left to get a running start, then jump across the spike pit here, making sure to avoid the central spikes since you'll fall through, aiming instead for the rightmost spikes. You now must walljump to the right, to the red door. | ||
<br> | <br> | ||
Revision as of 06:15, 14 April 2015
Norfair is a main area of Planet Zebes. It is made out of a rather stony area (Upper Norfair) and ancient ruins (Lower Norfair).
First Visit

Fleeting Visit
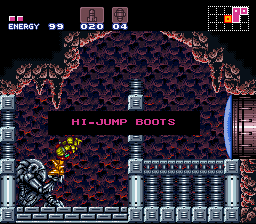
You'll just have to visit Norfair for a few minutes for now. The Hi-Jump Boots are few steps behind the lower left gate of the first room, which is quite similar to the first room of Upper Brinstar. Don't bother exploring any other areas, because there's nothing to obtain now and you will end up in superheated areas which will damage you (for now).
Enter the gate, then obtain the Energy Tank. Look for cracking blocks behind the tank, then morph into a ball and head left, then enter the gate.
In the next room, you can shoot the upper part of the column to destroy it. Do a spin jump up over it. Next, pick up the Hi-Jump Boots. As soon as you're back in the previous room, head upwards, get the Missile Tank and pass through the tunnel using bombs. If you can't open the gate, wait for enemies and kill them. The gate won't open until all enemies in the room are dead.
After leaving the chamber, keep going upwards, then use the elevator.
Your journey continues in Brinstar.
Second Visit with the Varia Suit
With the Varia Suit, you can survive Norfair's heated areas. Once you arrive after the elevator, take the first door on the right. The geemers and hoppers in here are more dangerous than the ones seen before, but should pose little threat. Just head right, through the red gate. In the next room you'll see pincers flying about similar to mothulas. Drop down the third pit. In the bottom right corner, in the lava, there is a hidden Missile Tank you can find if you hit the wall with your beam. If you're good on energy, turn into a ball and risk the damage in the lava to get it. With that, use a super missile on the green gate at the right side of this room.
Don't be too scared of the rising lava in this room, it stops eventually. Just make sure you don't get stuck below while it's rising. Lava dragons will rise from the lava and try to arc fireballs at you. They, and the rest of the enemies, can be easily ignored if you cautiously rush to the next room.

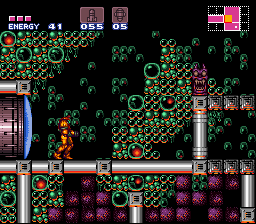
You now should be in a room comprised of what appears to be green bubbles. Head right, looking out for the red waver. You should see a metallic looking area that stands apart from the bubbles. Here, bomb each of the tube-like areas to fall down to a pit with a red ripper II and a Missile Tank.
Now, return to the upper area. Bomb the floor between the two face statues. Then, follow the path to the right in ball form, bombing the obstructing blocks and geemers until you get to a part with a door on the left, and one on the floor. Take the one one the floor.
Head down. The first blue door on the right leads to gamet enemies which come out of the middle of the floor. They arrive in packs of five. If you shoot them as soon as they appear while they're bunched up, you'll kill all of them at once, with the possibility of increasing your pickup count. So, you can use this room to restock on missiles and energy if you need it. Otherwise, return to the room you came from and head further down, to the right door.
In the next room, you'll see some multiviolas flying around, which are pretty easy to take care of. The magdollites in the lava are more of a problem, though. When you move towards them, they'll grow to match your vertical location. They then will throw three side-by-side fireballs. The fireballs can be shot, but it's difficult to hit them all at once so the best solution would be to avoid this projectile altogether. The magdollites return to the lava after their attack so you can pass then. Head to the right room.
In here, blue violas patrol platforms, and are a minor problem. The way down is blocked by a yellow door, so you have no choice but to keep going right, past the blue one.
This is another room where the lava level rises. Again, it stops at a certain point, but this time it can reach higher ground. Therefore, you must hurry to the right, aim up at the ceiling on the far right side to be rid of it, and jump up. You'll be safe from the lava here, just beware of the fune sticking out of the walls and the fire they spit in a slow horizontal trajectory. You want to head to the upper left room.

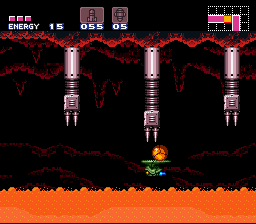
Once you enter this room, it may seem like a dead-end, but a green tripper soon greets you from the left side. This creature is actually beneficial as you can jump on top of it and ride it across the lava. As soon as you're on it, turn into a ball to avoid the spikes from the ceiling. Then, jump to the left. Beware of the spikes from below on the next set of thin platforms, and wait until the pipe from the ceiling moves up out of your way before continuing onto the next tripper and morph like before. The pipe cycles up and down constantly so you may need to be patient. Notice that the next tripper will have trouble supporting your weight, so you must quickly unmorph and jump left and head to the next room before being dunked into the lava.
Look out as you head up in the next room, because alcoons will try to surprise you from the ground. These creatures are similar to the dragons seen earlier, but they have legs and walk slowly toward you. They fire three fireballs in sequence a good ways, then they step forward. You can use missiles to take them out quickly but regular beam shots will suffice, it'll just take longer. Ignore the first blue door on the way up, and instead take the righthand red one.
Jump across the yellow platforms. On the third one, you may want to wait until the it goes down so that you have enough space to get to the final one. Then, you'll reach a shutter you can open which when heading through leads to a Missile Tank.
Wave Beam, Now or Later

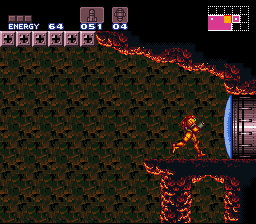
Now then, it's very dangerous, but you can get a beam upgrade slightly early if you want to risk it. It may be better to get to it with the Speed Booster, which you'll get soon, but you can try for it now. With the Speed Booster method, run on the right spikes then jump and you should have enough momentum from the boost to make it up. The safest way is to use the grapple beam on the grapple points above the spikes, but that won't be available until later. To get the Wave Beam now, move left to get a running start, then jump across the spike pit here, making sure to avoid the central spikes since you'll fall through, aiming instead for the rightmost spikes. You now must walljump to the right, to the red door.
If you're taking too much damage from the spikes, go towards the central set of spikes which will let you fall through to safety. However you get here, inside you'll find the Wave Beam. This beam upgrade allows you to shoot through walls, as well as doubling your damage output.
To the Speed Booster
Whether you want to get the Wave Beam now or wait, return to the left room, then take the high leftmost door. You're back in the first bubble room, on the upper right. Try not to fall below, because you'll have to traverse the previous rooms to return here if you do. Watch out for the enemies up here, then take the upper green door.
Kill the skrees on the ceiling here, then shoot towards the right part of the ceiling to reveal an opening. A simple jump will reveal a new upper area. You can use the gamets on the left to replenish energy and missiles, but either way you now want to head to the right door.
Continually run to the right in here. The gray parts of the floor will crumble as you pass and release enemies but ignore them. Once you get to the red door, shoot up to reveal a hidden Missile Tank which you can jump and get. Now, head right through the door to get your prize.
Literal Trial by Fire
In here, you'll get the Speed Booster from the chozo statue. Do not waste time celebrating, because lava will instantly start to rise from the floor. Return to the next room. You must dash across the room (move left or right while holding by default A) to the left without stopping. If you did it right, you should see the Speed Booster activate and you'll make it to the upper left side without incident. Head back left. Now, return to the bubble room, going down the bombable path between the two face statues. This time, take the left door instead of the right one.
About the Speed Booster
The Speed Booster causes you to run much faster, so long as you have enough distance to run long enough for it to activate. You'll know when it's activated by the sound, as well as a flashing effect across Samus, with afterimages trailing behind her. While it's active, weaker enemies will be killed instantly. With the Speed Booster, you can perform a technique known as the “shinespark”. To perform it, activate the boost, then crouch. If done right, you'll “store” your boost for a little bit. You can jump and hold left, right, up, or diagonal to zoom towards the direction held until you hit an obstacle. You'll have to sacrifice some health to do it, though, and you won't be able to pull it off if you don't have enough.
While not necessary to get to the end, shinesparking is a useful ability if aiming for 100% completion.