[[The Legend of Zelda/Underworld/Dungeon3|<< Dungeon 3]] | [[The Legend of Zelda/Underworld/Dungeon5|Dungeon 5 >>]]</div>
{{floatingtoc}}
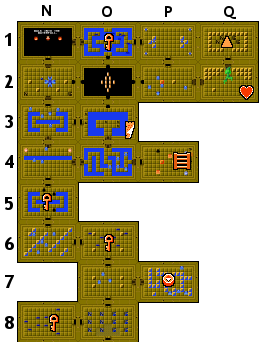
<center>[[File:LOZ_Dungeon_4.png]]</center>
== Objectives ==
== Objectives ==
* Obtain the ladder.
* Obtain the {{im/loz|Item|Ladder}}.
* Defeat the 2 headed Gleeok.
* Defeat the 2 headed Gleeok.
* Obtain a heart container.
* Obtain a {{im/loz|Item|Heart Container}}.
* Obtain the fourth Triforce piece.
* Obtain the fourth {{im/loz|Item|Piece of Triforce}}.
== Walkthrough ==
*To enter this dungeon, you must have obtained the raft from [[The Legend of Zelda/Underworld/Dungeon3|dungeon three]]. Once you have it, you can launch the raft from the dock at the bottom of the lake in [[The Legend of Zelda/Overworld/Hyrule6|section six]].
=== Prerequisites ===
*From the entrance, go left and clear this room to obtain a key.
* {{im/loz|Item|Raft}}.
*After that, from the entrance, head up and open the right door to find the compass. Remember that unless you have the Magic Sword, the Vires will split up in to two Keese.
*From the compass room, return to the left, and head up. Obtain a key in this room, then head left again, and up to locate another key.
=== Advised Preparation ===
*Head up once more, and you will reach a room whose north door is currently unreachable. Head right and defeat all of the Vires and Keese in the room to open the right door way. If you travel up from this room, you can see the map, but you can not obtain it from this direction.
*Use the raft to launch off from the dock at '''D-4''' in [[The Legend of Zelda/Overworld/Hyrule 1|section one]] and collect a {{im/loz|Item|Heart Container}}.
*When you enter the room with the single block, defeat all of the Zols and Like-Likes, while taking care to avoid the Bubbles. When the room is cleared (except for the Bubbles) push the block in any direction to reveal a staircase. Head down the stairs to find the ladder.
*Once you have obtained the ladder, return to the room all the way on the left with the unreachable door. You may now use the ladder to cross the gap and access the door. Enter it, and head right to obtain the map.
=== Dungeon Walkthrough ===
*From the map room, you can return to the left, or you can bomb the top wall to reveal a pathway which leads to an unmarked room on the map. In it, you will find 10 rupees, and every wall in that room can also be bombed.
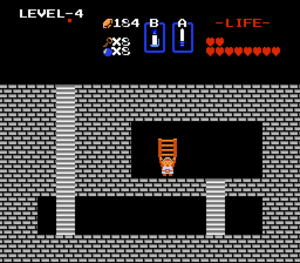
[[File:LOZLinkgetstheladder.png|thumb|right|Link gets the ladder.]]
*If you return to the right and head up, you will face another Manhandla which you must defeat to proceed up. Once you do, you will encounter a man who will reveal information about the waterfall.
*To enter this dungeon, you must have obtained the {{im/loz|Item|Raft}} from [[The Legend of Zelda/Underworld/Quest 1/Dungeon 3|dungeon three]]. Once you have it, you can launch the {{im/loz|Item|Raft}} from the dock at '''B-3''' in [[The Legend of Zelda/Overworld/Hyrule 6|section six]].
*From the man's room, head right, and use the ladder to cross the islands and collect a key. Head right again to enter a trap room. Avoiding the traps, make your way to the bottom door.
*From the entrance, go left and clear this room to obtain a {{im/loz|Item|Key}}.
*Here you must defeat all of the Vires and the resulting Keese that they become so that you can push the left block and continue on to the boss of the dugeon.
*After that, from the entrance, head up and open the right door to find the {{im/loz|Item|Compass}}. Remember that unless you have the {{im/loz|Item|Magical Sword}}, the {{im/loz|Enemy|Vires}} will split up in to two {{im/loz|Enemy|Keese}}.
*The compass room is one of the first dark rooms you encounter. If you have trouble going through these rooms, you can light them with the {{im/loz|Item|Blue Candle}}.
*From the compass room, return to the left, and head up. Obtain a key in this room, then head left again, and up to locate another {{im/loz|Item|Key}}.
*Head up once more, and you will reach a room whose north door is currently unreachable. Head right and defeat all of the {{im/loz|Enemy|Vires}} and {{im/loz|Enemy|Keese}} in the room to open the right door way. If you travel up from this room, you can see the {{im/loz|Item|Map}}, but you can not obtain it from this direction.
*When you enter the room with two individual blocks, defeat all of the {{im/loz|Enemy|Zols}} and {{im/loz|Enemy|Like-Likes}}, while taking care to avoid the {{im/loz|Enemy|Bubbles}}. When the room is cleared (except for the Bubbles) push the left block to the right to reveal a staircase. Head down the stairs to find the {{im/loz|Item|Ladder}}.
*Once you have obtained the {{im/loz|Item|Ladder}}, return to the room all the way on the left with the unreachable door. You may now use the {{im/loz|Item|Ladder}} to cross the gap and access the door. Enter it, and head right to obtain the {{im/loz|Item|Map}}.
*From the map room, you can return to the left, or you can bomb the top wall to reveal a pathway which leads to an unmarked room on the map. In it, you will find 10 {{im/loz|Item|Rupees}}, and every wall in that room can also be bombed.
*If you return to the left and head up, you will face another {{im/loz|Enemy|Manhandla}} which you must defeat to proceed up. Once you do, you will encounter a man who will reveal information about the waterfall.
*From the man's room, head right, and use the {{im/loz|Item|Ladder}} to cross the islands and collect a {{im/loz|Item|Key}}. Head right again to enter a trap room. Avoiding the traps, make your way to the bottom door.
*Here you must defeat all of the {{im/loz|Enemy|Vires}} and the resulting {{im/loz|Enemy|Keese}} that they become so that you can push the left block and continue on to the boss of the dungeon.
== Boss ==
== Boss ==
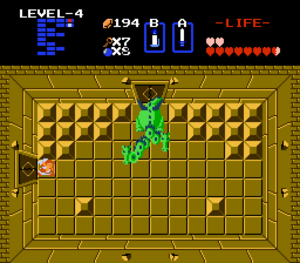
*The boss is a two headed Gleeok. Each head must be stabbed until it starts to fly freely around the room. Once the head is free, it is still a threat, and can not be defeated. The only way to beat Gleeok is to destroy every one of the attached heads.
*The boss is a two headed [[The Legend of Zelda/Bosses#Gleeok|Gleeok]]. Each head must be stabbed until it starts to fly freely around the room. Once the head is free, it is still a threat, and can not be defeated. The only way to beat Gleeok is to destroy every one of the attached heads.
*Defeat it to earn a '''Heart Container'''. Continue on to the room above to obtain the fourth piece of the '''Triforce'''.
{{-}}
== Resupply ==
* {{im/loz|Item|Bombs}} are one screen to the west.
* A cheap {{im/loz|Item|Shield}} is one screen to the east.
* A woman selling {{im/loz|Item|Water of Life}} is two screens to the south, and one to the west.
To enter this dungeon, you must have obtained the Raft from dungeon three. Once you have it, you can launch the Raft from the dock at B-3 in section six.
From the entrance, go left and clear this room to obtain a Key.
After that, from the entrance, head up and open the right door to find the Compass. Remember that unless you have the Magical Sword, the Vires will split up in to two Keese.
The compass room is one of the first dark rooms you encounter. If you have trouble going through these rooms, you can light them with the Blue Candle.
From the compass room, return to the left, and head up. Obtain a key in this room, then head left again, and up to locate another Key.
Head up once more, and you will reach a room whose north door is currently unreachable. Head right and defeat all of the Vires and Keese in the room to open the right door way. If you travel up from this room, you can see the Map, but you can not obtain it from this direction.
When you enter the room with two individual blocks, defeat all of the Zols and Like-Likes, while taking care to avoid the Bubbles. When the room is cleared (except for the Bubbles) push the left block to the right to reveal a staircase. Head down the stairs to find the Ladder.
Once you have obtained the Ladder, return to the room all the way on the left with the unreachable door. You may now use the Ladder to cross the gap and access the door. Enter it, and head right to obtain the Map.
From the map room, you can return to the left, or you can bomb the top wall to reveal a pathway which leads to an unmarked room on the map. In it, you will find 10 Rupees, and every wall in that room can also be bombed.
If you return to the left and head up, you will face another Manhandla which you must defeat to proceed up. Once you do, you will encounter a man who will reveal information about the waterfall.
From the man's room, head right, and use the Ladder to cross the islands and collect a Key. Head right again to enter a trap room. Avoiding the traps, make your way to the bottom door.
Here you must defeat all of the Vires and the resulting Keese that they become so that you can push the left block and continue on to the boss of the dungeon.
The boss is a two headed Gleeok. Each head must be stabbed until it starts to fly freely around the room. Once the head is free, it is still a threat, and can not be defeated. The only way to beat Gleeok is to destroy every one of the attached heads.
Defeat it to earn a Heart Container. Continue on to the room above to obtain the fourth piece of the Triforce.

 .
. .
. .
. .
.
 .
. . Remember that unless you have the Magical Sword
  , the Vires
  will split up in to two Keese
  .
. .
. , but you can not obtain it from this direction.
 and Like-Likes
  , while taking care to avoid the Bubbles
  . When the room is cleared (except for the Bubbles) push the left block to the right to reveal a staircase. Head down the stairs to find the Ladder
  , and every wall in that room can also be bombed.
 which you must defeat to proceed up. Once you do, you will encounter a man who will reveal information about the waterfall.

 are one screen to the west.
 is one screen to the east.
 is two screens to the south, and one to the west.