Jump to navigation
Jump to search
(→Walkthrough: capitalizing Wizzrobe) |
|||
| (10 intermediate revisions by 6 users not shown) | |||
| Line 1: | Line 1: | ||
{{Header Nav|game=The Legend of Zelda}} | {{Header Nav|game=The Legend of Zelda}} | ||
<center>[[ | |||
{{floatingtoc}} | |||
<center>[[File:LOZ_Dungeon_6.png]]</center> | |||
== Objectives == | == Objectives == | ||
* Obtain the | * Obtain the {{im/loz|Item|Magical Wand}}. | ||
* Defeat the Gohma. | * Defeat the {{im/loz|Boss|Gohma}}. | ||
* Obtain a | * Obtain a {{im/loz|Item|Heart Container}}. | ||
* Obtain the sixth Triforce | * Obtain the sixth {{im/loz|Item|Piece of Triforce}}. | ||
== Walkthrough == | == Walkthrough == | ||
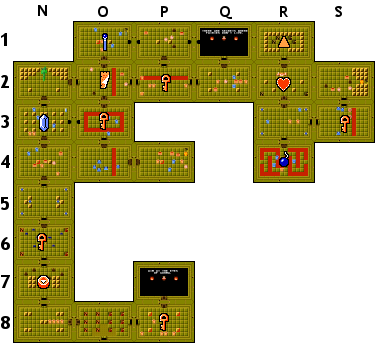
*To enter this dungeon, you locate the entrance which is just east of the [[The Legend of Zelda/Overworld/Hyrule 7|cemetery]]. | |||
=== Prerequisites === | |||
* {{im/loz|Item|Ladder}}. | |||
* {{im/loz|Item|Bow}}. | |||
* {{im/loz|Item|Arrow}}. | |||
=== Dungeon Walkthrough === | |||
#To enter this dungeon, you locate the entrance which is just east of the [[The Legend of Zelda/Overworld/Hyrule 7|cemetery]]. | |||
#From the entrance, go right and clear this room of {{im/loz|Enemy|Wizzrobes}} to obtain a {{im/loz|Item|Key}}. You may use the key to open the door above and listen to a man who has a hint regarding this dungeon's boss's weakness. | |||
#Back at the entrance, head left and then enter the room above. Defeat the {{im/loz|Enemy|Zols}} and obtain the {{im/loz|Item|Compass}}. | |||
#From the compass room, head up to the next room and obtain a {{im/loz|Item|Key}}. Head up again and avoid the traps. Head up once again, and you must defeat the {{im/loz|Enemy|Wizzrobes}} and the {{im/loz|Enemy|Like-Likes}} to proceed to the next room. | |||
#Enter the room above and you will have two options. You can either enter the room above and face a three headed {{im/loz|Boss|Gleeok}}. Or you may bomb the right wall which enables you to effectively bypass the Gleeok. | |||
#In the room to the right of the Gleeok, you will discover the {{im/loz|Item|Map}}. | |||
#From the map room, enter the room above and defeat the {{im/loz|Enemy|Wizzrobes}}. When the room is cleared, push the left block to reveal a stairwell that leads to the {{im/loz|Item|Magic Wand}}. The right wall of this room can be bombed. | |||
#From the map room, the room immediately to the right contains a {{im/loz|Item|Key}}. Beyond this room, you can go up and bomb the left wall, or you can go left and walk through the above door, and you will encounter a man who shares a hint regarding lakes that do not contain fairies. | |||
#From the map room once more, head down and collect the key if you haven't already. Head down again and defeat all of the {{im/loz|Enemy|Vires}} to proceed. | |||
#Once the Vire room is cleared, enter the room to the right and defeat the {{im/loz|Enemy|Wizzrobes}} and {{im/loz|Enemy|Like-Likes}}. When this room is cleared, push the single block to reveal a staircase to an underground passage that leads to the upper right most room in the map. | |||
#From here, enter the room below and obtain a {{im/loz|Item|Key}}. Then enter the room to the left. | |||
#From this room, you may travel up or down. The boss is in the room above, while you will only encounter {{im/loz|Enemy|Wizzrobes}} at a dead end below. | |||
== Boss == | == Boss == | ||
*The boss is | *The boss is [[The Legend of Zelda/Bosses#Gohma|Gohma]]. Gohma's giant eye is it's weak point, but it is only vulnerable to one weapon: the bow and arrow. Fire an arrow at the eye when it is wide open and exposed to defeat it. | ||
*Defeat it to earn a | *Defeat it to earn a {{im/loz|Item|Heart Container}}. Continue on to the room above to obtain the sixth {{im/loz|Item|Piece of Triforce}}. | ||
== Resupply == | == Resupply == | ||
* A | * A woman selling {{im/loz|Item|Water of Life}} is one screen south and one screen east. | ||
* From there, head one screen north and two screens east for replacement | * From there, head one screen north and two screens east for replacement {{im/loz|Item|Bombs}} and {{im/loz|Item|Shields}}. | ||
* Loop southward to reach the place one eastward screen away to get Monster Bait. | * Loop southward to reach the place one eastward screen away to get {{im/loz|Item|Monster Bait}}. Cheaper {{im/loz|Item|Shields}} can be found here as well. | ||
{{Footer Nav|game=The Legend of Zelda|prevpage=Underworld/Quest 1/Dungeon 5|prevname=Dungeon 5|nextpage=Underworld/Quest 1/Dungeon 7|nextname=Dungeon 7}} | {{Footer Nav|game=The Legend of Zelda|prevpage=Underworld/Quest 1/Dungeon 5|prevname=Dungeon 5|nextpage=Underworld/Quest 1/Dungeon 7|nextname=Dungeon 7}} | ||
Latest revision as of 22:31, 11 November 2022

Objectives[edit]
- Obtain the Magical Wand
 .
. - Defeat the Gohma
 .
. - Obtain a Heart Container
 .
. - Obtain the sixth Piece of Triforce
 .
.
Walkthrough[edit]
Prerequisites[edit]
Dungeon Walkthrough[edit]
- To enter this dungeon, you locate the entrance which is just east of the cemetery.
- From the entrance, go right and clear this room of Wizzrobes
 to obtain a Key
  . You may use the key to open the door above and listen to a man who has a hint regarding this dungeon's boss's weakness.
 - Back at the entrance, head left and then enter the room above. Defeat the Zols
 and obtain the Compass
  .
. - From the compass room, head up to the next room and obtain a Key . Head up again and avoid the traps. Head up once again, and you must defeat the Wizzrobes and the Like-Likes
 to proceed to the next room.
 - Enter the room above and you will have two options. You can either enter the room above and face a three headed Gleeok
 . Or you may bomb the right wall which enables you to effectively bypass the Gleeok.
 - In the room to the right of the Gleeok, you will discover the Map
 .
. - From the map room, enter the room above and defeat the Wizzrobes . When the room is cleared, push the left block to reveal a stairwell that leads to the Magic Wand File:LOZ1 Magic Wand.png. The right wall of this room can be bombed.
- From the map room, the room immediately to the right contains a Key . Beyond this room, you can go up and bomb the left wall, or you can go left and walk through the above door, and you will encounter a man who shares a hint regarding lakes that do not contain fairies.
- From the map room once more, head down and collect the key if you haven't already. Head down again and defeat all of the Vires
 to proceed.
 - Once the Vire room is cleared, enter the room to the right and defeat the Wizzrobes and Like-Likes . When this room is cleared, push the single block to reveal a staircase to an underground passage that leads to the upper right most room in the map.
- From here, enter the room below and obtain a Key . Then enter the room to the left.
- From this room, you may travel up or down. The boss is in the room above, while you will only encounter Wizzrobes at a dead end below.
Boss[edit]
- The boss is Gohma. Gohma's giant eye is it's weak point, but it is only vulnerable to one weapon: the bow and arrow. Fire an arrow at the eye when it is wide open and exposed to defeat it.
- Defeat it to earn a Heart Container . Continue on to the room above to obtain the sixth Piece of Triforce .
Resupply[edit]
- A woman selling Water of Life
 is one screen south and one screen east.
 - From there, head one screen north and two screens east for replacement Bombs
 and Shields File:LOZ1 Shields.png.
 - Loop southward to reach the place one eastward screen away to get Monster Bait
 . Cheaper Shields File:LOZ1 Shields.png can be found here as well.