Jump to navigation
Jump to search
(→Boss) |
|||
| Line 23: | Line 23: | ||
== Boss == | == Boss == | ||
*The boss is Ghoma. Ghoma's giant eye is it's weak point, but it is only vulnerable to one weapon: the bow and arrow. Fire | *The boss is Ghoma. Ghoma's giant eye is it's weak point, but it is only vulnerable to one weapon: the bow and arrow. Fire an arrow at the eye when it is wide open and exposed to defeat it. | ||
*Defeat it to earn a heart container. Continue on to the room above to obtain the sixth piece of the Triforce. | *Defeat it to earn a heart container. Continue on to the room above to obtain the sixth piece of the Triforce. | ||
Revision as of 19:08, 29 July 2007
Objectives
- Obtain the magic wand.
- Defeat the Gohma.
- Obtain a heart container.
- Obtain the sixth Triforce piece.
Walkthrough
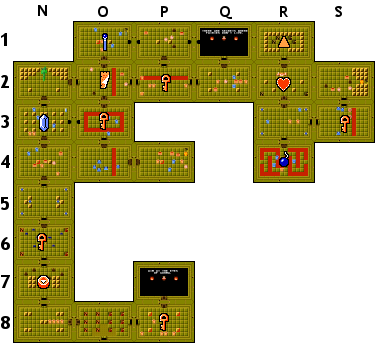
- To enter this dungeon, you locate the entrance which is just east of the cemetary.
- From the entrance, go right and clear this room of Wizzrobes to obtain a key. You may use the key to open the door above and listen to a man who has a hint regarding this dungeon's boss's weakness.
- Back at the entrance, head left and then enter the room above. Defeat the Zols and obtain the compass.
- From the compass room, head up to the next room and obtain a key. Head up again and avoid the traps. Head up once again, and you must defeat the wizzrobes and the Like-Likes to proceed to the next room.
- Enter the room above and you will have two options. You can either enter the room above and face a three headed Gleeok. Or you may bomb the right wall which enables you to effectively bypass the Gleeok.
- In the room to the right of the Gleeok, you will discover the map.
- From the map room, enter the room above and defeat the wizzrobes. When the room is cleared, push the left block to reveal a stairwell that leads to the magic wand. The left wall of this room can be bombed.
- From the map room, the room immediately to the right contains a key. Beyond this room, you can go up and bomb the left wall, or you can go left and walk through the above door, and you will encounter a man who shares a hint regarding lakes that do not contain fairies.
- From the map room once more, head down and collect the key if you haven't already. Head down again and defeat all of the Vires to proceed.
- Once the Vire room is cleared, enter the room to the right and defeat the wizzrobes and Like-Likes. When this room is cleared, push the single block to reveal a staircase to an underground passage that leads to the upper right most room in the map.
- From here, enter the room below and obatin a key. Then enter the room to the left.
- From this room, you may travel up or down. The boss is in the room above, while you will only encounter wizzrobes at a dead end below.
Boss
- The boss is Ghoma. Ghoma's giant eye is it's weak point, but it is only vulnerable to one weapon: the bow and arrow. Fire an arrow at the eye when it is wide open and exposed to defeat it.
- Defeat it to earn a heart container. Continue on to the room above to obtain the sixth piece of the Triforce.
