Jump to navigation
Jump to search
Megaminxwin (talk | contribs) (→Walkthrough: adding preparation section) |
|||
| (15 intermediate revisions by 7 users not shown) | |||
| Line 1: | Line 1: | ||
{{Header Nav|game=The Legend of Zelda}} | {{Header Nav|game=The Legend of Zelda}} | ||
<center>[[ | {{floatingtoc}} | ||
<center>[[File:LOZ_Dungeon_7.png]]</center> | |||
== Objectives == | == Objectives == | ||
* Obtain the | * Obtain the {{im/loz|Item|Red Candle}}. | ||
* Expand your | * Expand your {{im/loz|Item|Bomb}} carrying capacity. | ||
* Feed the hungry | * Feed the hungry Goriya {{im/loz|Enemy|Goriyas}}. | ||
* Defeat Aquamentus. | * Defeat {{im/loz|Boss|Aquamentus}}. | ||
* Obtain a | * Obtain a {{im/loz|Item|Heart Container}}. | ||
* Obtain the seventh Triforce | * Obtain the seventh {{im/loz|Item|Piece of Triforce}}. | ||
== Walkthrough == | == Walkthrough == | ||
=== | |||
=== Prerequisites === | |||
=== Dungeon | * {{im/loz|Item|Whistle}}. | ||
* {{im/loz|Item|Ladder}}. | |||
* {{im/loz|Item|Monster Bait}}. | |||
=== Dungeon walkthrough === | |||
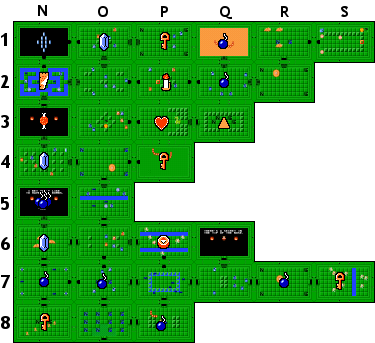
#This dungeon is larger and more complex than any of the previous dungeons. In order to proceed through this dungeon, you will need to bring {{im/loz|Item|Monster Bait}} along. It is also recommended that you bring a full supply of bombs and bomb every wall available in order to find all of the secret pathways that must be discovered in order to clear the dungeon. | |||
#To enter this dungeon, use the information you have about secrets where faeries don't live. Locate the lake at '''D-1''' in [[The Legend of Zelda/Overworld/Hyrule 8|section eight]], which does not contain a fairy. A few notes on the whistle will reveal this level's entrance. | |||
#Many rooms close to the entrance contain rooms where you can obtain sets of four bombs. | |||
#From the entrance, move one room up, and then as far to the right as you can to find a key, defeating a {{im/loz|Boss|Digdogger}} along the way using the whistle. | |||
#In order to proceed beyond the lower region of the dungeon, the top and left walls of the room above the entrance may be bombed to reveal passages that lead further in to the dungeon. | |||
#From this room, head through the left passage, and then the room below to obtain another key. | |||
#The top wall of the room that starts out dark, populated by {{im/loz|Enemy|Keeses}} and has a circular formation of blocks can be bombed to reveal a shortcut to the room which contains the {{im/loz|Item|Compass}}. | |||
#Along the left side of the dungeon, the third room from the bottom contains three {{im/loz|Boss|Dodongos}}. If you unlock the door above, you will find another man who will upgrade your bomb carrying capacity by four bombs for 100 rupees. | |||
#From the bomb man's room, head down, then right, and up two rooms and you will discover a Digdogger. This Digdogger is more powerful than before, and when you use the whistle, it will shrivel up in to three separate little Digodggers instead of just one. The right wall may be bombed to expose a passage to a room with two {{im/loz|Enemy|Moldorms}} and a key. | |||
#From the second Digdogger's room, enter the left room, and unlock the door above. Here you will find a {{im/loz|Enemy|Goriya}} that will do nothing but grumble, and will not allow you to pass. If you feed him the Monster Bait, he will disappear, allowing you to continue on. | |||
#Above the hungry Goriya's room, you will find the {{im/loz|Item|Map}}. The wall above may be bombed to reveal a passage in to a room that contains ten rupees. The right wall of the rupee room may also be bombed. | |||
#From the map room, enter the right room. In order to proceed, you must bomb the right wall. | |||
#Enter through the right passage and defeat the {{im/loz|Enemy|Goriyas}}. When the room is clear, push the left most block aside to gain access to the stairwell. Down below, you will discover the {{im/loz|Item|Red Candle}}. When you return to the room, bomb the right wall. | |||
#Enter through the right passage, and continue right until you encounter a third Digdogger. Like the second one, this one is stronger and shrivels in to three separate pieces. You must defeat all three to proceed to the room above. | |||
#Enter the room above to discover three Dodongos. Bomb the right wall to reveal yet another passage that leads to a room with {{im/loz|Enemy|Bubbles}} and {{im/loz|Enemy|Wallmasters}}. This can be a deadly combination. Do not stand by a wall if you are stunned by a Bubble and can not draw your sword. | |||
#In this room, you must defeat every single Wallmaster before you can push the center block along the right side of the room to reveal a stairwell. The stairwell leads to an underground passage that deposits you one room to the right of the hungry Moblin's room. | |||
#When you arrive, defeat the Goriyas and bomb the right wall to gain access to the dungeon's boss. | |||
== Boss == | == Boss == | ||
*The boss is [[The Legend of Zelda/Bosses#Aquamentus|Aquamentus]]. | *The boss is [[The Legend of Zelda/Bosses#Aquamentus|Aquamentus]]. The strategy now is exactly the same as for [[The Legend of Zelda/Underworld/Quest 1/Dungeon 1|level one]] so you should have no problem dispatching it. Defeat it to earn a {{im/loz|Item|Heart Container}}. Continue to the room to the right and obtain the seventh {{im/loz|Item|Piece of Triforce}}. | ||
== Resupply == | == Resupply == | ||
*There's a | *There's a {{im/loz|Item|Fairy}} pool to the east. | ||
*From the dungeon, go one screen south, two screens east and two screens north to get a cheap Monster Bait. The cave just south of that provides a replacement | *From the dungeon, go one screen south, two screens east and two screens north to get a cheap {{im/loz|Item|Monster Bait}}. The cave just south of that provides a replacement {{im/loz|Item|Shield}}. | ||
*Two screens south and two screens east contain a | *Two screens south and two screens east contain a woman selling {{im/loz|Item|Water of Life}}. | ||
{{Footer Nav|game=The Legend of Zelda|prevpage=Underworld/Quest 1/Dungeon 6|prevname=Dungeon 6|nextpage=Underworld/Quest 1/Dungeon 8|nextname=Dungeon 8}} | {{Footer Nav|game=The Legend of Zelda|prevpage=Underworld/Quest 1/Dungeon 6|prevname=Dungeon 6|nextpage=Underworld/Quest 1/Dungeon 8|nextname=Dungeon 8}} | ||
Latest revision as of 04:02, 24 March 2021

Objectives[edit]
- Obtain the Red Candle
 .
. - Expand your Bomb
 carrying capacity.
 - Feed the hungry Goriya Goriyas
 .
. - Defeat Aquamentus
 .
. - Obtain a Heart Container
 .
. - Obtain the seventh Piece of Triforce
 .
.
Walkthrough[edit]
Prerequisites[edit]
- Whistle
 .
. - Ladder
 .
. - Monster Bait
 .
.
Dungeon walkthrough[edit]
- This dungeon is larger and more complex than any of the previous dungeons. In order to proceed through this dungeon, you will need to bring Monster Bait along. It is also recommended that you bring a full supply of bombs and bomb every wall available in order to find all of the secret pathways that must be discovered in order to clear the dungeon.
- To enter this dungeon, use the information you have about secrets where faeries don't live. Locate the lake at D-1 in section eight, which does not contain a fairy. A few notes on the whistle will reveal this level's entrance.
- Many rooms close to the entrance contain rooms where you can obtain sets of four bombs.
- From the entrance, move one room up, and then as far to the right as you can to find a key, defeating a Digdogger
 along the way using the whistle.
 - In order to proceed beyond the lower region of the dungeon, the top and left walls of the room above the entrance may be bombed to reveal passages that lead further in to the dungeon.
- From this room, head through the left passage, and then the room below to obtain another key.
- The top wall of the room that starts out dark, populated by Keeses
 and has a circular formation of blocks can be bombed to reveal a shortcut to the room which contains the Compass
  .
. - Along the left side of the dungeon, the third room from the bottom contains three Dodongos
 . If you unlock the door above, you will find another man who will upgrade your bomb carrying capacity by four bombs for 100 rupees.
 - From the bomb man's room, head down, then right, and up two rooms and you will discover a Digdogger. This Digdogger is more powerful than before, and when you use the whistle, it will shrivel up in to three separate little Digodggers instead of just one. The right wall may be bombed to expose a passage to a room with two Moldorms
 and a key.
 - From the second Digdogger's room, enter the left room, and unlock the door above. Here you will find a Goriya File:LOZ1 Goriya.png that will do nothing but grumble, and will not allow you to pass. If you feed him the Monster Bait, he will disappear, allowing you to continue on.
- Above the hungry Goriya's room, you will find the Map
 . The wall above may be bombed to reveal a passage in to a room that contains ten rupees. The right wall of the rupee room may also be bombed.
 - From the map room, enter the right room. In order to proceed, you must bomb the right wall.
- Enter through the right passage and defeat the Goriyas . When the room is clear, push the left most block aside to gain access to the stairwell. Down below, you will discover the Red Candle . When you return to the room, bomb the right wall.
- Enter through the right passage, and continue right until you encounter a third Digdogger. Like the second one, this one is stronger and shrivels in to three separate pieces. You must defeat all three to proceed to the room above.
- Enter the room above to discover three Dodongos. Bomb the right wall to reveal yet another passage that leads to a room with Bubbles
 and Wallmasters
  . This can be a deadly combination. Do not stand by a wall if you are stunned by a Bubble and can not draw your sword.
 - In this room, you must defeat every single Wallmaster before you can push the center block along the right side of the room to reveal a stairwell. The stairwell leads to an underground passage that deposits you one room to the right of the hungry Moblin's room.
- When you arrive, defeat the Goriyas and bomb the right wall to gain access to the dungeon's boss.
Boss[edit]
- The boss is Aquamentus. The strategy now is exactly the same as for level one so you should have no problem dispatching it. Defeat it to earn a Heart Container . Continue to the room to the right and obtain the seventh Piece of Triforce .
Resupply[edit]
- There's a Fairy
 pool to the east.
 - From the dungeon, go one screen south, two screens east and two screens north to get a cheap Monster Bait . The cave just south of that provides a replacement Shield
 .
. - Two screens south and two screens east contain a woman selling Water of Life
 .
.