m (→Two Mermaid's keys: typo) |
(→Side quests: linked game information) |
||
| Line 61: | Line 61: | ||
=== Side quests === | === Side quests === | ||
{{sidebar | |||
|width=35% | |||
|title=Linked game: Biggoron secret | |||
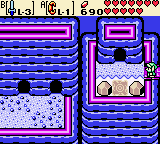
|contents=''(If you already cleared [[The Legend of Zelda: Oracle of Seasons/Secrets_to_and_from_Labrynna|Oracle of Seasons]] and linked to this game)''<br/> [[File:LZ7_ages_secret_biggoron.png|center]] <br/>During Zelda's age, start from "East" exit of the tunnel connecting West and East Rolling Ridge; walk north and cross the little bridge to the west. A Goron inside the cave there will ask you to tell a secret to the Biggoron in Holodrum. Switch back to ''Oracle of Seasons'' and get to the top of Goron Mountain. On the mountaintop, tell the secret to the Biggoron, and he will give you the '''Biggoron Sword'''. Then, he will tell you another secret. Switch again to ''Oracle of Ages'', go to Farore and tell her the Biggoron's secret: the Biggoron Sword will be available in this game, too. | |||
}} | |||
Let us start from the beginning: Zelda's age, top of East Rolling Ridge. | Let us start from the beginning: Zelda's age, top of East Rolling Ridge. | ||
| Line 70: | Line 76: | ||
# Return to Ambi's age and go south-west. Jump off the ledge and enter the cave. Use the Switch Hook to swap yourself with the bush across to get '''100 [[File:Zelda Oracles Big Blue Rupee.png]] Rupees''' from the chest. | # Return to Ambi's age and go south-west. Jump off the ledge and enter the cave. Use the Switch Hook to swap yourself with the bush across to get '''100 [[File:Zelda Oracles Big Blue Rupee.png]] Rupees''' from the chest. | ||
# Travel to the future, enter the cave and go down one floor. Use the Switch Hook, then go right to get '''10 [[File:Zelda Oracles Bomb.png]] Bombs''' from the Chest. Now go up two floors. Jump off to the right to get [[File:Zelda Oracles Gasha Seed.png]] '''Gasha Seed''' from the chest. | # Travel to the future, enter the cave and go down one floor. Use the Switch Hook, then go right to get '''10 [[File:Zelda Oracles Bomb.png]] Bombs''' from the Chest. Now go up two floors. Jump off to the right to get [[File:Zelda Oracles Gasha Seed.png]] '''Gasha Seed''' from the chest. | ||
{{col|2|begin}} | |||
{{sidebar | |||
|width=70% | |||
|title=Linked game: Subrosian secret | |||
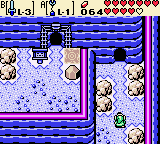
|contents=''(If you already cleared [[The Legend of Zelda: Oracle of Seasons/Secrets_to_and_from_Labrynna|Oracle of Seasons]] and linked to this game)''<br/> [[File:LZ7_ages_secret_subrosian.png|center]] <br/>During Zelda's age, go to the east of East Rolling Ridge, on the same screen as the Rolling Carts game. A Subrosian in that second cave will ask you to tell a secret to his brother in Subrosia. Switch back to ''Oracle of Seasons'' and travel to Subrosia; the easiest way is from the portal in the north-west of Winter Woods. The Subrosian brother lives in the northern volcanoes. He will ask you to cut all the grass in his cave with just three boomerang throws; it can require several tries. Once you succeed, he will give you ten '''Bombchus'''. Then, he will tell you another secret. Switch again to ''Oracle of Ages'', go to Farore and tell her the Subrosian's secret: the Bombchus will become available in this game, too.<br><br> If you run out of Bombchus, the witch Syrup in Yoll Graveyard now will sell more. | |||
}} | |||
{{col|2}} | |||
{{sidebar | |||
|width=70% | |||
|title=Linked game: smith secret | |||
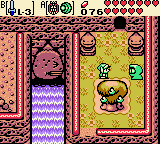
|contents=''(If you already cleared [[The Legend of Zelda: Oracle of Seasons/Secrets_to_and_from_Labrynna|Oracle of Seasons]] and linked to this game)''<br/> [[File:LZ7_ages_secret_smith.png|center]] <br/>During Ambi's age, find the Mystery Tree on East Rolling Ridge. A Subrosian near the tree will ask you to tell a secret to the master smith in Subrosia. Switch back to ''Oracle of Seasons'' and go to Subrosia. The easiest way is probably from the portal in north-west Winter Woords; from there, travel to the south-west to the forge. When you get there, tell the secret to the subrosian at the counter. When you do so, the master smith will give you a '''Shield Upgrade'''. Then, he will tell you another secret. Switch again to ''Oracle of Ages'', go to Farore and tell her the smith's secret: the Shield will be upgraded in this game, too.<br><br> If you owned a wooden shield, the upgrade turns it into an '''Iron Shield'''; if you owned and iron shield already, now it becomes a '''Mirror Shield'''. | |||
}} | |||
{{col|2|end}} | |||
== Mermaid's Cave == | == Mermaid's Cave == | ||
Revision as of 12:22, 21 June 2017
The Maku Tree will tell you about another Essence of Time at Rolling Ridge. A Goron will come and tell you that a new tunnel has been made to a new part of Rolling Ridge where you can play games.
| Optional items: | Plot items:
|
Dungeon items: |
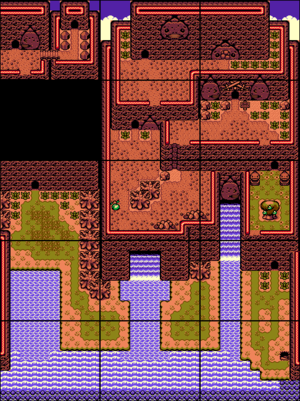
East Rolling Ridge
 |
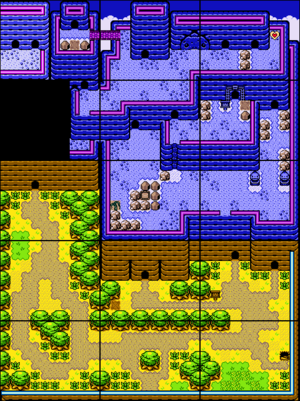 |
As soon as you leave the Crown Dungeon, a Goron from the East brings good, news: a tunnel to the Eastern part of Rolling Ridge was just completed.
To simplify, the main plot and the optional items will be separated.
Two Mermaid's keys
One screen to the east there are now two cave entrances: enter the new one and go down the stairs. Move the top block right, then the bottom block in the pit. Repeat this step with the next group of blocks. Exit the cave and follow the path (one screen east and one north). Enter the first cave you see.
Descend the stairs and step on the button to open the bridge. When you exit at Rolling Ridge Base, follow the path until you see a small tree. If you burn it with Ember Seeds and talk with the Old Man, then you have to pay him 100 Rupees for destroying the door. That reminds of The Legend of Zelda 1, where you had to pay for destroying door, too.
Continue north. If you need some healing, go in the left cave to grab some Fairy. Then, choose the right cave. A Goron in front of a staircase will only allow brothers to pass. Play the Goron Dance to receive ![]() Brother Emblem. Show it to the Goron guard before the stairs. He will move from there, but ask you for help, since he is hungry. The green Goron nearby suggests to play Shooting Carts.
Brother Emblem. Show it to the Goron guard before the stairs. He will move from there, but ask you for help, since he is hungry. The green Goron nearby suggests to play Shooting Carts.
Go up the stairs past the Goron Guard. Swap along using the Switch Hook left, up, Go left and up the stairs. A sign directs you south towards the Shooting Carts. Outside, you can notice a small green plant far away inlet for climbing vines. It is time to travel back in time. In the next screen to the east, jump down the ridge, then go west. Slash the bush to reveal a Time Portal, so use the Harp of Ages.
Go north-west and enter the cave. Inside, use the Switch Hook to get across and climb the stairs. Exit the cave, go south, jump down and continue south. Use the Switch Hook to swap the vine sapling to the ledge where it belongs to. Play the Tune of Currents and climb up the vine. Lift the right stone to uncover a Time Portal. Enter the Cave and play Target Carts. You can win ![]() Rock Sirloin the first time, after which it is 50
Rock Sirloin the first time, after which it is 50 ![]() Rupees each time.
Rupees each time.
Give the Rick Sirloin to the Goron Guard and you'll receive ![]() Goron Vase for it. The green Goron tells you to give it to another Goron in the past. Therefore, return to Ambi's age. Go east and talk with the Stairs Guard; he will move aside and asks you for something, too: something to shown his future generation that the life is worth it. Trade the Goron Vase for
Goron Vase for it. The green Goron tells you to give it to another Goron in the past. Therefore, return to Ambi's age. Go east and talk with the Stairs Guard; he will move aside and asks you for something, too: something to shown his future generation that the life is worth it. Trade the Goron Vase for ![]() Goronade.
Goronade.
Now, the green Goron tells you to go to the future and give the Goronade to another Goon. Return to Zelda's age once again. Enter the same cave with the green Goron and go upstairs to the Big Bang game. Give Goronade to the tired Goron, then you can play Big Bang Game. The Moving Sand Ring and some Pegasus Seeds will grant you an easy victory. When you win this game, you will get ![]() Old Mermaid Key; if you play again, the prize will be 30 Rupees.
Old Mermaid Key; if you play again, the prize will be 30 Rupees.
Having obtained the first Mermaid key during Zelda's age, you should look for the second one during Ambi's age. A Goron on the first floor says that the Gracious Goron dancer owns what you need, but the green Goron suggests you to play a different game: the Goron Shooting Gallery. Make your way to the exit at the top of this same cave; on the vine sapling screen, play the Harp of Ages and return to Zelda's age. Continue to the nearby Time Portal and travel back to Ambi's age. At the shooting gallery, you can get ![]() Lava Juice. You should also get File:Zelda Oracles Boomerang.PNG Boomerang either here or at Target Carts. Leave the cave, go west and jump off the ledge. Continue north, enter the cave and trade the Lava Juice for a
Lava Juice. You should also get File:Zelda Oracles Boomerang.PNG Boomerang either here or at Target Carts. Leave the cave, go west and jump off the ledge. Continue north, enter the cave and trade the Lava Juice for a ![]() Letter of Introduction (but only if you have the Old Mermaid Key in your possession). Now descend to the ground floor with Goron Dancing Hall; play the Goron Dance to win
Letter of Introduction (but only if you have the Old Mermaid Key in your possession). Now descend to the ground floor with Goron Dancing Hall; play the Goron Dance to win ![]() Mermaid Key.
Mermaid Key.
With both keys in your possession, you can access the local dungeon in both ages. Anyway, collect the several items first.
Side quests
Let us start from the beginning: Zelda's age, top of East Rolling Ridge.
- Climb the small bridge in the north-west. Lift the middle stone and play the Harp of Ages to unlock a Time Portal. Enter the Time Portal and go in the right cave. Talk with the Goron there. He wants to borrow 20 Bombs and 20 Ember Seeds from you. Say yes, but if you don't have enough, then come back again. Exit the cave and go left to discover a Soft Soil hidden under the spot surrounded by bushes (it is just a rank 3 spot). Doing that will let that digging Goron be finished with the digging, so return to the Goron again to choose either one chest, but actually both hold the same: you will get a
 Red Luck Ring.
 - Exit and return to Zelda's age. Go east, enter the cave, descend to Rolling Ridge Base, enter the Time Portal outside the dungeon entrance. Go to the south-east and burn down the tree to visit the Old Man there. Unlike the one in Zelda's age, he will give you 200
 Rupees.
 - Now go back up to visit Goron Dancing Hall where the difficulty will be raised higher, but you can win
 Bomber's Ring at Platinum Level which you can obtain only here!
 - From the Old Man's home, go to the north-west cave. Inside Rolling Ridge, bomb the cracked blocks away to get a
 Gasha Seed. Continue to the right and use the Switch Hook to get across, but before you go up the stairs, use the Switch Hook in the south part to a chest with 50
  Rupees.
 - Get atop Rolling Ridge during Ambi's age. Go east and bomb the Wall. Enter it and get 100
 Rupees and leave. Slash the bushes outside and play the Tune of Currents in the corner to obtain the second-to-last
  Piece of Heart found ingame.
 - Return to Ambi's age and go south-west. Jump off the ledge and enter the cave. Use the Switch Hook to swap yourself with the bush across to get 100
 Rupees from the chest.
 - Travel to the future, enter the cave and go down one floor. Use the Switch Hook, then go right to get 10
 Bombs from the Chest. Now go up two floors. Jump off to the right to get
  Gasha Seed from the chest.
Mermaid's Cave
Dungeon, part 1
Bombe the right wall. Kill all Wizzrobes here to obtain ![]() Gasha Seed. Go right again and put the Candleheads on fire with Ember Seeds. Go up and right. Lit up the Lamps in order (upper-left, upper-middle, lower-middle and lasty upper-right. Doing it right will cause the right wall to disappear. Since you don't have the Mermaid Suit yet you can't do anything for now. Go left and swim to the far left for the
Gasha Seed. Go right again and put the Candleheads on fire with Ember Seeds. Go up and right. Lit up the Lamps in order (upper-left, upper-middle, lower-middle and lasty upper-right. Doing it right will cause the right wall to disappear. Since you don't have the Mermaid Suit yet you can't do anything for now. Go left and swim to the far left for the ![]() Dungeon Map. The Bubbles can be killed with Boomerang. Return to the Entrance and go up and left for the
Dungeon Map. The Bubbles can be killed with Boomerang. Return to the Entrance and go up and left for the ![]() Compass after you've slayed all four Gels there.
Compass after you've slayed all four Gels there.
Go right, up twice and kill three Candleheads and two Keeses to open up the door to the next room. In this room you need to kill two Template:Shrouded Stalfos to pick up ![]() Small Key. Go left, down and unlock the door to the left. Kill the Blue Wizzrobe first before using the Cane of Somaria to place a red block on the right Button. Destroy all Pots except the one in the middle. Move it on the left Button to open the door. Kill the two Floormasters first, since they can bring you back to the Entrance. Destroy the Blocks with Bombs along with the northern wall which has a secret passage to the north. Once the hole in the wall is made, exit the Dungeon and play the Tune of Currents.
Small Key. Go left, down and unlock the door to the left. Kill the Blue Wizzrobe first before using the Cane of Somaria to place a red block on the right Button. Destroy all Pots except the one in the middle. Move it on the left Button to open the door. Kill the two Floormasters first, since they can bring you back to the Entrance. Destroy the Blocks with Bombs along with the northern wall which has a secret passage to the north. Once the hole in the wall is made, exit the Dungeon and play the Tune of Currents.
Now enter the Cave and unlock the Door to Mermaids Cave. Go up and kill four Ropes and the Lamps will stop firing Fireballs at you. Go up and left. Go across with the Switch Hook and get the ![]() Dungeon Map. Go right and up. Shoot the Crystal with Seed Shooter and walk to the upper-right part and shoot the Crystal again to go right. The Owls give you a tip to use Scent Seed. Use it from Seed Satchel to let the Ropes run to their death. This will net you a
Dungeon Map. Go right and up. Shoot the Crystal with Seed Shooter and walk to the upper-right part and shoot the Crystal again to go right. The Owls give you a tip to use Scent Seed. Use it from Seed Satchel to let the Ropes run to their death. This will net you a ![]() Small Key. Go left and shoot the Crystal. Now go to lower-left part and shoot the Crystal again. Go left and dispatch three Floormasters and one Red Wizzrobe from this World. Bomb up the southern wall, go south using the Switch Hook and bomb up another wall to a room with a puzzle.
Small Key. Go left and shoot the Crystal. Now go to lower-left part and shoot the Crystal again. Go left and dispatch three Floormasters and one Red Wizzrobe from this World. Bomb up the southern wall, go south using the Switch Hook and bomb up another wall to a room with a puzzle.
Push down the Color Cube down, left twice to clear the Red Mark. Push Color Cube right twice, up, left, down, right, up, left, down and right three times to clear the Yellow Mark. Push Color Cube left twice, up, right, down, left and up three times to clear the last Mark. A Chest with ![]() Small Key. Take it and go up twice. If you bombed up the wall in the past, then a hole will be there. Go up and enter both Wheels and go up, left, down. Jump off the Ledge and go right in the Wheel again. Repeat it again, so that come out south. Go left, up and take another
Small Key. Take it and go up twice. If you bombed up the wall in the past, then a hole will be there. Go up and enter both Wheels and go up, left, down. Jump off the Ledge and go right in the Wheel again. Repeat it again, so that come out south. Go left, up and take another ![]() Small Key from the chest. Jump off to the right and return to the Wheel once again. Enter the Wheel, go up, jump off right, go back down and repeat it again, so that you can go right. Go up, right and open the door and be prepared to fight Vire.
Small Key from the chest. Jump off to the right and return to the Wheel once again. Enter the Wheel, go up, jump off right, go back down and repeat it again, so that you can go right. Go up, right and open the door and be prepared to fight Vire.
Miniboss: Vire
Vire is a underling of Veran. Equip yourself with Sword and Shield. Vire will fire several different Fireball at you. You can either destroy it with Sword or block it with the Shield. Wait until Vire come near you and attack him. After 3 hits Vire will change his tactics and circle around you. Be patient and wait until he attack you. After 3 more hits Vire will split up in 2 parts. Again wait until these 2 parts fly low towards you and slash them for good. Vire will give up and flee.
Dungeon, part 2
Go right and throw a bomb with the right timing at the cracked Blocks, then swap over with the Switch Hook to the chest with the ![]() Mermaid Suit. Now go left and warp yourself to the Entrance. From there go right and fire Ember Seeds on three Candleheads to open the door right. Watch out for the Giant Blade Trap which follow a pattern. Bypass that and open the north door with a Small Key. Swap yourself to the other side with the Switch Hook and go right. Get the
Mermaid Suit. Now go left and warp yourself to the Entrance. From there go right and fire Ember Seeds on three Candleheads to open the door right. Watch out for the Giant Blade Trap which follow a pattern. Bypass that and open the north door with a Small Key. Swap yourself to the other side with the Switch Hook and go right. Get the ![]() Compass from the chest and jump down. Go down the stairs and go to the other side. Once you're out go bottomleft to get 10 File:Zelda Oracles Small Red Rupee.png Rupees.
Compass from the chest and jump down. Go down the stairs and go to the other side. Once you're out go bottomleft to get 10 File:Zelda Oracles Small Red Rupee.png Rupees.
Go back right and unlock the Key Block. Go left and up. It's random, so try to pull any Lever until a chest appear instead of Ropes and take out the ![]() Boss Key from it. Now's the time to leave this Dungeon. On the Undergroundway back you need to use the Cane of Somaria to create a Block to reach the Exit. Outside go in the small pond left from the Dungeon. Dive in it and you'll find a
Boss Key from it. Now's the time to leave this Dungeon. On the Undergroundway back you need to use the Cane of Somaria to create a Block to reach the Exit. Outside go in the small pond left from the Dungeon. Dive in it and you'll find a ![]() Toss Ring. Return to the Past and reenter the Dungeon. Go right twice, then up and right again. Dive in the deep water. Watch out for Bari which can electroshocked you and if you defeat one it will split up in two Biris. Go left and go bottomright. Go downstairs and swim right to a different area, but watch out for the current and don't fall in the pit.
Toss Ring. Return to the Past and reenter the Dungeon. Go right twice, then up and right again. Dive in the deep water. Watch out for Bari which can electroshocked you and if you defeat one it will split up in two Biris. Go left and go bottomright. Go downstairs and swim right to a different area, but watch out for the current and don't fall in the pit.
Swim left and up to a room with two Ropes. Kill them for one ![]() Small Key. Now return to the surface and go back to the Entrance. Go up twice, then left. Move one Pot on the left Button and use Cane of Somaria on the other Button and go in the next room. Destroy the Blocks with Bombs and go up again. Go in the Wheel and around and reenter it so you come out right. Don't open the door yet, but instead go past it and dive in the deep water. Go up and get 30
Small Key. Now return to the surface and go back to the Entrance. Go up twice, then left. Move one Pot on the left Button and use Cane of Somaria on the other Button and go in the next room. Destroy the Blocks with Bombs and go up again. Go in the Wheel and around and reenter it so you come out right. Don't open the door yet, but instead go past it and dive in the deep water. Go up and get 30 ![]() Rupees from the chest and go right, up. Kill two Ropes there to open the door right. Use the Switch Hook to bring all six Diamonds on the colored plattform to get one
Rupees from the chest and go right, up. Kill two Ropes there to open the door right. Use the Switch Hook to bring all six Diamonds on the colored plattform to get one ![]() Small Key. Now resurface and use Small Key to open the door. Unlock the Key Block and use the Cane of Somaria to place a Block on the button, then shoot the Crystal with the Seed Shooter. Now the way to the Boss Octogon is free.
Small Key. Now resurface and use Small Key to open the door. Unlock the Key Block and use the Cane of Somaria to place a Block on the button, then shoot the Crystal with the Seed Shooter. Now the way to the Boss Octogon is free.
Boss: Octogon
Swim to the plattform in the middle and prepare Sword and Seed Shooter for this Boss. Octogon will circle around and shoot a Rock at you. When Octogon open the mouth, then attack it with the sword, since that is the only vulnerable spot on him. After a while he will dive under water. Do the same and attack him there with the Seed Shooter until Octogon surface, then you just need to surface too and attack him with the sword. After a while Octogon will be defeated and you can obtain the ![]() Heart Container. Go right and get the
Heart Container. Go right and get the ![]() Lonely Peak.
Lonely Peak.
"It is a proud, lonely spirit that remains stalwart, even in trying times."
The Maku Tree will tell you that Queen Ambi left her palace, so now is the time to save Nayru.

