Route A[edit]
Route A consists of two long horizontally scrolling scenes. Without a lot of vertical options, they are moderately difficult for a beginner to get through.
Scene 1A[edit]
| Clear condition | Enemy revival | Enemy appearance |
|---|---|---|
| Exit | Never | Kuroku, Lightning Boy |
This first scene is a long horizontal stage containing many Kuroku ninjas and a few Lightning Boys. There are no platforms to jump on, so you will meet all of the enemies head on. You can out-fire the ninjas, but only if your up against one. If multiple ninjas attack you, you'll have to run away.
The exit appears roughly two-thirds of the way in. You aren't required to defeat all of the enemies, so jump through the exit as soon as you see it. If you don't wish to get bogged down in combat, jump over your enemies, or jump on their heads to stun them.
Scene 2A[edit]

| Clear condition | Enemy revival | Enemy appearance |
|---|---|---|
| Defeat enemies | Never | Kuroku, Lightning Boy |
At first, these scene may appear similar to the previous scene, but the difference becomes clear when you reach the first platform that you can jump on top of. Once you reach this, you have more options for fighting enemies. You must defeat all of the enemies in order to advance to the next stage. Advance slowly, and take out each enemy as they approach. One you reach the platform, you can jump around in an effort to fire at some of the enemies from behind.
Route B[edit]
With Route B's single screen for the first scene, followed by a vertical climb in the second scene, it may seem easy, but they both mask serious challenges. Only experts should attempt this route.
Scene 1B[edit]

| Clear condition | Enemy revival | Enemy appearance |
|---|---|---|
| Defeat enemies | Never | Lightning Boy |
If you're not careful, you can become easily overwhelmed by the sheer number of Lighting Boy enemies in this one-screen scene. You start in the middle, and must choose to jump up, or drop down, in order to defeat all of the enemies. If one of them starts to shoot lightning at you, move to another ledge as quickly as possible, since you cannot out-fire them. There is a bonus bunch of grapes hanging from the highest ledge on the right side. Don't make it a priority until most of the enemies are cleared out.
Scene 2B[edit]

| Clear condition | Enemy revival | Enemy appearance |
|---|---|---|
| Defeat enemies | Never | Skeleton, Lightning Boy Eyeball, Kabuki, Armor |
This scene can be deceptively difficult, especially due to the tough Armor enemy found near the top. You must defeat all of the enemies in order to advance to scene 3. You start off at the bottom, and will likely be attacked by Eyeballs. They can't kill you, but they can stun you and make you prone to attacks by other enemies, so clear them out as quickly as you can.
As you climb up the ledges, you will discover a couple of fireball items. Collect them, and wait to be surrounded by multiple enemies before throwing a set of fireballs out, in order to maximize the damage that they do. Fireballs only last for around ten seconds, so climb up the ledges as quickly as you can once you collect them, and destroy as many enemies as possible before the item runs out.
When you get closer to the top, you will encounter Kabukis. They fire red blobs that float up and down as they travel across the screen. You can destroy the blobs with your own throwing stars, so remove them from the screen before they get too close and become a nuisance. When you reach the top, you will encounter a lone Armor enemy. In order to defeat him, you must stun him first, and he doesn't make that easy. Try to drop down on top of him from a high ledge. Or jump up to his level, but land on his head. More than anything, be sure to get out of his way when he pulls out his bow, before he shoots a volley of several arrows at you.
Route C[edit]
Both of Route C's two vertically scrolling scenes are the most reminiscent of the original Ninjakun gameplay, and is best suited for new players.
Scene 1C[edit]
| Clear condition | Enemy revival | Enemy appearance |
|---|---|---|
| Defeat enemies | Never | Skeleton, Lightning Boy |
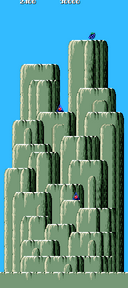
If you're familiar with the game mechanics of the original Ninjakun game, you will feel right at home in these scene. The ledges are spaced out, so if you jump from one height to another, you will put a good bit of distance between you and an enemy. Use the ledges to your advantage, and try to take out the enemies when their backs are turned to you.
There are two fireball items to collect in this scene. You can use these items to take advantage of a trick to boost your score well over 80,000 and earn two extra lives in the process. To earn a ton of points, use the fireball when you are surrounded by enemies, particularly when enemies are above you. Once you hit them, begin falling down with them and use fireballs continuously. As you fall with the enemies, you will score multiple thousands of points every time the fireballs hit a falling enemy. Maximize this opportunity, and you will earn a substantial amount of points.
A bonus bunch of grapes can be found at the very top of the scene. Only attempt to collect it when the coast is clear.
Scene 2C[edit]
| Clear condition | Enemy revival | Enemy appearance |
|---|---|---|
| Defeat enemies | Never | Skeleton, Lightning Boy |
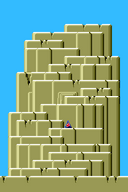
This scene is like a shorter compressed version of the previous scene. Because the ledges are spaced out as far, you'll have to be a little more careful when moving up or down to neighboring ledges. Be sure that no enemies are firing above or below you before you transition to a new ledge.
There is a single fireball item for you to collect. Since there is only one, you'll only get one shot at using the trick described above to collect a tremendous amount of points. But the enemies will be more tightly clustered, so you should have a good opportunity. Once you collect the item, jump up a bit to hit the enemies that are above you, and then drop down with them as to fall and continue to use the fireballs to maximize your score.
Scene 3A/3B/3C[edit]
| Clear condition | Enemy revival | Enemy appearance |
|---|---|---|
| Bonus | n/a | none |
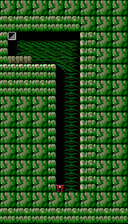
Regardless of which route you took, all of the third scenes are identical. You begin at the bottom of a long vertical shaft. To the left is an exit, but if you use it, you will be asked if you really wish to quit. Quitting means you forfeit your chance to get a bonus weapon upgrade. If you say no, you will return to the scene to continue trying.
The real goal is at the top of the stage. There are two ways to reach you. You can jump on to the left wall, hang on to it, and climb up very slowly until you reach the ledge at the top. Or you can very quickly wall jump to the top. To wall jump, you must jump towards a wall, release the jump button, push the joystick in the opposite direction, and hold the jump button down until you make contact with the wall. If done right, you will spring off the wall even higher. Repeat the process, and you will eventually make it to the top.
Once you reach the top, you can shoot the blocks along the floor of the ledge to reveal a few bonus items: two bunches of grapes and some rice balls. Collect them before making a running jump into the exit near the ceiling. If you succeed, you will obtain the throwing blades which boomerang back to you.
Scene 4[edit]

| Clear condition | Enemy revival | Enemy appearance |
|---|---|---|
| Exit | Always | Skeleton, Lightning Boy, Kuroku, Bats |
This is the first stage that can feel a bit frustrating. You begin with a long fall. During the fall, you can press the jump button to tuck into a roll, but if you do this too soon, there's a chance that you will still land on your back and be stunned. If you do, tap jump quickly to get back up. It's best to wait until the last minute while you're falling to press jump. If you land successfully, you'll get a 1000 point bonus.
Once you're on the ground, you're goal is to reach the exit that is visible on the left side of the map. However, you can't reach it from the ground. The only sure-fire way to reach it, is to climb all the way to the top of the map, and then drop down from the highest ledge. In order to do this, you will have to navigate a complicated series of jumps from one platform to the next. Your path will wind along the right side of the map, up the smaller mountain until you reach the peek. Then you will have to carefully leap to the very small pillar, and over to the larger mountain on the left. From there, you must advance to the highest possible ledge, before dropping down to the exit below.
The bottom of the mountain is occupied by Kurokus and some Skeletons. In this level, it does not matter how many enemies you defeat, they will continue to reappear. For that reason, you should only engage as many enemies as you need to in order to reach the top. Fighting any more will put your life at risk, and eat up what little time you have to complete the stage. Bats will also be present throughout the stage, and you should stop and destroy them whenever you have the opportunity, or they might interfere with your jumps. There are two fireball items to collect, but don't try to earn points by falling down with defeated enemies. You should only use them to help advance you higher up the mountains.
Once you leap across the narrow pillar to the left mountain, you will start to encounter Lightning Boys. When you reach the top, clear the ledge of all Lightning Boys before you jump over, and then walk to the left edge of the platform and push down to fall to the exit. Do not press jump as you fall, as you might roll off the ledge with the exit and be forced to start over. If you miss the exit, or get knocked down to the ground along the way, you must be very mindful of the timer. The flame wheel will appear when you start running out of time. While it's possible to dodge the wheel before the timer reaches 0, it's very difficult, so it's in your best interests to be careful and succeed in reaching the exit on your first attempt through the scene.
Scene 5[edit]
| Clear condition | Enemy revival | Enemy appearance |
|---|---|---|
| Exit | Always | Piranha, Octopus, Demon Fish Dragon Child, Water Flea |
Scene 5 is the first swimming stage. Remember that the controls change while swimming. The Jump button becomes a speed button, allowing you to swim faster when you tap it. Your weapon also changes to a sword with a rather limited range. You have to get close to your enemies in order to defeat them, but you can use the sword very rapidly. As you swim along, you will first encounter piranha fish and octopuses. Be very careful around them, and don't try to rush away from them unless the path is clear.
Midway through the level, you will encounter the gigantic Demon Fish. The only dangerous part of the Demon Fish is its head, you can swim through the rest of him. Shortly after that, you will see the blue Dragon Child. Avoid the Dragon Child at all costs; while it can be defeated, it takes entirely too long to accomplish, so ignore it and swim away. You will know that you're getting close to the exit when you see the large Water Fleas. They are vulnerable to attack from below, but be careful when approaching them.
Not too long before the exit, you will see a group of bonus items on the ocean floor. Be very careful when collecting them; if you die at any point in this stage, you return to the very beginning, and must swim through it all again. A short distance after the first bonuses, there is a flashing necklace which, if collected, will transform the nearby enemies into fruit that you can collect for more bonus points. When you see the exit stairs, head straight for them to advance to the next scene.
Scene 6[edit]
| Clear condition | Enemy revival | Enemy appearance |
|---|---|---|
| Bonus | n/a | none |
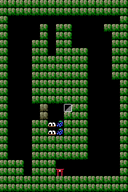
This is the second bonus stage. If you have mastered wall jumping, it won't present much of a challenge to you. If not, it's still possible to complete this stage by climbing the walls, but you will have to move as quickly as possible in order to reach the true exit before time runs out.
You start in the lower right corner, and must bounce your way up the right side of the scene in order to reach the top. It's difficult, but possible to hop over the small gap in the middle of the top platform. If you fall in, you will be forced to climb back out in order to reach the left side. Once you make it, fall down to the floor, and then climb up from the small crevice. You must rebound off the left wall to the two stones on the right that lead to the interior. Break the stones with your weapon, and head inside to collect the bonus items before climbing up to the exit.
If you make it through this, and you successfully completed the first bonus stage as well, you will be rewarded with the bomb weapon, which will make a big difference in the upcoming scenes.
Scene 7[edit]

| Clear condition | Enemy revival | Enemy appearance |
|---|---|---|
| Exit | Never | Eyeball, Bats |
To reach the exit of scene 7, you must first walk all the way to the right before dropping down a level, and returning a short distance to the left. As you walk to the right along the cavern, you will encounter bats. Bats can kill you with one touch, so it's important to remove them safely. If you have bombs, you should be able to catch the bats in the bomb explosions.
When you get further to the right, you will start to encounter eyeballs. Unlike bats, eyeballs can't kill you under any circumstance, but they can stun you long enough to get killed by bats, so it's equally important to avoid them as well. Once again, you should be able to throw plenty of bombs to clear them out of your way. Bats will continue to appear as you drop down to the lower level. When you land, head to the left, and jump up to the top platform to reach the exit.
Scene 8[edit]

| Clear condition | Enemy revival | Enemy appearance |
|---|---|---|
| Exit | Never | Giant Daruma Doll, Bats |
This scene will introduce you to the gigantic, and earthquake producing Daruma Dolls. As soon as you arrive, you will experience their ground shaking jumps, as one approaches you from the right. If you have bombs, these dolls should be no problem, as it only takes two solid explosions to defeat them. If you have no received bombs, then you're in for a much long fight, as it takes 16 strikes from a star or crescent blade to defeat them. In that situation, you're much better off running away from the dolls than fighting.
After you get past the first doll, a second one will appear as you approach the ledges. Defeat it as quickly as you can if you have bombs. Beyond the second doll are a bunch of eyeballs waiting by the two exits that this scene has to offer. Clear them out and choose one of the exits. The upper exit leads to the A route, while the lower exit leads to the B route. The B route is only recommended for experts who feel they can survive combat one-on-one with the Giant Skeleton Demon in scene 13B.

