Jump to navigation
Jump to search
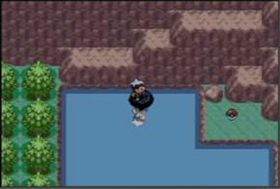
TM22 (Solarbeam) is here
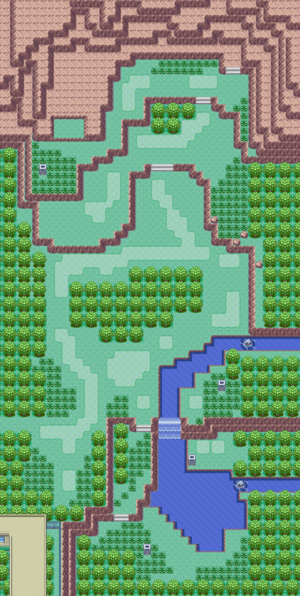
Extended areas of the Safari Zone in Emerald.
m (→Emerald Extended Areas: forgot Miltank) |
(added half of Pokemon encounters) |
||
| Line 35: | Line 35: | ||
*{{bp|Dodrio}} | *{{bp|Dodrio}} | ||
Items | ===Items=== | ||
* Max Revive - southwest area, south edge of the southwest pond (requires Surf) | * Max Revive - southwest area, south edge of the southwest pond (requires Surf) | ||
* TM22 (Solar Beam) - northwest area, northeast edge of the pond (requires Mach Bike, Surf) | * TM22 (Solar Beam) - northwest area, northeast edge of the pond (requires Mach Bike, Surf) | ||
* Calcium - northeast area, north edge of the northwest grass patch (requires Acro Bike) | * Calcium - northeast area, north edge of the northwest grass patch (requires Acro Bike) | ||
===Northwest Area (Mach Bike required)=== | |||
{| {{prettytable|text center=1}} | |||
|+ Pokémon found (grass) | |||
! style="background-color:#a82c2a;color:#fff" | Ruby | |||
! style="background-color:#a82c2a;color:#fff" | Encounter Rate | |||
! style="background-color:#36c;color:#fff" | Sapphire | |||
! style="background-color:#36c;color:#fff" | Encounter Rate | |||
! style="background-color:#008000;color:#fff" | Emerald | |||
! style="background-color:#008000;color:#fff" | Encounter Rate | |||
|- valign="center" | |||
||[[File:Pokemon_043Oddish.png|40px]]{{bp|Oddish}} | |||
|30% | |||
||[[File:Pokemon_043Oddish.png|40px]]{{bp|Oddish}} | |||
|30% | |||
||[[File:Pokemon_043Oddish.png|40px]]{{bp|Oddish}} | |||
|30% | |||
|- | |||
||[[File:Pokemon_111Rhyhorn.png|40px]]{{bp|Rhyhorn}} | |||
|30% | |||
||[[File:Pokemon_111Rhyhorn.png|40px]]{{bp|Rhyhorn}} | |||
|30% | |||
||[[File:Pokemon_111Rhyhorn.png|40px]]{{bp|Rhyhorn}} | |||
|30% | |||
|- | |||
||[[File:Pokemon_044Gloom.png|40px]]{{bp|Gloom}} | |||
|15% | |||
||[[File:Pokemon_044Gloom.png|40px]]{{bp|Gloom}} | |||
|15% | |||
||[[File:Pokemon_044Gloom.png|40px]]{{bp|Gloom}} | |||
|15% | |||
|- | |||
||[[File:Pokemon_084Doduo.png|40px]]{{bp|Doduo}} | |||
|15% | |||
||[[File:Pokemon_084Doduo.png|40px]]{{bp|Doduo}} | |||
|15% | |||
||[[File:Pokemon_084Doduo.png|40px]]{{bp|Doduo}} | |||
|15% | |||
|- | |||
||[[File:Pokemon_085Dodrio.png|40px]]{{bp|Dodrio}} | |||
|5% | |||
||[[File:Pokemon_085Dodrio.png|40px]]{{bp|Dodrio}} | |||
|5% | |||
||[[File:Pokemon_085Dodrio.png|40px]]{{bp|Dodrio}} | |||
|5% | |||
|- | |||
||[[File:Pokemon_127Pinsir.png|40px]]{{bp|Pinsir}} | |||
|5% | |||
||[[File:Pokemon_127Pinsir.png|40px]]{{bp|Pinsir}} | |||
|5% | |||
||[[File:Pokemon_127Pinsir.png|40px]]{{bp|Pinsir}} | |||
|5% | |||
|} | |||
{| {{prettytable|text center=1}} | |||
|+ Pokémon found (Surfing) | |||
! style="background-color:#a82c2a;color:#fff" | Ruby | |||
! style="background-color:#a82c2a;color:#fff" | Encounter Rate | |||
! style="background-color:#36c;color:#fff" | Sapphire | |||
! style="background-color:#36c;color:#fff" | Encounter Rate | |||
! style="background-color:#008000;color:#fff" | Emerald | |||
! style="background-color:#008000;color:#fff" | Encounter Rate | |||
|- valign="center" | |||
||[[File:Pokemon_054Psyduck.png|40px]]{{bp|Psyduck}} | |||
|95% | |||
||[[File:Pokemon_054Psyduck.png|40px]]{{bp|Psyduck}} | |||
|95% | |||
||[[File:Pokemon_054Psyduck.png|40px]]{{bp|Psyduck}} | |||
|95% | |||
|- | |||
||[[File:Pokemon_055Golduck.png|40px]]{{bp|Golduck}} | |||
|5% | |||
||[[File:Pokemon_055Golduck.png|40px]]{{bp|Golduck}} | |||
|5% | |||
||[[File:Pokemon_055Golduck.png|40px]]{{bp|Golduck}} | |||
|5% | |||
|} | |||
{| {{prettytable|text center=1}} | |||
|+ Pokémon found (Fishing) | |||
! style="background-color:#a82c2a;color:#fff" | Ruby | |||
! style="background-color:#a82c2a;color:#fff" | Encounter Rate | |||
! style="background-color:#36c;color:#fff" | Sapphire | |||
! style="background-color:#36c;color:#fff" | Encounter Rate | |||
! style="background-color:#008000;color:#fff" | Emerald | |||
! style="background-color:#008000;color:#fff" | Encounter Rate | |||
|- valign="center" | |||
! style="background-color:#49c;color:#fff" colspan="6" | Old Rod | |||
|- | |||
||[[File:Pokemon_129Magikarp.png|40px]]{{bp|Magikarp}} | |||
|70% | |||
||[[File:Pokemon_129Magikarp.png|40px]]{{bp|Magikarp}} | |||
|70% | |||
||[[File:Pokemon_129Magikarp.png|40px]]{{bp|Magikarp}} | |||
|70% | |||
|- | |||
||[[File:Pokemon_118Goldeen.png|40px]]{{bp|Goldeen}} | |||
|30% | |||
||[[File:Pokemon_118Goldeen.png|40px]]{{bp|Goldeen}} | |||
|30% | |||
||[[File:Pokemon_118Goldeen.png|40px]]{{bp|Goldeen}} | |||
|30% | |||
|- | |||
! style="background-color:#49c;color:#fff" colspan="6" | Good Rod | |||
|- | |||
||[[File:Pokemon_129Magikarp.png|40px]]{{bp|Magikarp}} | |||
|60% | |||
||[[File:Pokemon_129Magikarp.png|40px]]{{bp|Magikarp}} | |||
|60% | |||
||[[File:Pokemon_129Magikarp.png|40px]]{{bp|Magikarp}} | |||
|60% | |||
|- | |||
||[[File:Pokemon_118Goldeen.png|40px]]{{bp|Goldeen}} | |||
|40% | |||
||[[File:Pokemon_118Goldeen.png|40px]]{{bp|Goldeen}} | |||
|40% | |||
||[[File:Pokemon_118Goldeen.png|40px]]{{bp|Goldeen}} | |||
|40% | |||
|- | |||
! style="background-color:#49c;color:#fff" colspan="6" | Super Rod | |||
|- | |||
||[[File:Pokemon_118Goldeen.png|40px]]{{bp|Goldeen}} | |||
|80% | |||
||[[File:Pokemon_118Goldeen.png|40px]]{{bp|Goldeen}} | |||
|80% | |||
||[[File:Pokemon_118Goldeen.png|40px]]{{bp|Goldeen}} | |||
|80% | |||
|- | |||
||[[File:Pokemon_119Seaking.png|40px]]{{bp|Seaking}} | |||
|20% | |||
||[[File:Pokemon_119Seaking.png|40px]]{{bp|Seaking}} | |||
|20% | |||
||[[File:Pokemon_119Seaking.png|40px]]{{bp|Seaking}} | |||
|20% | |||
|} | |||
===Northeast Area (Acro Bike required)=== | |||
{| {{prettytable|text center=1}} | |||
|+ Pokémon found (grass) | |||
! style="background-color:#a82c2a;color:#fff" | Ruby | |||
! style="background-color:#a82c2a;color:#fff" | Encounter Rate | |||
! style="background-color:#36c;color:#fff" | Sapphire | |||
! style="background-color:#36c;color:#fff" | Encounter Rate | |||
! style="background-color:#008000;color:#fff" | Emerald | |||
! style="background-color:#008000;color:#fff" | Encounter Rate | |||
|- valign="center" | |||
||[[File:Pokemon_043Oddish.png|40px]]{{bp|Oddish}} | |||
|30% | |||
||[[File:Pokemon_043Oddish.png|40px]]{{bp|Oddish}} | |||
|30% | |||
||[[File:Pokemon_043Oddish.png|40px]]{{bp|Oddish}} | |||
|30% | |||
|- | |||
||[[File:Pokemon_231Phanpy.png|40px]]{{bp|Phanpy}} | |||
|30% | |||
||[[File:Pokemon_231Phanpy.png|40px]]{{bp|Phanpy}} | |||
|30% | |||
||[[File:Pokemon_231Phanpy.png|40px]]{{bp|Phanpy}} | |||
|30% | |||
|- | |||
||[[File:Pokemon_044Gloom.png|40px]]{{bp|Gloom}} | |||
|15% | |||
||[[File:Pokemon_044Gloom.png|40px]]{{bp|Gloom}} | |||
|15% | |||
||[[File:Pokemon_044Gloom.png|40px]]{{bp|Gloom}} | |||
|15% | |||
|- | |||
||[[File:Pokemon_177Natu.png|40px]]{{bp|Natu}} | |||
|15% | |||
||[[File:Pokemon_177Natu.png|40px]]{{bp|Natu}} | |||
|15% | |||
||[[File:Pokemon_177Natu.png|40px]]{{bp|Natu}} | |||
|15% | |||
|- | |||
||[[File:Pokemon_178Xatu.png|40px]]{{bp|Xatu}} | |||
|5% | |||
||[[File:Pokemon_178Xatu.png|40px]]{{bp|Xatu}} | |||
|5% | |||
||[[File:Pokemon_178Xatu.png|40px]]{{bp|Xatu}} | |||
|5% | |||
|- | |||
||[[File:Pokemon_214Heracross.png|40px]]{{bp|Heracross}} | |||
|5% | |||
||[[File:Pokemon_214Heracross.png|40px]]{{bp|Heracross}} | |||
|5% | |||
||[[File:Pokemon_214Heracross.png|40px]]{{bp|Heracross}} | |||
|5% | |||
|} | |||
{| {{prettytable|text center=1}} | |||
|+ Pokémon found (Rock Smash) | |||
! style="background-color:#a82c2a;color:#fff" | Ruby | |||
! style="background-color:#a82c2a;color:#fff" | Encounter Rate | |||
! style="background-color:#36c;color:#fff" | Sapphire | |||
! style="background-color:#36c;color:#fff" | Encounter Rate | |||
! style="background-color:#008000;color:#fff" | Emerald | |||
! style="background-color:#008000;color:#fff" | Encounter Rate | |||
|- valign="center" | |||
||[[File:Pokemon_074Geodude.png|40px]]{{bp|Geodude}} | |||
|100% | |||
||[[File:Pokemon_074Geodude.png|40px]]{{bp|Geodude}} | |||
|100% | |||
||[[File:Pokemon_074Geodude.png|40px]]{{bp|Geodude}} | |||
|100% | |||
|} | |||
==Emerald Extended Areas== | ==Emerald Extended Areas== | ||
Revision as of 19:24, 24 November 2018
The idea behind the Safari Zone is to catch many Pokémon. You'll get 30 Safari Balls to play, but you have to use them all before you walk 500 steps.
The Safari Zone is unlike other Pokémon-catching situations: you don't actually battle any of the creatures that you meet. Instead of that, you have two options. Either you can creep closer and attempt to use the Poké Ball, or you can distract them with Pokéblocks.

- Notes
- Getting closer to a Pokémon increases your shot. Don't move too close, or you could frighten it away.
- Use the Pokéblock Feeders. Pokémon around the feeders are more likely to be caught because they're distracted.
- Specific Pokéblocks attract Pokémon with natures similar to the Pokéblock's. A Pokémon attracted in this way is much easier to catch.
- One way to save steps is to stand on a square in the grass and flick the D-Pad in a different direction or use Sweet Scent. You won't take a step. Additionally, jumping in place with the Acro bike can accomplish the same.
- Use the Mach Bike to go up the cliff to the west, then to the northern pond. Cross it to find TM22 (Solarbeam).
- Use the Acro Bike to go across a bridge that needs to be jumped. Phanpy can be found in this region of the Safari Zone, and there is also a Calcium.
- Wild Pokémon
- Oddish
- Gloom
- Natu
- Xatu
- Wobbuffet
- Phanpy
- Psyduck
- Girafarig
- Rhyhorn
- Pikachu
- Lairon
- Pinsir
- Phanpy
- Golduck
- Goldeen
- Seaking
- Heracross
- Doduo
- Dodrio
Items
- Max Revive - southwest area, south edge of the southwest pond (requires Surf)
- TM22 (Solar Beam) - northwest area, northeast edge of the pond (requires Mach Bike, Surf)
- Calcium - northeast area, north edge of the northwest grass patch (requires Acro Bike)
Northwest Area (Mach Bike required)
| Ruby | Encounter Rate | Sapphire | Encounter Rate | Emerald | Encounter Rate |
|---|---|---|---|---|---|
| 30% | 30% | 30% | |||
| 30% | 30% | 30% | |||
| 15% | 15% | 15% | |||
| 15% | 15% | 15% | |||
| 5% | 5% | 5% | |||
| 5% | 5% | 5% |
| Ruby | Encounter Rate | Sapphire | Encounter Rate | Emerald | Encounter Rate |
|---|---|---|---|---|---|
| 95% | 95% | 95% | |||
| 5% | 5% | 5% |
| Ruby | Encounter Rate | Sapphire | Encounter Rate | Emerald | Encounter Rate |
|---|---|---|---|---|---|
| Old Rod | |||||
| 70% | 70% | 70% | |||
| 30% | 30% | 30% | |||
| Good Rod | |||||
| 60% | 60% | 60% | |||
| 40% | 40% | 40% | |||
| Super Rod | |||||
| 80% | 80% | 80% | |||
| 20% | 20% | 20% | |||
Northeast Area (Acro Bike required)
| Ruby | Encounter Rate | Sapphire | Encounter Rate | Emerald | Encounter Rate |
|---|---|---|---|---|---|
| 30% | 30% | 30% | |||
| 30% | 30% | 30% | |||
| 15% | 15% | 15% | |||
| 15% | 15% | 15% | |||
| 5% | 5% | 5% | |||
| 5% | 5% | 5% |
| Ruby | Encounter Rate | Sapphire | Encounter Rate | Emerald | Encounter Rate |
|---|---|---|---|---|---|
| 100% | 100% | 100% |
Emerald Extended Areas
| Emerald |
|---|
|

In Emerald, there are two additional sections (with different Pokémon) that is accessible only after you beat the Elite Four.
Items (all in Emerald only)
- PP Up - southern extended area, hidden three squares south of the southernmost Pokéblock stand
- Full Restore - southern extended area, hidden in the northmost bare square among the southeastern-most patch of grass
- Big Pearl - southern extended area, in the northeastern-most patch of grass beyond the top of the waterfall (requires Surf)
- Rare Candy - northern extended area, hidden in the southeast portion of the area, in a 2×3 patch of light green grass, in the southeastern-most square
- Zinc - northern extended area, hidden in a small nook among the wall in the rocky path to the north
- Nugget - northern extended area, between two ledges at the end of the rocky path to the west
Pokémon encounters
| Emerald | Encounter Rate |
|---|---|
| 30% | |
| 30% | |
| 10% | |
| 10% | |
| 5% | |
| 5% | |
| 5% | |
| 5% |
| Emerald | Encounter Rate |
|---|---|
| 60% | |
| 39% | |
| 1% |
| Emerald | Encounter Rate |
|---|---|
| Old Rod | |
| 70% | |
| 30% | |
| Good Rod | |
| 60% | |
| 20% | |
| 20% | |
| Super Rod | |
| 59% | |
| 40% | |
| 1% | |
| Emerald | Encounter Rate |
|---|---|
| 30% | |
| 30% | |
| 10% | |
| 10% | |
| 5% | |
| 5% | |
| 5% | |
| 5% |
| Emerald | Encounter Rate |
|---|---|
| 100% |