Jump to navigation
Jump to search
Route 125 in Emerald
(added item) |
(added new Pokemon table and map) |
||
| Line 1: | Line 1: | ||
{{Header Nav|game=Pokémon Ruby and Sapphire}} | {{Header Nav|game=Pokémon Ruby and Sapphire}} | ||
{| {{prettytable|notwide=1}} align="right" style="text-align:center" | |||
|+ New Pokémon | |||
! style="background-color:#a82c2a; color:#fff" | Ruby | |||
! style="background-color:#36c; color:#fff" | Sapphire | |||
! style="background-color:#008000; color:#fff" | Emerald | |||
|- valign="center" | |||
| colspan=3 | none | |||
|} | |||
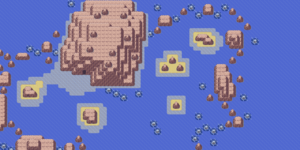
[[File:PRS%26E_Route_125.png|right|thumb|Route 125 in Emerald]] | |||
The purpose for Route 125 is to allow you to get to Shoal Cave. However, there are some trainer fights here as well, explore the seas to the northeast to find everyone. | The purpose for Route 125 is to allow you to get to Shoal Cave. However, there are some trainer fights here as well, explore the seas to the northeast to find everyone. | ||
| Line 8: | Line 16: | ||
{| {{prettytable|text center=1}} | {| {{prettytable|text center=1}} | ||
|+ Pokémon found (Surfing) | |+ Pokémon found (Surfing) | ||
! style="background-color:#a82c2a;color:#fff" | Ruby | |||
! style="background-color:#a82c2a;color:#fff" | Encounter Rate | |||
! style="background-color:#36c;color:#fff" | Sapphire | ! style="background-color:#36c;color:#fff" | Sapphire | ||
! style="background-color:#36c;color:#fff" | Encounter Rate | ! style="background-color:#36c;color:#fff" | Encounter Rate | ||
! style="background-color:#008000;color:#fff" | Emerald | ! style="background-color:#008000;color:#fff" | Emerald | ||
! style="background-color:#008000;color:#fff" | Encounter Rate | ! style="background-color:#008000;color:#fff" | Encounter Rate | ||
| Line 38: | Line 46: | ||
{| {{prettytable|text center=1}} | {| {{prettytable|text center=1}} | ||
|+ Pokémon found (Fishing) | |+ Pokémon found (Fishing) | ||
! style="background-color:#a82c2a;color:#fff" | Ruby | |||
! style="background-color:#a82c2a;color:#fff" | Encounter Rate | |||
! style="background-color:#36c;color:#fff" | Sapphire | ! style="background-color:#36c;color:#fff" | Sapphire | ||
! style="background-color:#36c;color:#fff" | Encounter Rate | ! style="background-color:#36c;color:#fff" | Encounter Rate | ||
! style="background-color:#008000;color:#fff" | Emerald | ! style="background-color:#008000;color:#fff" | Emerald | ||
! style="background-color:#008000;color:#fff" | Encounter Rate | ! style="background-color:#008000;color:#fff" | Encounter Rate | ||
Revision as of 20:30, 25 November 2018
| Ruby | Sapphire | Emerald |
|---|---|---|
| none | ||

The purpose for Route 125 is to allow you to get to Shoal Cave. However, there are some trainer fights here as well, explore the seas to the northeast to find everyone.
In Emerald you can also get a Big Pearl on the second island on the eastern side.
Pokemon Found
| Ruby | Encounter Rate | Sapphire | Encounter Rate | Emerald | Encounter Rate |
|---|---|---|---|---|---|
| 60% | 60% | 60% | |||
| 35% | 35% | 35% | |||
| 5% | 5% | 5% |
| Ruby | Encounter Rate | Sapphire | Encounter Rate | Emerald | Encounter Rate |
|---|---|---|---|---|---|
| Old Rod | |||||
| 70% | 70% | 70% | |||
| 30% | 30% | 30% | |||
| Good Rod | |||||
| 60% | 60% | 60% | |||
| 20% | 20% | 20% | |||
| 20% | 20% | 20% | |||
| Super Rod | |||||
| 60% | 60% | 60% | |||
| 40% | 40% | 40% | |||