Jump to navigation
Jump to search
m (Added all game nav (bot edit)) |
m (Text replacement - "Infobox_SMW_Level" to "SMW/Level") |
||
| (8 intermediate revisions by 7 users not shown) | |||
| Line 1: | Line 1: | ||
{{ | {{Header Nav|game=Super Mario World}} | ||
[[ | {{SMW/Level | ||
|level name = Forest of Illusion 2 | |||
|level type = Underwater | |||
|entrance = [[Super Mario World/Forest of Illusion 1|Forest of Illusion 1]] | |||
|exit = [[Super Mario World/Forest of Illusion 3|Forest of Illusion 3]] | |||
|secret exit = [[Super Mario World/Blue Switch Palace|Blue Switch Palace]] | |||
|time at start = 300 | |||
}} | |||
==Walkthrough== | |||
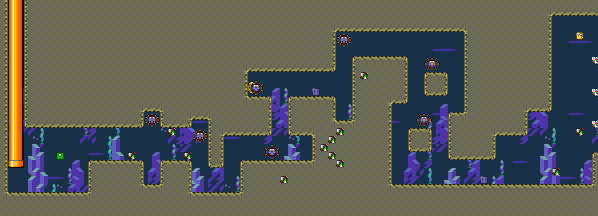
{{Scrolling map|SMW-FOI2-1.png}} | |||
* This level is filled with Urchins that simply move back and forth. You can't hurt them, but they aren't really a threat and are easily avoided. | |||
* It's much easier to complete this level if you are Fire Mario and/or have Yoshi. As such, you might want to hold off the feather you can get from the green switch block. | |||
* On the way you will find a blue block. If Mario is alone, he swims a lot faster while holding one, and you can kick them into the Urchins to defeat them. | |||
* After the group of Cheep-Cheep, you can find a flower in a ? block. | |||
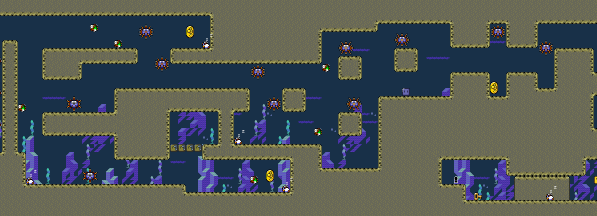
{{Scrolling map|SMW-FOI2-2.png}} | |||
* The Rip Van Fish wake up and pursue you if you swim too close to them. Luckily, they are generally far enough out of the way that you can simply bypass them. | |||
* If you drop at the bottom after the large wall, you will only get to a dead-end. However, the second invisible ? block from the right contains a 1-up mushroom that you can get if you wish. | |||
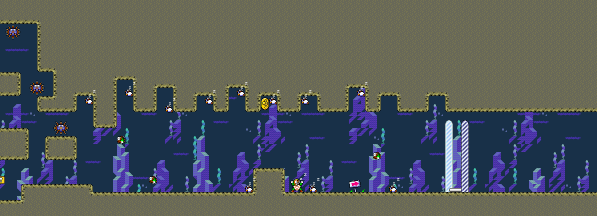
{{Scrolling map|SMW-FOI2-3.png}} | |||
* The Whistlin' Chuck wakes up all the Rip Van Fish in the vicinity once you come near him. Quickly swim to the goal tape before the armada reaches you. | |||
* You can use sprite overload to your advantage here. Have some Rip Van Fish from the previous section follow you, and fewer of them will appear near the end, making that section a bit easier. | |||
==Secret Exit== | |||
The secret exit is found in a secluded area near the end. After dropping all the way down, before the Whistlin' Chuck, you will see a small alcove with yellow switch block. The wall to the left of it is not solid, and in fact it is even guarded by a Rip Van Fish that you need to bypass. After swimming through the wall, you will find the key and keyhole that you need to unlock the secret exit. | |||
==Dragon Coin locations== | |||
The five Dragon Coins in this level are located as follows: | |||
* Near the beginning, hidden by a Urchin (near the blue block). | |||
* After the large wall, drop all the way down to the bottom and swim to the end. The Dragon Coin is guarded by a Rip Van Fish. | |||
* After the large wall, at the end of the topmost passage. A Rip Van Fish guards this one as well. | |||
* In an alcove where a urchin moves bach and furth near the end. | |||
* At the ceiling where the Whistlin' Chuck is, guarded by a Rip Van Fish. This one is difficult to collect due to all the fish coming after you! | |||
{{Footer Nav|game=Super Mario World|prevpage=Forest of Illusion 1|nextpage=Blue Switch Palace}} | |||
Latest revision as of 15:52, 26 February 2020
| Forest of Illusion 2 | |
|---|---|
| Level type | Underwater |
| Entrance | |
| Exit | |
| Secret Exit | Blue Switch Palace |
| Time at Start | 300 |
Walkthrough[edit]

- This level is filled with Urchins that simply move back and forth. You can't hurt them, but they aren't really a threat and are easily avoided.
- It's much easier to complete this level if you are Fire Mario and/or have Yoshi. As such, you might want to hold off the feather you can get from the green switch block.
- On the way you will find a blue block. If Mario is alone, he swims a lot faster while holding one, and you can kick them into the Urchins to defeat them.
- After the group of Cheep-Cheep, you can find a flower in a ? block.

- The Rip Van Fish wake up and pursue you if you swim too close to them. Luckily, they are generally far enough out of the way that you can simply bypass them.
- If you drop at the bottom after the large wall, you will only get to a dead-end. However, the second invisible ? block from the right contains a 1-up mushroom that you can get if you wish.

- The Whistlin' Chuck wakes up all the Rip Van Fish in the vicinity once you come near him. Quickly swim to the goal tape before the armada reaches you.
- You can use sprite overload to your advantage here. Have some Rip Van Fish from the previous section follow you, and fewer of them will appear near the end, making that section a bit easier.
Secret Exit[edit]
The secret exit is found in a secluded area near the end. After dropping all the way down, before the Whistlin' Chuck, you will see a small alcove with yellow switch block. The wall to the left of it is not solid, and in fact it is even guarded by a Rip Van Fish that you need to bypass. After swimming through the wall, you will find the key and keyhole that you need to unlock the secret exit.
Dragon Coin locations[edit]
The five Dragon Coins in this level are located as follows:
- Near the beginning, hidden by a Urchin (near the blue block).
- After the large wall, drop all the way down to the bottom and swim to the end. The Dragon Coin is guarded by a Rip Van Fish.
- After the large wall, at the end of the topmost passage. A Rip Van Fish guards this one as well.
- In an alcove where a urchin moves bach and furth near the end.
- At the ceiling where the Whistlin' Chuck is, guarded by a Rip Van Fish. This one is difficult to collect due to all the fish coming after you!